वापरकर्ता मॅन्युअल
![]()
VLVWIP2000-ENC साठी चौकशी सबमिट करा, आम्ही तुमच्याशी २४ तासांत संपर्क करू.
VLVWIP2000-DEC साठी चौकशी सबमिट करा, आम्ही तुमच्याशी २४ तासांत संपर्क करू.
JPEG2000 AVoIP एन्कोडर आणि डिकोडर

सर्व हक्क राखीव
आवृत्ती: VLVWIP2000-ENC_2025V1.0
आवृत्ती: VLVWIP2000-DEC_2025V1.0
![]()
JPEG2000 AVoIP एन्कोडर आणि डिकोडर
प्रस्तावना
उत्पादन वापरण्यापूर्वी हे वापरकर्ता मॅन्युअल काळजीपूर्वक वाचा. या मॅन्युअलमध्ये दर्शविलेली चित्रे केवळ संदर्भासाठी आहेत. भिन्न मॉडेल आणि वैशिष्ट्ये वास्तविक उत्पादनाच्या अधीन आहेत.
हे मॅन्युअल फक्त ऑपरेशन निर्देशांसाठी आहे, कृपया देखभाल सहाय्यासाठी स्थानिक वितरकाशी संपर्क साधा. उत्पादनात सुधारणा करण्याच्या सतत प्रयत्नात, आम्ही सूचना किंवा बंधनाशिवाय फंक्शन्स किंवा पॅरामीटर्समध्ये बदल करण्याचा अधिकार राखून ठेवतो. नवीनतम तपशीलांसाठी कृपया डीलर्सचा संदर्भ घ्या.
FCC विधान
हे उपकरण रेडिओ फ्रिक्वेन्सी उर्जा निर्माण करते, वापरते आणि विकिरण करू शकते आणि, जर सूचनांनुसार स्थापित आणि वापरले नसेल तर, रेडिओ संप्रेषणांमध्ये हानिकारक हस्तक्षेप होऊ शकतो. FCC नियमांच्या भाग 15 च्या अनुषंगाने, वर्ग B डिजिटल उपकरणाच्या मर्यादेचे पालन करत असल्याचे तपासले गेले आहे आणि आढळले आहे. या मर्यादा व्यावसायिक स्थापनेमध्ये हानिकारक हस्तक्षेपाविरूद्ध वाजवी संरक्षण प्रदान करण्यासाठी डिझाइन केल्या आहेत.
निवासी क्षेत्रात या उपकरणाच्या ऑपरेशनमुळे हस्तक्षेप होण्याची शक्यता आहे, अशा परिस्थितीत वापरकर्त्याने त्यांच्या स्वत: च्या खर्चावर हस्तक्षेप दुरुस्त करण्यासाठी आवश्यक असलेल्या कोणत्याही उपाययोजना करणे आवश्यक आहे.
निर्मात्याने स्पष्टपणे मंजूर केलेले कोणतेही बदल किंवा बदल उपकरणे चालविण्याचा वापरकर्त्याचा अधिकार रद्द करेल.
![]()

![]()
![]()
सुरक्षितता खबरदारी
उत्पादनातील सर्वोत्तम कार्यप्रदर्शन सुनिश्चित करण्यासाठी, कृपया डिव्हाइस वापरण्यापूर्वी सर्व सूचना काळजीपूर्वक वाचा. पुढील संदर्भासाठी ही पुस्तिका जतन करा.
- उपकरणे काळजीपूर्वक अनपॅक करा आणि भविष्यातील संभाव्य शिपमेंटसाठी मूळ बॉक्स आणि पॅकिंग सामग्री जतन करा.
- आग, विद्युत शॉक आणि व्यक्तींना दुखापत होण्याचा धोका कमी करण्यासाठी मूलभूत सुरक्षा खबरदारी पाळा.
- घरांचे विघटन करू नका किंवा मॉड्यूलमध्ये बदल करू नका. याचा परिणाम विद्युत शॉक किंवा बर्न होऊ शकतो.
- उत्पादनांच्या वैशिष्ट्यांची पूर्तता न करणारे पुरवठा किंवा भाग वापरल्याने नुकसान, खराब होणे किंवा खराबी होऊ शकते.
- सर्व सेवांचा संदर्भ पात्र सेवा कर्मचाऱ्यांना द्या.
- आग किंवा शॉकचा धोका टाळण्यासाठी, युनिटला पाऊस, ओलावा किंवा हे उत्पादन पाण्याजवळ स्थापित करू नका.
- एक्स्ट्रुजनच्या बाबतीत एक्स्टेंशन केबलवर कोणतीही जड वस्तू ठेवू नका.
- डिव्हाइसचे घर काढू नका कारण घर उघडणे किंवा काढणे तुम्हाला धोकादायक व्हॉल्यूमच्या संपर्कात येऊ शकतेtagई किंवा इतर धोके.
- अतिउष्णतेमुळे होणारे नुकसान टाळण्यासाठी बारीक वायुवीजन असलेल्या ठिकाणी डिव्हाइस स्थापित करा.
- मॉड्यूलला द्रवपदार्थांपासून दूर ठेवा.
- घरामध्ये गळती झाल्यामुळे आग, विद्युत शॉक किंवा उपकरणांचे नुकसान होऊ शकते. एखादी वस्तू किंवा द्रव घरावर पडल्यास किंवा सांडल्यास, मॉड्यूल ताबडतोब अनप्लग करा.
- ऑप्टिकल केबलच्या टोकांना जोराने वळवू नका किंवा ओढू नका. यामुळे खराबी होऊ शकते.
- हे युनिट साफ करण्यासाठी द्रव किंवा एरोसोल क्लीनर वापरू नका. साफसफाई करण्यापूर्वी नेहमी डिव्हाइसची पॉवर अनप्लग करा.
- दीर्घ कालावधीसाठी न वापरलेले असताना पॉवर कॉर्ड अनप्लग करा.
- स्क्रॅप केलेल्या उपकरणांच्या विल्हेवाटीची माहिती: सामान्य घरातील कचऱ्यात जाळू नका किंवा मिसळू नका, कृपया त्यांना सामान्य विद्युत कचरा समजा.
खरेदी केल्याबद्दल धन्यवाद.asinहे उत्पादन
इष्टतम कार्यप्रदर्शन आणि सुरक्षिततेसाठी, कृपया हे उत्पादन कनेक्ट करण्यापूर्वी, ऑपरेट करण्यापूर्वी किंवा समायोजित करण्यापूर्वी या सूचना काळजीपूर्वक वाचा. कृपया भविष्यातील संदर्भासाठी ही पुस्तिका ठेवा.
सर्ज संरक्षण उपकरणाची शिफारस केली जाते
या उत्पादनामध्ये संवेदनशील विद्युत घटक आहेत ज्यांना इलेक्ट्रिकल स्पाइक, सर्ज, इलेक्ट्रिक शॉक, लाइटिंग स्ट्राइक इत्यादीमुळे नुकसान होऊ शकते. तुमच्या उपकरणांचे संरक्षण आणि आयुष्य वाढवण्यासाठी सर्ज प्रोटेक्शन सिस्टमचा वापर करण्याची अत्यंत शिफारस केली जाते.
1. परिचय
हे उत्पादन JPEG2000 तंत्रज्ञानावर आधारित आहे. ते एकाच बॉक्समध्ये कॉपर पोर्ट आणि फायबर पोर्ट एकत्रित करते. एन्कोडर इनपुट 4K60 4:4:4 पर्यंत, ऑडिओ एम्बेडिंग किंवा एक्सट्रॅक्टिंगला समर्थन देते. डीकोडर आउटपुट 4K60 4:4:4 पर्यंत, ऑडिओ एक्सट्रॅक्टिंगला समर्थन देते. हे उत्पादन ARC/eARC/S/PDIF/अॅनालॉग ऑडिओ रिटर्न फंक्शनला समर्थन देते, USB2.0/KVM/कॅमेरा, 1G इथरनेट, द्विदिशात्मक RS-232, द्वि-मार्ग IR आणि POE फंक्शनला देखील समर्थन देते. RS-232, IR, CEC चे अतिथी मोड नियंत्रणे समर्थित आहेत. संपर्क नियंत्रणासाठी अंगभूत दोन चॅनेल RELAY पोर्ट आणि दोन चॅनेल I/O पोर्ट. उत्पादन परवाना सक्रिय असल्यास दांते AV-A मोड समर्थित आहे.
लवचिक कॉन्फिगरेशन साध्य करण्यासाठी भरपूर API कमांडना समर्थन देणारे बिल्ट-इन MJPEG सबस्ट्रीम तृतीय पक्ष नियंत्रण अॅप्ससाठी प्री-इंस्टॉल करण्यासाठी उपयुक्त आहे.view व्हिडिओ सामग्री.
ही प्रणाली सॉफ्टवेअर डेव्हलपमेंटसाठी लिनक्सवर आधारित आहे, लवचिक नियंत्रण पद्धती प्रदान करते, जी 1G इथरनेट स्विचच्या बुद्धिमान नेटवर्किंगवर आधारित आहे.
2. वैशिष्ट्ये
☆ HDCP 2.2 अनुरूप
☆ समर्थन 18Gbps व्हिडिओ बँडविड्थ
☆ HDMI 2.0b मध्ये निर्दिष्ट केल्याप्रमाणे इनपुट आणि आउटपुट व्हिडिओ रिझोल्यूशन 4K60 4:4:4 पर्यंत आहे.
☆ CAT328E/100/5A/6 केबलद्वारे सिग्नल ट्रान्समिशन अंतर 6ft / 7m पर्यंत वाढवता येते
☆ इथरनेटवरून व्हिडिओ, अॅनालॉग/डिजिटल ऑडिओ, आयआर, आरएस-२३२, सीईसी आणि यूएसबी प्रसारित करा.
☆ कॉपर पोर्ट आणि फायबर पोर्ट एकाच बॉक्समध्ये एकत्र करा
☆ ARC/eARC/S/PDIF/अॅनालॉग ऑडिओ रिटर्न फंक्शन
☆ परवाना सक्रिय असल्यास दांते AV-A मोड समर्थित आहे
☆ फ्रंट पॅनल बटणे आणि LED स्क्रीनद्वारे चॅनल कॉन्फिगरेशन
☆ संपर्क नियंत्रणासाठी अंगभूत दोन चॅनेल रिले पोर्ट आणि दोन चॅनेल I/O पोर्ट
☆ युनिकास्ट आणि मल्टीकास्ट फंक्शन्सना सपोर्ट करा
☆ पॉइंट-टू-पॉइंट, व्हिडिओ मॅट्रिक्स आणि व्हिडिओ वॉल फंक्शन्सला सपोर्ट करा (व्हिडिओ वॉल 9×9 पर्यंत सपोर्ट करते)
☆ बुद्धिमान व्हिडिओ भिंत वर्ग व्यवस्थापन
☆ समर्थन MJPEG सबस्ट्रीम रिअल-टाइम पूर्वview
☆ 1G इथरनेट स्विच
☆ समर्थन POE फंक्शन
☆ अंगभूत web पृष्ठ कॉन्फिगरेशन आणि नियंत्रण, टेलनेट आणि SSH तसेच
☆ HDMI ऑडिओ फॉरमॅट: LPCM 2.0/5.1/7.1CH, Dolby Digital/Plus/EX, Dolby True HD, DTS, DTS-96/24, DTS-EX DSD, DTS High Res, DTS-HD मास्टर
☆ सुलभ आणि लवचिक स्थापनेसाठी स्मार्ट नेटवर्किंग डिझाइन
3. पॅकेज सामग्री
| प्रमाण | आयटम |
| 1 | IP 4GbE एन्कोडरवर 60K1 |
| 1 | IR रिसीव्हर केबल (1.5 मीटर) |
| 1 | IR ब्लास्टर केबल (1.5 मीटर) |
| 3 | 3-पिन 3.81 मिमी फिनिक्स कनेक्टर |
| 2 | 4-पिन 3.81 मिमी फिनिक्स कनेक्टर |
| 1 | 12V/2.5A लॉकिंग पॉवर अॅडॉप्टर |
| 2 | माउंटिंग कान |
| 4 | मशीन स्क्रू (KM3*4) |
| 1 | वापरकर्ता मॅन्युअल |
or
| प्रमाण | आयटम |
| 1 | IP 4GbE डिकोडरवर 60K1 |
| 1 | IR रिसीव्हर केबल (1.5 मीटर) |
| 1 | IR ब्लास्टर केबल (1.5 मीटर) |
| 3 | 3-पिन 3.81 मिमी फिनिक्स कनेक्टर |
| 2 | 4-पिन 3.81 मिमी फिनिक्स कनेक्टर |
| 1 | 12V/2.5A लॉकिंग पॉवर अॅडॉप्टर |
| 2 | माउंटिंग कान |
| 4 | मशीन स्क्रू (KM3*4) |
| 1 | वापरकर्ता मॅन्युअल |
4. तपशील
तांत्रिक
| HDMI अनुरूप | HDMI 2.0b |
| HDCP अनुरूप | HDCP 2.2 |
| व्हिडिओ बँडविड्थ | 18Gbps |
| व्हिडिओ कॉम्प्रेशन मानक | JPEG2000 |
| व्हिडिओ नेटवर्क बँडविड्थ | 1G |
| व्हिडिओ रिझोल्यूशन | 4K@60Hz 4:4:4 पर्यंत |
| रंगाची खोली | इनपुट: 8/10/12-बिट आउटपुट: 8-बिट |
| रंगीत जागा | RGB 4:4:4, YCbCr 4:4:4 / 4:2:2 / 4:2:0 |
| एचडीएमआय ऑडिओ स्वरूप | LPCM 2.0/5.1/7.1CH, Dolby Digital/Plus/EX, Dolby True HD, DTS, DTS-96/24, DTS-EX DSD, DTS High Res, DTS-HD मास्टर |
| ट्रान्समिशन अंतर | 100M CAT5E/6/6A/7 |
| IR पातळी | डीफॉल्ट 12V, पर्यायी 5V |
| IR वारंवारता | वाइडबँड २०K – ६०KHz |
| ESD संरक्षण | आयईसी ६१०००-४-२: ±८ केव्ही (एअर-गॅप डिस्चार्ज) आणि ±4kV (संपर्क डिस्चार्ज) |
जोडणी
| एन्कोडर | इनपुट: १ x HDMI इन [टाइप A, १९-पिन फिमेल] १ x L/R ऑडिओ इन [३-पिन ३.८१ मिमी फिनिक्स कनेक्टर] आउटपुट: १ x HDMI आउट [टाइप A, १९-पिन फिमेल] १ x L/R ऑडिओ आउट [३-पिन ३.८१ मिमी फिनिक्स कनेक्टर] १ x SPDIF आउट [ऑप्टिकल ऑडिओ कनेक्टर] नियंत्रण: १ x RS-232 [३-पिन ३.८१ मिमी फिनिक्स कनेक्टर] १ x LAN (POE) [RJ45 जॅक] १ x फायबर [ऑप्टिकल फायबर स्लॉट] १ x USB 2.0 होस्ट [टाइप B, ४-पिन फिमेल] २ x USB 2.0 डिव्हाइस [टाइप-A, ४-पिन फिमेल] २ x रिले [३.८१ मिमी फिनिक्स कनेक्टर] २ x डिजिटल IO [३.८१ मिमी फिनिक्स कनेक्टर] १ x IR इन [३.५ मिमी ऑडिओ जॅक] १ x IR बाहेर [३.५ मिमी ऑडिओ जॅक] |
| डिकोडर | इनपुट: १ x SPDIF इन [ऑप्टिकल ऑडिओ कनेक्टर] १ x L/R ऑडिओ इन [३-पिन ३.८१ मिमी फिनिक्स कनेक्टर] आउटपुट: १ x HDMI आउट [टाइप A, १९-पिन फिमेल] १ x L/R ऑडिओ आउट [३-पिन ३.८१ मिमी फिनिक्स कनेक्टर] कंट्रोल: १ x RS-232 [३.८१ मिमी फिनिक्स कनेक्टर] १ x LAN (POE) [RJ45 जॅक] १ x फायबर [ऑप्टिकल फायबर स्लॉट] २ x USB १.१ डिव्हाइस [टाइप-A, ४-पिन फिमेल] २ x USB २.० डिव्हाइस [टाइप-A, ४-पिन फिमेल] २ x रिले [३.८१ मिमी फिनिक्स कनेक्टर] २ x डिजिटल IO [३.८१ मिमी फिनिक्स कनेक्टर] १ x IR इन [३.५ मिमी ऑडिओ जॅक] १ x IR आउट [३.५ मिमी ऑडिओ जॅक] |
यांत्रिक
| गृहनिर्माण | धातूचे आवरण |
| रंग | काळा |
| परिमाण | एन्कोडर/डीकोडर: 204mm [W] x 136mm [D] x 25.5mm [H] |
| वजन | एन्कोडर: 631g, डिकोडर: 626g |
| वीज पुरवठा | इनपुट: AC100 – 240V 50/60Hz, आउटपुट: DC 12V/2.5A (US/EU मानके, CE/FCC/UL प्रमाणित) |
| वीज वापर | एन्कोडर: 8.52W, डिकोडर: 7.08W (कमाल) |
| ऑपरेटिंग तापमान | 32 - 104 ° फॅ / 0 - 40. से |
| स्टोरेज तापमान | -4 - 140 ° फॅ / -20 - 60 ° से |
| सापेक्ष आर्द्रता | 20 - 90% RH (कंडेन्सिंग नाही) |
| ठराव / केबल लांबी | 4 के 60 - पाय / मीटर | 4 के 30 - पाय / मीटर | 1080P60 – फूट / मीटर |
| HDMI इन / आउट | 16 फूट / 5 एम | 32 फूट / 10 एम | 50 फूट / 15 एम |
| "प्रीमियम हाय स्पीड HDMI" केबल वापरण्याची अत्यंत शिफारस केली जाते. | |||
5. ऑपरेशन नियंत्रणे आणि कार्ये
5.1 एन्कोडर पॅनेल


| नाही. | नाव | कार्य वर्णन |
| 1 | रीसेट करा | डिव्हाइसवर पॉवर केल्यानंतर, एकाच वेळी POWER LED आणि LINK LED फ्लॅश होईपर्यंत रीसेट बटण दाबा आणि धरून ठेवा, डिव्हाइसला फॅक्टरी सेटिंग्जवर रीसेट करण्यासाठी बटण सोडा. |
| 2 | पॉवर एलईडी (लाल) |
|
| 3 | लिंक LED (हिरवा) | कनेक्शन स्थिती LED.
|
| 4 | एलईडी स्क्रीन | डीफॉल्ट म्हणून एन्कोडर आयडी दाखवते. एन्कोडर कॉन्फिगरेशन सेट करताना कॉन्फिगरेशन फंक्शन्सचे संबंधित पर्याय प्रदर्शित करते. |
| 5 | CH निवडा | एन्कोडर आयडी आणि इतर सेटिंग्ज सेट करण्यासाठी वापरला जातो. |
| 6 | USB 2.0 डिव्हाइस | USB 2.0 डिव्हाइसेसशी कनेक्ट करा. |
| 7 | यूएसबी होस्ट | पीसी कनेक्ट करण्यासाठी USB-B कनेक्टर. |
| 8 | IR आउट | IR सिग्नल आउटपुट पोर्ट. पॅनेल बटणांद्वारे IR पातळी 5V किंवा 12V (डिफॉल्ट) वर सेट केली जाऊ शकते. |
| 9 | IR IN | IR सिग्नल इनपुट पोर्ट. पॅनेल बटणांद्वारे IR पातळी 5V किंवा 12V (डिफॉल्ट) वर सेट केली जाऊ शकते. |
| 10 | रिलेज मी डिजिटल आयओ | VCC: पॉवर आउटपुट (१२V किंवा ५V कॉन्फिगर करण्यायोग्य), जास्तीत जास्त १२V @५०mA पर्यंत, ५V @ १००mA लोडिंग. डीफॉल्ट आउटपुट १२V आहे. रिले: 2 चॅनेल लो-वॉल्यूमtage रिले पोर्ट्स, प्रत्येक गट स्वतंत्र आणि वेगळा आहे, जास्तीत जास्त 1A 30VDC लोडिंग. संपर्क डीफॉल्टनुसार डिस्कनेक्ट केले जातात. DIGITAL IO: 2 चॅनेल GPIO पोर्ट्स, डिजिटल लेव्हल सिग्नल आउटपुट कंट्रोल किंवा इनपुट डिटेक्शनसाठी (12V लेव्हल डिटेक्शन पर्यंत). आउटपुट कंट्रोल मोड (डीफॉल्ट मोड, डीफॉल्ट आउटपुट म्हणून निम्न स्तर) किंवा इनपुट शोध मोड कॉन्फिगर करण्यायोग्य आहे. DIGITAL IO अंतर्गत पुल-अप व्हॉल्यूमtage VCC चे अनुसरण करते. आउटपुट नियंत्रण मोड: a कमी पातळीचे आउटपुट करताना सिंकचा जास्तीत जास्त प्रतिकार 50mA असतो. b जेव्हा VCC 5V असते आणि उच्च पातळी आउटपुट असते, तेव्हा कमाल वर्तमान ड्रायव्हिंग क्षमता 2mA असते. c जेव्हा VCC 12V असते आणि उच्च पातळी आउटपुट असते, तेव्हा कमाल वर्तमान ड्रायव्हिंग क्षमता 5mA असते. इनपुट शोध मोड: a जेव्हा VCC 5V असतो, तेव्हा DIGITAL IO 5K ohm रेझिस्टरद्वारे अंतर्गत 2.2V पर्यंत खेचला जातो. b VCC 12V असताना, DIGITAL IO 12K ohm रेझिस्टरद्वारे अंतर्गत 2.2V पर्यंत खेचला जातो. |
| 11 | RS-232 | RS-232 सीरियल पोर्ट, RS-232 कमांड पास-थ्रू आणि स्थानिक सिरीयल पोर्ट नियंत्रणास समर्थन देते. |
| 12 | ऑडिओ इन/आउट | ऑडिओ इन: अॅनालॉग ऑडिओ इनपुट पोर्ट, ऑडिओ HDMI सिग्नलमध्ये एम्बेड केला जाऊ शकतो जेणेकरून तो HDMI आउटपुटवर पास-थ्रू होईल आणि डीकोडरवर ऑडिओ आउट होईल किंवा एन्कोडरवरील ऑडिओ आउट पोर्टद्वारे लूप आउट केला जाऊ शकतो. |
| ऑडिओ आउट: अॅनालॉग ऑडिओ आउटपुट पोर्ट. ते HDMI IN पोर्टमधून काढलेला ऑडिओ आउटपुट करू शकते (LPCM च्या बाबतीत). तसेच ते डिकोडरच्या ऑडिओ IN पोर्टवरून प्रसारित केलेला ऑडिओ युनिकस्ट मोडमध्ये (पॉइंट-टू-पॉइंट डायरेक्ट कनेक्शन) आउटपुट करू शकते. | ||
| 13 | एसपीडीआयएफ आउट | S/PDIF सिग्नल आउटपुट पोर्ट. जेव्हा एन्कोडर आणि डिकोडर दोन्ही ARC किंवा S/PDIF ऑडिओ रिटर्न मोडवर सेट केले जातात (मल्टीकास्ट मोडमध्ये कंट्रोलर बॉक्स किंवा API कमांडद्वारे सेट करा; युनिकास्ट मोडमध्ये फ्रंट पॅनल बटणांद्वारे सेट करा) तेव्हा ते डिकोडरमधून परत आलेला ARC किंवा S/PDIF ऑडिओ आउटपुट करू शकते. |
| 14 | HDMI बाहेर | HDMI लोकल लूप आउटपुट पोर्ट, HDMI डिस्प्ले उपकरण जसे की टीव्ही किंवा मॉनिटरशी कनेक्ट केलेले. |
| 15 | एचडीएमआय इन | HDMI सिग्नल इनपुट पोर्ट, जो HDMI केबलसह ब्लू-रे प्लेयर किंवा सेट-टॉप बॉक्स सारख्या HDMI सोर्स डिव्हाइसशी जोडलेला आहे. |
| 16 | फायबर | ऑप्टिकल फायबर मॉड्यूलसह कनेक्ट करा आणि थेट किंवा स्विचद्वारे ऑप्टिकल फायबर केबलसह डीकोडरला सिग्नल प्रसारित करा. |
| 17 | लॅन (पीओई) | 1G LAN पोर्ट, वितरित प्रणाली तयार करण्यासाठी नेटवर्क स्विच कनेक्ट करा. टीप: जेव्हा नेटवर्क स्विच POE वीज पुरवठा वितरीत करते, तेव्हा DC 12V अडॅप्टरला युनिटवर लागू करण्याची आवश्यकता नसते. |
| 18 | डेटा सिग्नल इंडिकेटर lamp (पिवळा) | लाईट फ्लॅशिंग: डेटा ट्रान्समिशन आहे. ▪ लाईट ऑफ: डेटा ट्रान्समिशन नाही. |
| 19 | लिंक सिग्नल इंडिकेटर lamp (हिरवा) | लाईट चालू: नेटवर्क केबल सामान्यपणे जोडलेली असते. ▪ लाईट बंद: नेटवर्क केबल व्यवस्थित जोडलेली नसते. |
| 20 | डीसी 12V | डिव्हाइस दोन पद्धतींनी चालविले जाऊ शकते:
जेव्हा स्विच POE फंक्शनला सपोर्ट करतो, तेव्हा DC पॉवर सप्लायची आवश्यकता नसते. |
LED स्क्रीन आणि CH SELECT बटणांचे ऑपरेशन वर्णन (एनकोडरसाठी).
1, ENC आयडी: सिस्टम चालू केल्यानंतर, एन्कोडरची LED स्क्रीन ENC आयडी (सेट न केल्यास 000 बाय डीफॉल्ट) दर्शवेल.
2, IP पत्ता: 5 सेकंदांसाठी UP बटण दाबा आणि धरून ठेवा, एन्कोडरचा LED स्क्रीन “IPx”, “xxx”, “xxx”, “xxx”, “xxx” या क्रमाने दिसेल, जो एन्कोडरचा IP मोड आणि IP पत्ता आहे.
3, कॉन्फिगरेशन मोड: 5 सेकंदांसाठी एकाच वेळी UP + DOWN बटणे दाबा आणि धरून ठेवा, नंतर LED स्क्रीनवर प्रदर्शित होणाऱ्या “CFN” सह कॉन्फिगरेशन मोडमध्ये प्रवेश करण्यासाठी सोडा.
4, डिव्हाइस आयडी सेटिंग्ज: कॉन्फिगरेशन मोडमध्ये प्रवेश केल्यानंतर, LED स्क्रीनवर (डिफॉल्टनुसार 000) प्रदर्शित होत असलेल्या पहिल्या पृष्ठावर प्रवेश करण्यासाठी UP/DOWN बटण दाबा. UP + DOWN बटणे 5 सेकंदांसाठी दाबा आणि धरून ठेवा, नंतर ID सेटिंग्ज मोडमध्ये प्रवेश करण्यासाठी सोडा, ज्यामध्ये LED स्क्रीनवरील ID क्रमांक (उदा. 001) 1Hz वर फ्लॅश होईल, नंतर तुम्हाला हवा असलेला डिव्हाइस आयडी निवडण्यासाठी UP/DOWN बटण दाबा (आयडी श्रेणी: 000~762), नंतर सेटिंगची पुष्टी करण्यासाठी आणि फ्लॅशिंग थांबवण्यासाठी 5 सेकंदांसाठी UP + DOWN बटणे दाबा आणि धरून ठेवा. सेटिंग केल्यानंतर, युनिट स्वयंचलितपणे रीबूट होईल.
टीप: कंट्रोलर बॉक्स मोडमध्ये डिव्हाइस आयडी सुधारित केला जाऊ शकत नाही.
5, EDID सेटिंग्ज: कॉन्फिगरेशन मोडमध्ये प्रवेश केल्यानंतर, LED स्क्रीनवर प्रदर्शित होणारे "E00" (ज्यामध्ये "E" म्हणजे EDID, "00" म्हणजे EDID ID) किंवा "COP" (जे कॉपी EDID दर्शवते) असलेले दुसरे पृष्ठ प्रविष्ट करण्यासाठी वर/खाली बटण दाबा (डिफॉल्टनुसार E15).
५ सेकंदांसाठी UP + DOWN बटणे दाबा आणि धरून ठेवा, नंतर EDID सेटिंग्ज मोडमध्ये प्रवेश करण्यासाठी सोडा, ज्यामध्ये LED स्क्रीनवरील EDID आयडी क्रमांक (उदा. E01) १Hz वर फ्लॅश होईल, नंतर तुम्हाला हवा असलेला EDID आयडी निवडण्यासाठी UP/DOWN बटण दाबा, नंतर सेटिंगची पुष्टी करण्यासाठी आणि फ्लॅशिंग थांबवण्यासाठी UP + DOWN बटणे ५ सेकंदांसाठी दाबा आणि धरून ठेवा.
संबंधित EDID आयडी खालीलप्रमाणे आहे:
| EDID आयडी | EDID वर्णन |
| E00 | 1080P_Stereo_Audio_2.0_SDR |
| E01 | 1080P_DolbyDTS_5.1_SDR |
| E02 | 1080P_HD_Audio_7.1_SDR |
| E03 | 1080I_Stereo_Audio_2.0_SDR |
| E04 | 1080I_DolbyDTS_5.1_SDR |
| E05 | 1080I_HD_Audio_7.1_SDR |
| E06 | 3D_Stereo_Audio_2.0_SDR |
| E07 | 3D_DolbyDTS_5.1_SDR |
| E08 | 3D_HD_Audio_7.1_SDR |
| E09 | 4K2K30_444_Stereo_Audio_2.0_SDR |
| E10 | 4K2K30_444_DolbyDTS_5.1_SDR |
| E11 | 4K2K30_444_HD_Audio_7.1_SDR |
| E12 | 4K2K60_420_Stereo_Audio_2.0_SDR |
| E13 | 4K2K60_420_DolbyDTS_5.1_SDR |
| E14 | 4K2K60_420_HD_Audio_7.1_SDR |
| E15 | 4K2K60_444_Stereo_Audio_2.0_SDR |
| E16 | 4K2K60_444_DolbyDTS_5.1_SDR |
| E17 | 4K2K60_444_HD_Audio_7.1_SDR |
| E18 | 4K2K60_444_Stereo_Audio_2.0_HDR_10-bit |
| E19 | 4K2K60_444_DolbyDTS_5.1_HDR_10-bit |
| E20 | 4K2K60_444_HD_Audio_7.1_HDR_10-bit |
| E21 | DVI_1280x1024 |
| E22 | DVI_1920x1080 |
| E23 | DVI_1920x1200 |
टीप: पॉइंट टू पॉइंट कनेक्शन मोडमध्ये, EDID कॉपी फंक्शन वापरण्यापूर्वी, सर्व कोडेक्स CA1 युनिकास्ट मोडवर सेट करणे आवश्यक आहे आणि सेट केल्यानंतर, एन्कोडरला टीव्हीचा EDID रिपोर्ट करण्यासाठी डीकोडरची HDMI केबल पुन्हा प्लग करणे आवश्यक आहे.
6, IR मोड सेटिंग्ज: कॉन्फिगरेशन मोडमध्ये प्रवेश केल्यानंतर, LED स्क्रीनवर (डिफॉल्टनुसार IR2) प्रदर्शित होत असलेल्या तिसऱ्या पृष्ठावर प्रवेश करण्यासाठी UP/DOWN बटण दाबा. UP + DOWN बटणे 5 सेकंदांसाठी दाबा आणि धरून ठेवा, नंतर सेटिंग्ज मोडमध्ये प्रवेश करण्यासाठी सोडा, ज्यामध्ये LED स्क्रीनवरील IR मोड (IR1 किंवा IR2) 1Hz वर फ्लॅश होईल, नंतर IR मोड निवडण्यासाठी UP/DOWN बटण दाबा, नंतर सेटिंगची पुष्टी करण्यासाठी आणि फ्लॅशिंग थांबवण्यासाठी UP + DOWN बटणे 5 सेकंदांसाठी दाबा आणि धरून ठेवा.
संबंधित IR मोड पर्याय खालीलप्रमाणे आहेत:
IR1: 5V IR वायर
IR2: 12V IR वायर
7, ऑडिओ एम्बेडिंग मोड सेटिंग्ज: कॉन्फिगरेशन मोडमध्ये प्रवेश केल्यानंतर, LED स्क्रीनवर "HDI/ANA" प्रदर्शित होत असलेल्या चौथ्या पृष्ठावर प्रवेश करण्यासाठी UP/DOWN बटण दाबा (डिफॉल्टनुसार HDI). UP + DOWN बटणे 5 सेकंद दाबा आणि धरून ठेवा, नंतर सेटिंग्ज मोडमध्ये प्रवेश करण्यासाठी सोडा, ज्यामध्ये LED स्क्रीनवरील ऑडिओ रिटर्न मोड (HDI/ANA) 1Hz वर फ्लॅश होईल, नंतर मोड निवडण्यासाठी UP/DOWN बटण दाबा, नंतर सेटिंगची पुष्टी करण्यासाठी आणि फ्लॅशिंग थांबवण्यासाठी UP + DOWN बटणे 5 सेकंद दाबा आणि धरून ठेवा.
संबंधित ऑडिओ एम्बेडिंग मोड पर्याय खालीलप्रमाणे आहेत:
एचडीआय: एचडीएमआय ऑडिओ एम्बेडिंग
ANA: अॅनालॉग ऑडिओ एम्बेडिंग
8, IP मोड सेटिंग्ज: कॉन्फिगरेशन मोडमध्ये प्रवेश केल्यानंतर, LED स्क्रीनवर "IP1/IP2/IP3" प्रदर्शित होत असलेल्या पाचव्या पृष्ठावर प्रवेश करण्यासाठी वर/खाली बटण दाबा (डिफॉल्टनुसार IP3).
५ सेकंदांसाठी UP + DOWN बटणे दाबा आणि धरून ठेवा, नंतर सेटिंग्ज मोडमध्ये जाण्यासाठी सोडा, ज्यामध्ये LED स्क्रीनवरील IP मोड (IP1/IP2/IP3) १Hz वर फ्लॅश होईल, नंतर मोड निवडण्यासाठी UP/DOWN बटण दाबा, नंतर सेटिंगची पुष्टी करण्यासाठी आणि फ्लॅशिंग थांबवण्यासाठी UP + DOWN बटणे ५ सेकंदांसाठी दाबा आणि धरून ठेवा. सेटिंग केल्यानंतर, युनिट आपोआप रीबूट होईल.
संबंधित आयपी मोड पर्याय खालीलप्रमाणे आहेत:
IP1: स्टॅटिक IP मोड (डीफॉल्ट IP पत्ता: 169.254.100.254)
IP2: DHCP IP मोड
IP3: ऑटो IP मोड (डिफॉल्ट असाइन केलेला नेटवर्क सेगमेंट: 169.254.xxx.xxx)
टीप: कंट्रोलर बॉक्स मोडमध्ये आयपी मोड बदलता येत नाही.
9, फायबर/कॉपर मोड सेटिंग्ज: कॉन्फिगरेशन मोडमध्ये प्रवेश केल्यानंतर, LED स्क्रीनवर "CPP/FIB" प्रदर्शित होत असलेल्या सहाव्या पृष्ठावर प्रवेश करण्यासाठी UP/DOWN बटण दाबा (डिफॉल्टनुसार CPP). UP + DOWN बटणे 5 सेकंद दाबा आणि धरून ठेवा, नंतर सेटिंग्ज मोडमध्ये प्रवेश करण्यासाठी सोडा, ज्यामध्ये LED स्क्रीनवरील फायबर/कॉपर मोड (CPP/FIB) 1Hz वर फ्लॅश होईल, नंतर मोड निवडण्यासाठी UP/DOWN बटण दाबा, नंतर सेटिंगची पुष्टी करण्यासाठी आणि फ्लॅशिंग थांबवण्यासाठी 5 सेकंदांसाठी UP + DOWN बटणे दाबा आणि धरून ठेवा. सेटिंग केल्यानंतर, युनिट स्वयंचलितपणे रीबूट होईल.
संबंधित फायबर/कॉपर मोड पर्याय खालीलप्रमाणे आहेत:
सीपीपी: कॉपर मोड
FIB: फायबर मोड
१२,२४, मल्टीकास्ट मोड सेटिंग्ज: कॉन्फिगरेशन मोडमध्ये प्रवेश केल्यानंतर, LED स्क्रीनवर “CA1/CA2” प्रदर्शित होत असलेल्या सातव्या पृष्ठावर प्रवेश करण्यासाठी UP/DOWN बटण दाबा (डिफॉल्टनुसार CA1). UP + DOWN बटणे 5 सेकंद दाबा आणि धरून ठेवा, नंतर सेटिंग्ज मोडमध्ये प्रवेश करण्यासाठी सोडा, ज्यामध्ये LED स्क्रीनवरील मल्टीकास्ट मोड (CA1/CA2) 1Hz वर फ्लॅश होईल, नंतर मोड निवडण्यासाठी UP/DOWN बटण दाबा, नंतर सेटिंगची पुष्टी करण्यासाठी आणि फ्लॅशिंग थांबवण्यासाठी 5 सेकंदांसाठी UP + DOWN बटणे दाबा आणि धरून ठेवा. सेटिंग केल्यानंतर, युनिट स्वयंचलितपणे रीबूट होईल.
संबंधित मल्टीकास्ट मोड पर्याय खालीलप्रमाणे आहेत:
CA1: युनिकास्ट मोड
CA2: मल्टीकास्ट मोड
१२,२४, ऑडिओ रिटर्न मोड सेटिंग्ज: कॉन्फिगरेशन मोडमध्ये प्रवेश केल्यानंतर, LED स्क्रीनवर "C2C/A2A" प्रदर्शित होत असलेल्या आठव्या पृष्ठावर प्रवेश करण्यासाठी UP/DOWN बटण दाबा (डिफॉल्टनुसार C2C). UP + DOWN बटणे 5 सेकंद दाबा आणि धरून ठेवा, नंतर सेटिंग्ज मोडमध्ये प्रवेश करण्यासाठी सोडा, ज्यामध्ये LED स्क्रीनवरील ऑडिओ रिटर्न मोड (C2C/A2A) 1Hz वर फ्लॅश होईल, नंतर मोड निवडण्यासाठी UP/DOWN बटण दाबा, नंतर सेटिंगची पुष्टी करण्यासाठी आणि फ्लॅशिंग थांबवण्यासाठी 5 सेकंदांसाठी UP + DOWN बटणे दाबा आणि धरून ठेवा. सेटिंग केल्यानंतर, युनिट स्वयंचलितपणे रीबूट होईल.
संबंधित ऑडिओ रिटर्न मोड पर्याय खालीलप्रमाणे आहेत:
C2C: डिकोडरमधील eARC/ARC किंवा S/PDIF ऑडिओ एन्कोडरच्या HDMI IN किंवा SPDIF OUT पोर्टवर परत पाठवला जातो.
A2A: डिकोडरमध्ये एम्बेड केलेला अॅनालॉग ऑडिओ एन्कोडरच्या ऑडिओ आउट अॅनालॉग ऑडिओ पोर्टवर परत प्रसारित केला जातो.
टीप:
(1) कंट्रोलर बॉक्स किंवा मल्टीकास्ट मोडमधील फ्रंट पॅनल बटणांद्वारे ऑडिओ रिटर्न मोडमध्ये बदल केला जाऊ शकत नाही.
(२) जेव्हा एन्कोडर आणि डिकोडर दोन्ही युनिकास्ट मोडमध्ये C2C/A2A ऑडिओ रिटर्न मोडवर सेट केले जातात तेव्हाच ऑडिओ रिटर्न साध्य करता येतो.
(३) A2A ऑडिओ रिटर्न मोड फक्त युनिकास्ट मोडमध्ये उपलब्ध आहे.
(4) ARC, ARC ऑडिओ कधी वापरायचा ampएन्कोडर एचडीएमआय इन पोर्टवर लिफायर आणि डीकोडर एचडीएमआय आउट पोर्टवर एआरसी टीव्ही वापरावे.
eARC, eARC ऑडिओ कधी वापरायचा ampएन्कोडर एचडीएमआय इन पोर्टवर लिफायर आणि डीकोडर एचडीएमआय आउट पोर्टवर ईएआरसी टीव्ही वापरावे.
(२) विविध सेटिंग मोडमध्ये प्रवेश केल्यानंतर, तुम्ही सध्याच्या इंटरफेसमधून पटकन बाहेर पडण्यासाठी डाउन बटण दाबून ठेवू शकता, किंवा तुम्ही 5 सेकंदात कोणतेही ऑपरेशन न केल्यास, ते आपोआप मागील इंटरफेसवर परत येईल.
5.2 डीकोडर पॅनेल


| नाही. | नाव | कार्य वर्णन |
| 1 | रीसेट करा | डिव्हाइसवर पॉवर केल्यानंतर, एकाच वेळी POWER LED आणि LINK LED फ्लॅश होईपर्यंत रीसेट बटण दाबा आणि धरून ठेवा, डिव्हाइसला फॅक्टरी सेटिंग्जवर रीसेट करण्यासाठी बटण सोडा. |
| 2 | पॉवर एलईडी (लाल) |
|
| 3 | लिंक LED (हिरवा) | कनेक्शन स्थिती LED.
|
| 4 | एलईडी स्क्रीन | निवडलेला एन्कोडर आयडी डीफॉल्ट म्हणून दाखवतो. डीकोडर कॉन्फिगरेशन सेट करताना कॉन्फिगरेशन फंक्शन्सचे संबंधित पर्याय प्रदर्शित करते. |
| 5 | CH निवडा | डीकोडर आयडी आणि इतर सेटिंग्ज सेट करण्यासाठी वापरला जातो. |
| 6 | USB 1.1 डिव्हाइस | USB 1.1 डिव्हाइसेसशी कनेक्ट करा, जसे की कीबोर्ड किंवा माउस. |
| 7 | USB 2.0 डिव्हाइस | USB 2.0 डिव्हाइसेसशी कनेक्ट करा, जसे की USB फ्लॅश डिस्क किंवा USB कॅमेरा. |
| 8 | IR आउट | IR सिग्नल आउटपुट पोर्ट. पॅनेल बटणांद्वारे IR पातळी 5V किंवा 12V (डिफॉल्ट) वर सेट केली जाऊ शकते. |
| 9 | IR IN | IR सिग्नल इनपुट पोर्ट. पॅनेल बटणांद्वारे IR पातळी 5V किंवा 12V (डिफॉल्ट) वर सेट केली जाऊ शकते. |
| 10 | रिलेज मी डिजिटल आयओ | VCC: पॉवर आउटपुट (12V किंवा 5V कॉन्फिगर करण्यायोग्य), कमाल ते 12V@50mA, 5V@100mA लोडिंग. डीफॉल्ट आउटपुट 12V आहे. रिले: 2 चॅनेल लो-वॉल्यूमtage रिले पोर्ट्स, प्रत्येक गट स्वतंत्र आणि वेगळा आहे, जास्तीत जास्त 1A 30VDC लोडिंग. संपर्क डीफॉल्टनुसार डिस्कनेक्ट केले जातात. डिजिटल आयओ: डिजिटल लेव्हल सिग्नल आउटपुट कंट्रोल किंवा इनपुट डिटेक्शनसाठी (१२ व्ही लेव्हल डिटेक्शन पर्यंत) २ चॅनेल जीपीआयओ पोर्ट. आउटपुट कंट्रोल मोड (डिफॉल्ट मोड, डिफॉल्ट आउटपुट म्हणून कमी पातळी) किंवा इनपुट डिटेक्शन मोड कॉन्फिगर करण्यायोग्य आहे. DIGITAL IO अंतर्गत पुल-अप व्हॉल्यूमtage VCC चे अनुसरण करते. आउटपुट नियंत्रण मोड: a कमी पातळीचे आउटपुट करताना सिंकचा जास्तीत जास्त प्रतिकार 50mA असतो. b जेव्हा VCC 5V असते आणि उच्च पातळी आउटपुट असते, तेव्हा कमाल वर्तमान ड्रायव्हिंग क्षमता 2mA असते. c जेव्हा VCC 12V असते आणि उच्च पातळी आउटपुट असते, तेव्हा कमाल वर्तमान ड्रायव्हिंग क्षमता 5mA असते. इनपुट शोध मोड: a जेव्हा VCC 5V असतो, तेव्हा DIGITAL IO 5K ohm रेझिस्टरद्वारे अंतर्गत 2.2V पर्यंत खेचला जातो. b VCC 12V असताना, DIGITAL IO 12K ohm रेझिस्टरद्वारे अंतर्गत 2.2V पर्यंत खेचला जातो. |
| 11 | RS-232 | RS-232 सीरियल पोर्ट, RS-232 कमांड पास-थ्रू आणि स्थानिक सिरीयल पोर्ट नियंत्रणास समर्थन देते. |
| 12 | ऑडिओ इन/आउट | ऑडिओ इन: अॅनालॉग ऑडिओ इनपुट पोर्ट, ऑडिओ एन्कोडर ऑडिओ आउटमध्ये युनिकास्ट मोडमध्ये प्रसारित केला जाऊ शकतो (पॉइंट-टू-पॉइंट डायरेक्ट कनेक्शन). |
| ऑडिओ आउट: अॅनालॉग ऑडिओ आउटपुट पोर्ट. ऑडिओ फॉरमॅट LPCM असल्यास ते HDMI OUT वर त्याच ऑडिओचे आउटपुट करते. | ||
| 13 | एसपीडीआयएफ इन | S/PDIF सिग्नल इनपुट पोर्ट. |
| 14 | HDMI बाहेर | HDMI सिग्नल आउटपुट पोर्ट, HDMI डिस्प्ले उपकरण जसे की टीव्ही किंवा मॉनिटरशी कनेक्ट केलेले. |
| 15 | फायबर | ऑप्टिकल फायबर मॉड्यूलसह कनेक्ट करा आणि थेट किंवा स्विचद्वारे ऑप्टिकल फायबर केबलसह एन्कोडरकडून सिग्नल प्राप्त करा. |
| 16 | लॅन (पीओई) | 1G LAN पोर्ट, वितरित प्रणाली तयार करण्यासाठी नेटवर्क स्विच कनेक्ट करा. टीप: जेव्हा नेटवर्क स्विच POE वीज पुरवठा वितरीत करते, तेव्हा DC 12V अडॅप्टरला युनिटवर लागू करण्याची आवश्यकता नसते. |
| 17 | डेटा सिग्नल इंडिकेटर lamp (पिवळा) |
|
| 18 | लिंक सिग्नल इंडिकेटर lamp (हिरवा) |
|
| 19 | डीसी 12V | डिव्हाइस दोन पद्धतींनी चालविले जाऊ शकते:
जेव्हा स्विच POE फंक्शनला सपोर्ट करतो, तेव्हा DC पॉवर सप्लायची आवश्यकता नसते. |
LED स्क्रीन आणि CH SELECT बटणांचे ऑपरेशन वर्णन (डीकोडरसाठी).
1, ENC कनेक्शन: सिस्टम चालू केल्यानंतर, डिकोडरची LED स्क्रीन सेट न केल्यास 000 बाय डीफॉल्ट दर्शवेल. कनेक्शन पूर्ण करण्यासाठी कनेक्ट केलेल्या एन्कोडरचा चॅनेल आयडी (आयडी श्रेणी: 000~762) निवडण्यासाठी थेट UP/DOWN बटण दाबा.
2, IP पत्ता: 5 सेकंदांसाठी UP बटण दाबा आणि धरून ठेवा, डीकोडरची LED स्क्रीन “IPx”, “xxx”, “xxx”, “xxx”, “xxx” या क्रमाने दिसेल, जे डीकोडरचा IP मोड आणि IP पत्ता आहेत.
3, कॉन्फिगरेशन मोड: 5 सेकंदांसाठी एकाच वेळी UP + DOWN बटणे दाबा आणि धरून ठेवा, नंतर LED स्क्रीनवर प्रदर्शित होणाऱ्या “CFN” सह कॉन्फिगरेशन मोडमध्ये प्रवेश करण्यासाठी सोडा.
4, डिव्हाइस आयडी सेटिंग्ज: कॉन्फिगरेशन मोडमध्ये प्रवेश केल्यानंतर, LED स्क्रीनवर (डिफॉल्टनुसार 000) प्रदर्शित होत असलेल्या पहिल्या पृष्ठावर प्रवेश करण्यासाठी UP/DOWN बटण दाबा. UP + DOWN बटणे 5 सेकंदांसाठी दाबा आणि धरून ठेवा, नंतर ID सेटिंग्ज मोडमध्ये प्रवेश करण्यासाठी सोडा, ज्यामध्ये LED स्क्रीनवरील ID क्रमांक (उदा. 001) 1Hz वर फ्लॅश होईल, नंतर तुम्हाला हवा असलेला डिव्हाइस आयडी निवडण्यासाठी UP/DOWN बटण दाबा (आयडी श्रेणी: 000~762), नंतर सेटिंगची पुष्टी करण्यासाठी आणि फ्लॅशिंग थांबवण्यासाठी 5 सेकंदांसाठी UP + DOWN बटणे दाबा आणि धरून ठेवा. सेटिंग केल्यानंतर, युनिट स्वयंचलितपणे रीबूट होईल.
टीप: कंट्रोलर बॉक्स मोडमध्ये डिव्हाइस आयडी सुधारित केला जाऊ शकत नाही.
5, आउटपुट स्केलिंग सेटिंग्ज: कॉन्फिगरेशन मोडमध्ये प्रवेश केल्यानंतर, LED स्क्रीनवर (डिफॉल्टनुसार S00) प्रदर्शित होत असलेल्या दुसऱ्या पृष्ठावर प्रवेश करण्यासाठी UP/DOWN बटण दाबा (ज्यामध्ये “S” म्हणजे स्केलिंग आणि “00” म्हणजे रिझोल्यूशन ID). 5 सेकंदांसाठी UP + DOWN बटणे दाबा आणि धरून ठेवा, नंतर सेटिंग्ज मोडमध्ये प्रवेश करण्यासाठी सोडा, ज्यामध्ये LED स्क्रीनवरील Sxx 1Hz वर फ्लॅश होईल, नंतर तुम्हाला हवा असलेला आयडी निवडण्यासाठी UP/DOWN बटण दाबा, नंतर सेटिंगची पुष्टी करण्यासाठी आणि फ्लॅशिंग थांबवण्यासाठी 5 सेकंदांसाठी UP + DOWN बटणे दाबा आणि धरून ठेवा.
स्केलिंग सेटिंग्ज खाली सूचीबद्ध आहेत:
| स्केलिंग Sxx | ठराव वर्णन |
| S00 | बायपास |
| S01 | 1080P50 |
| S02 | 1080P60 |
| S03 | 720P50 |
| S04 | 720P60 |
| S05 | 2160P24 |
| S06 | 2160P30 |
| S07 | 2160P50 |
| S08 | 2160P60 |
| S09 | 1280×1024 |
| S10 | 1360×768 |
| S11 | 1440×900 |
| S12 | 1680×1050 |
| S13 | 1920×1200 |
6, IR मोड सेटिंग्ज: कॉन्फिगरेशन मोडमध्ये प्रवेश केल्यानंतर, LED स्क्रीनवर (डिफॉल्टनुसार IR2) प्रदर्शित होत असलेल्या तिसऱ्या पृष्ठावर प्रवेश करण्यासाठी UP/DOWN बटण दाबा. UP + DOWN बटणे 5 सेकंदांसाठी दाबा आणि धरून ठेवा, नंतर सेटिंग्ज मोडमध्ये प्रवेश करण्यासाठी सोडा, ज्यामध्ये LED स्क्रीनवरील IR मोड (IR1 किंवा IR2) 1Hz वर फ्लॅश होईल, नंतर IR मोड निवडण्यासाठी UP/DOWN बटण दाबा, नंतर सेटिंगची पुष्टी करण्यासाठी आणि फ्लॅशिंग थांबवण्यासाठी UP + DOWN बटणे 5 सेकंदांसाठी दाबा आणि धरून ठेवा.
संबंधित IR मोड पर्याय खालीलप्रमाणे आहेत:
IR1: 5V IR वायर
IR2: 12V IR वायर
7, eARC/ARC किंवा S/PDIF ऑडिओ रिटर्न सेटिंग्ज: कॉन्फिगरेशन मोडमध्ये प्रवेश केल्यानंतर, LED स्क्रीनवर "ARC/SPD" प्रदर्शित होत असलेल्या चौथ्या पृष्ठावर प्रवेश करण्यासाठी UP/DOWN बटण दाबा (डिफॉल्टनुसार ARC). UP + DOWN बटणे 5 सेकंद दाबा आणि धरून ठेवा, नंतर ऑडिओ रिटर्न सेटिंग्ज मोडमध्ये प्रवेश करण्यासाठी सोडा, ज्यामध्ये LED स्क्रीनवरील ऑडिओ रिटर्न मोड (ARC/SPD) 1Hz वर फ्लॅश होईल, नंतर मोड निवडण्यासाठी UP/DOWN बटण दाबा, नंतर सेटिंगची पुष्टी करण्यासाठी आणि फ्लॅशिंग थांबवण्यासाठी 5 सेकंदांसाठी UP + DOWN बटणे दाबा आणि धरून ठेवा. संबंधित ऑडिओ रिटर्न मोड पर्याय खालीलप्रमाणे आहेत:
ARC: eARC/ARC ऑडिओ रिटर्न (डीकोडरच्या HDMI OUT पोर्टमधील ऑडिओ एन्कोडरच्या HDMI IN पोर्टवर परत पाठवला जातो.)
SPD: S/PDIF ऑडिओ रिटर्न (डीकोडरच्या S/PDIF IN पोर्टमधील ऑडिओ एन्कोडरच्या S/PDIF OUT पोर्टवर परत पाठवला जातो.)
टीप:
(1) कंट्रोलर बॉक्स किंवा मल्टीकास्ट मोडमधील फ्रंट पॅनल बटणांद्वारे ऑडिओ रिटर्न मोडमध्ये बदल केला जाऊ शकत नाही.
(२) जेव्हा एन्कोडर आणि डिकोडर दोन्ही C2C ऑडिओ रिटर्न मोडवर सेट केले जातात, तेव्हाच eARC/ARC किंवा S/PDIF ऑडिओ रिटर्न साध्य करता येतो.
(3) ARC, ARC ऑडिओ कधी वापरायचा ampएन्कोडर एचडीएमआय इन पोर्टवर लिफायर आणि डीकोडर एचडीएमआय आउट पोर्टवर एआरसी टीव्ही वापरावे.
eARC, eARC ऑडिओ कधी वापरायचा ampएन्कोडर एचडीएमआय इन पोर्टवर लिफायर आणि डीकोडर एचडीएमआय आउट पोर्टवर ईएआरसी टीव्ही वापरावे.
8, IP मोड सेटिंग्ज: कॉन्फिगरेशन मोडमध्ये प्रवेश केल्यानंतर, LED स्क्रीनवर "IP1/IP2/IP3" प्रदर्शित होत असलेल्या पाचव्या पृष्ठावर प्रवेश करण्यासाठी वर/खाली बटण दाबा (डिफॉल्टनुसार IP3).
५ सेकंदांसाठी UP + DOWN बटणे दाबा आणि धरून ठेवा, नंतर सेटिंग्ज मोडमध्ये जाण्यासाठी सोडा, ज्यामध्ये LED स्क्रीनवरील IP मोड (IP1/IP2/IP3) १Hz वर फ्लॅश होईल, नंतर मोड निवडण्यासाठी UP/DOWN बटण दाबा, नंतर सेटिंगची पुष्टी करण्यासाठी आणि फ्लॅशिंग थांबवण्यासाठी UP + DOWN बटणे ५ सेकंदांसाठी दाबा आणि धरून ठेवा. सेटिंग केल्यानंतर, युनिट आपोआप रीबूट होईल.
संबंधित आयपी मोड पर्याय खालीलप्रमाणे आहेत:
IP1: स्टॅटिक IP मोड (डीफॉल्ट IP पत्ता: 169.254.100.253)
IP2: DHCP IP मोड
IP3: ऑटो IP मोड (डिफॉल्ट असाइन केलेला नेटवर्क सेगमेंट: 169.254.xxx.xxx)
टीप: आयपी मोड कंट्रोलर बॉक्स मोडमध्ये बदलला जाऊ शकत नाही.
9, फायबर/कॉपर मोड सेटिंग्ज: कॉन्फिगरेशन मोडमध्ये प्रवेश केल्यानंतर, LED स्क्रीनवर "CPP/FIB" प्रदर्शित होत असलेल्या सहाव्या पृष्ठावर प्रवेश करण्यासाठी UP/DOWN बटण दाबा (डिफॉल्टनुसार CPP). UP + DOWN बटणे 5 सेकंद दाबा आणि धरून ठेवा, नंतर सेटिंग्ज मोडमध्ये प्रवेश करण्यासाठी सोडा, ज्यामध्ये LED स्क्रीनवरील कॉपर/फायबर मोड (CPP/FIB) 1Hz वर फ्लॅश होईल, नंतर मोड निवडण्यासाठी UP/DOWN बटण दाबा, नंतर सेटिंगची पुष्टी करण्यासाठी आणि फ्लॅशिंग थांबवण्यासाठी 5 सेकंदांसाठी UP + DOWN बटणे दाबा आणि धरून ठेवा. सेटिंग केल्यानंतर, युनिट स्वयंचलितपणे रीबूट होईल.
संबंधित फायबर/कॉपर मोड पर्याय खालीलप्रमाणे आहेत:
सीपीपी: कॉपर मोड
FIB: फायबर मोड
१२,२४, मल्टीकास्ट मोड सेटिंग्ज: कॉन्फिगरेशन मोडमध्ये प्रवेश केल्यानंतर, LED स्क्रीनवर “CA1/CA2” प्रदर्शित होत असलेल्या सातव्या पृष्ठावर प्रवेश करण्यासाठी UP/DOWN बटण दाबा (डिफॉल्टनुसार CA1). UP + DOWN बटणे 5 सेकंद दाबा आणि धरून ठेवा, नंतर सेटिंग्ज मोडमध्ये प्रवेश करण्यासाठी सोडा, ज्यामध्ये LED स्क्रीनवरील मल्टीकास्ट मोड (CA1/CA2) 1Hz वर फ्लॅश होईल, नंतर मोड निवडण्यासाठी UP/DOWN बटण दाबा, नंतर सेटिंगची पुष्टी करण्यासाठी आणि फ्लॅशिंग थांबवण्यासाठी 5 सेकंदांसाठी UP + DOWN बटणे दाबा आणि धरून ठेवा. सेटिंग केल्यानंतर, युनिट स्वयंचलितपणे रीबूट होईल.
संबंधित मल्टीकास्ट मोड पर्याय खालीलप्रमाणे आहेत:
CA1: युनिकास्ट मोड
CA2: मल्टीकास्ट मोड
१२,२४, ऑडिओ रिटर्न मोड सेटिंग्ज: कॉन्फिगरेशन मोडमध्ये प्रवेश केल्यानंतर, LED स्क्रीनवर "C2C/A2A" प्रदर्शित होत असलेल्या आठव्या पृष्ठावर प्रवेश करण्यासाठी UP/DOWN बटण दाबा (डिफॉल्टनुसार C2C). UP + DOWN बटणे 5 सेकंद दाबा आणि धरून ठेवा, नंतर सेटिंग्ज मोडमध्ये प्रवेश करण्यासाठी सोडा, ज्यामध्ये LED स्क्रीनवरील ऑडिओ रिटर्न मोड (C2C/A2A) 1Hz वर फ्लॅश होईल, नंतर मोड निवडण्यासाठी UP/DOWN बटण दाबा, नंतर सेटिंगची पुष्टी करण्यासाठी आणि फ्लॅशिंग थांबवण्यासाठी 5 सेकंदांसाठी UP + DOWN बटणे दाबा आणि धरून ठेवा. सेटिंग केल्यानंतर, युनिट स्वयंचलितपणे रीबूट होईल.
संबंधित ऑडिओ रिटर्न मोड पर्याय खालीलप्रमाणे आहेत:
C2C: डिकोडरमधील eARC/ARC किंवा S/PDIF ऑडिओ एन्कोडरच्या HDMI IN किंवा S/PDIF OUT पोर्टवर परत पाठवला जातो.
A2A: डिकोडरमध्ये एम्बेड केलेला अॅनालॉग ऑडिओ एन्कोडरच्या ऑडिओ आउट अॅनालॉग ऑडिओ पोर्टवर परत प्रसारित केला जातो.
टीप:
(1) कंट्रोलर बॉक्स किंवा मल्टीकास्ट मोडमधील फ्रंट पॅनल बटणांद्वारे ऑडिओ रिटर्न मोडमध्ये बदल केला जाऊ शकत नाही.
(२) जेव्हा एन्कोडर आणि डिकोडर दोन्ही युनिकास्ट मोडमध्ये C2C/A2A ऑडिओ रिटर्न मोडवर सेट केले जातात तेव्हाच ऑडिओ रिटर्न साध्य करता येतो.
(३) A2A ऑडिओ रिटर्न मोड फक्त युनिकास्ट मोडमध्ये उपलब्ध आहे.
(4) ARC, ARC ऑडिओ कधी वापरायचा ampएन्कोडर एचडीएमआय इन पोर्टवर लिफायर आणि डीकोडर एचडीएमआय आउट पोर्टवर एआरसी टीव्ही वापरावे.
eARC, eARC ऑडिओ कधी वापरायचा ampएन्कोडर एचडीएमआय इन पोर्टवर लिफायर आणि डीकोडर एचडीएमआय आउट पोर्टवर ईएआरसी टीव्ही वापरावे.
(२) विविध सेटिंग मोडमध्ये प्रवेश केल्यानंतर, तुम्ही सध्याच्या इंटरफेसमधून पटकन बाहेर पडण्यासाठी डाउन बटण दाबून ठेवू शकता, किंवा तुम्ही 5 सेकंदात कोणतेही ऑपरेशन न केल्यास, ते आपोआप मागील इंटरफेसवर परत येईल.
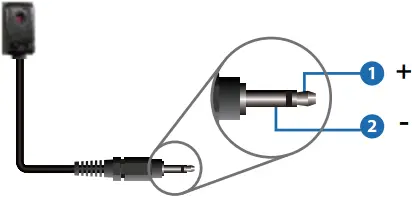
5.3 आयआर पिन व्याख्या
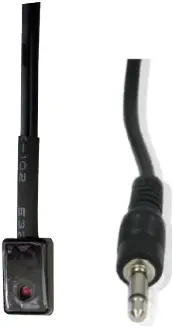
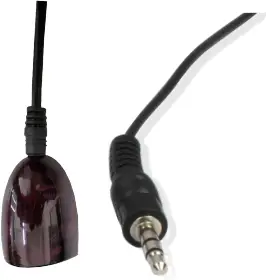
आयआर ब्लास्टर आयआर रिसीव्हर
आयआर ब्लास्टर
IR प्राप्तकर्ता
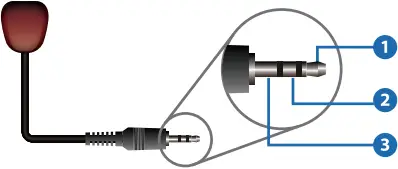
(१) IR सिग्नल
(१) ग्राउंडिंग
(१) पॉवर 12V
6. रॅक माउंटिंग सूचना
6.1 6U V2 रॅक माउंटिंग
हे उत्पादन मानक 6U V2 रॅकमध्ये माउंट केले जाऊ शकते (कृपया 6U V2 रॅक विक्रीसाठी आपल्या पुरवठादाराशी संपर्क साधा). माउंटिंग टप्पे खालीलप्रमाणे आहेत:
पायरी 1: खालील आकृतीमध्ये दर्शविल्याप्रमाणे, उत्पादनावर दोन माउंटिंग कान निश्चित करण्यासाठी समाविष्ट स्क्रू वापरा:
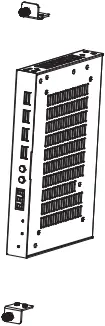
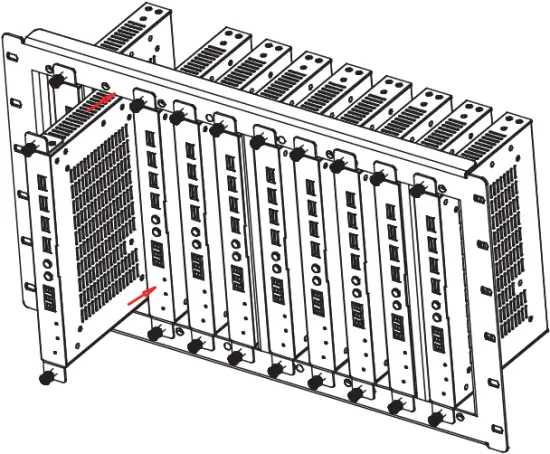
पायरी 2: 6U V2 रॅकमध्ये माउंटिंग इअरसह उत्पादन घाला (6/8/10 युनिट्स अनुलंब स्थापित केले जाऊ शकतात), खालील आकृतीमध्ये दर्शविल्याप्रमाणे:
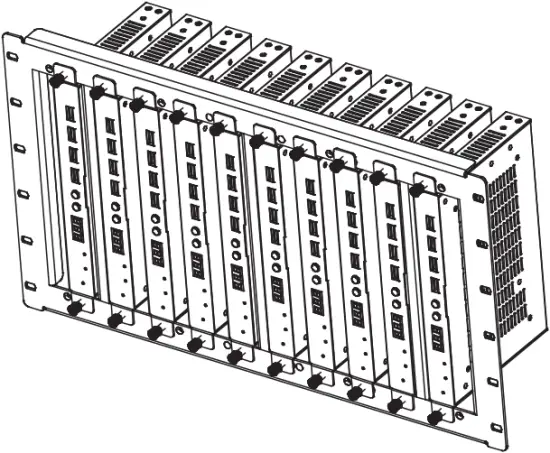
पायरी 3: खालील आकृतीत दर्शविल्याप्रमाणे, माउंटिंग पूर्ण करण्यासाठी रॅकवर माउंटिंग कान निश्चित करण्यासाठी स्क्रू वापरा:
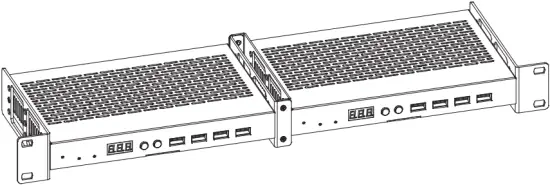
6.2 1U V2 रॅक माउंटिंग
हे उत्पादन मानक 1U V2 रॅकमध्ये देखील माउंट केले जाऊ शकते (2 युनिट्स क्षैतिजरित्या स्थापित केले जाऊ शकतात). माउंटिंग टप्पे खालीलप्रमाणे आहेत:
पायरी 1: खालील आकृतीत दर्शविल्याप्रमाणे, दोन उत्पादनांवर अनुक्रमे दोन 1U V2 रॅक कंस निश्चित करण्यासाठी समाविष्ट स्क्रू वापरा:
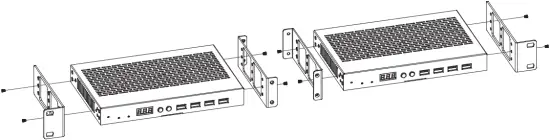
पायरी 2: खालील आकृतीत दाखवल्याप्रमाणे दोन 1U V2 रॅक कंस एकत्र निश्चित करण्यासाठी स्क्रू वापरा:

पायरी 3: दोन 1U V2 रॅक कंसात स्क्रू बांधा, जेणेकरून दोन उत्पादने 1U V2 रॅकमध्ये बसवली जातील, खालील आकृतीत दाखवल्याप्रमाणे:
7. MJPEG सबस्ट्रीम ऑपरेशन परिचय
7.1 MJPEG सबस्ट्रीम प्रीview/ द्वारे कॉन्फिगरेशन Web पान
हे उत्पादन संबंधित सॉफ्टवेअरद्वारे संगणकावर MJPEG सबस्ट्रीम प्ले करण्यास समर्थन देते जसे की VLC मीडिया प्लेयर, आपण एकाच वेळी प्रवेश करू शकता Web MJPEG सबस्ट्रीम कॉन्फिगर करण्यासाठी पृष्ठ.
पूर्व करण्यासाठी खालील चरणांचे अनुसरण कराview आणि MJPEG सबस्ट्रीम कॉन्फिगर करा.
पायरी 1: एन्कोडर, डीकोडर आणि पीसी एकाच स्विचरशी कनेक्ट करा, नंतर HDMI स्त्रोत डिव्हाइस आणि वीज पुरवठा कनेक्ट करा. कनेक्शन आकृती खालीलप्रमाणे दर्शविली आहे.
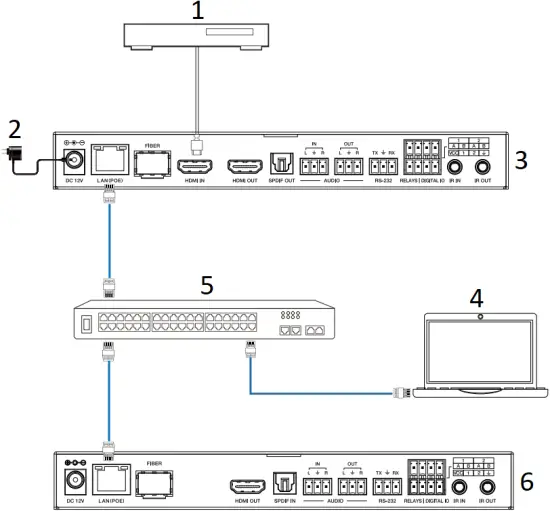
- ब्लू-रे प्लेयर
- पॉवर अडॅप्टर
- एन्कोडर
- PC
- 1G इथरनेट स्विच
- डिकोडर
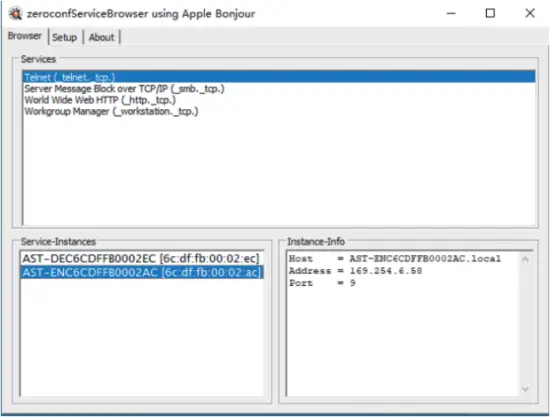
पायरी 2: एन्कोडर/डिकोडरचा आयपी अॅड्रेस शोधण्यासाठी पीसीवर बोंजोर प्रोटोकॉल चेकिंग टूल (जसे की झिरोकॉन्फ सर्व्हिस ब्राउझर) इंस्टॉल करा.
माजी म्हणून zeroconfServiceBrowser घ्याampले सॉफ्टवेअर उघडल्यानंतर, तुम्ही ब्राउझरच्या सर्व्हिसेसमध्ये “वर्कग्रुप मॅनेजर” निवडू शकता, सर्व्हिस-इन्स्टन्सेसमध्ये होस्टचे नाव निवडू शकता आणि इन्स्टन्स-माहिती मधील अॅड्रेस आयटममध्ये IP पत्ता शोधू शकता.
टीप:
(1) खालच्या डाव्या कोपऱ्यातील विंडो सध्याच्या नेटवर्कमधील सर्व उपकरणांची होस्ट नावे दाखवते.
(२) खालच्या उजव्या कोपऱ्यातील विंडो डिव्हाइसचे होस्ट नाव, आयपी पत्ता आणि पोर्ट क्रमांक प्रदर्शित करते.
(३) एन्कोडरचे होस्ट नाव AST-ENC ने सुरू होते; डिकोडरचे होस्ट नाव AST-DEC ने सुरू होते.
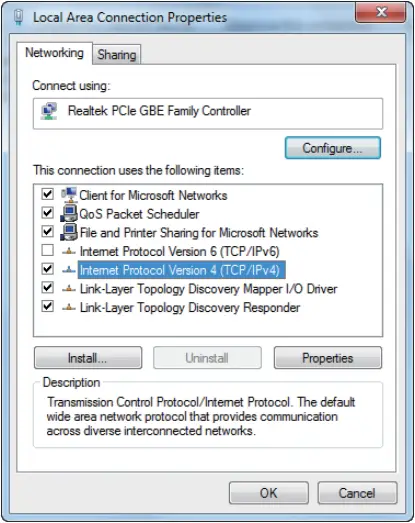
पायरी 3: स्टेप 2 मध्ये आढळलेल्या एन्कोडर/डीकोडरच्या IP पत्त्यासह PC चा IP पत्ता समान नेटवर्क विभागात सेट करा.

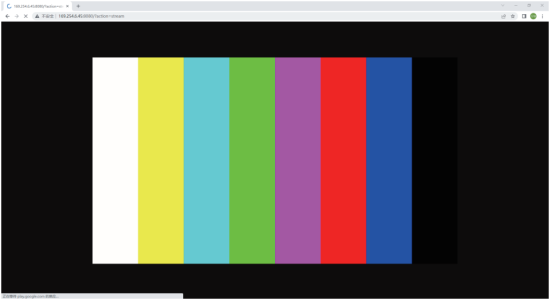
पायरी 4: बॉन्जोर प्रोटोकॉल चेकिंग टूलद्वारे आढळलेल्या एन्कोडर/डीकोडरच्या IP पत्त्यानुसार, "http://IP:PORT/?action=stream" मध्ये इनपुट करा web पीसी वर ब्राउझर. खालील आकृतीत दाखवल्याप्रमाणे, MJPEG सबस्ट्रीम डीफॉल्ट रिझोल्यूशनसह प्रदर्शित होईल.
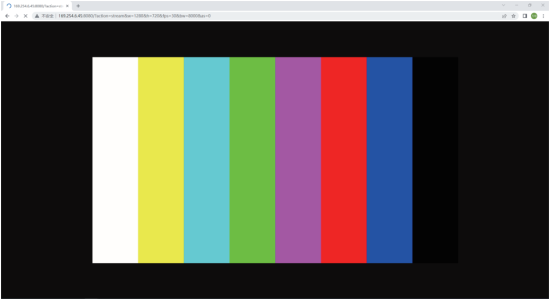
पायरी 5: प्राप्त एन्कोडर/डीकोडर IP पत्त्याचे रिझोल्यूशन खालील फॉरमॅटमध्ये बदला.
http://IP:PORT/?action=stream&w=x&h=x&fps=x&bw=x&as=x&mq=x
- रुंदी: [पर्यायी] प्रतिमेची रुंदी. पिक्सेलमध्ये. 'x' म्हणजे बदल नाही.
डीफॉल्ट 640 आहे. - उंची: [पर्यायी] प्रतिमेची उंची. पिक्सेलमध्ये. 'x' म्हणजे बदल नाही.
डीफॉल्ट 360 आहे. - फ्रेमरेट: सब-स्ट्रीमचा [पर्यायी] फ्रेम दर.
युनिट: fps (फ्रेम प्रति सेकंद). 'x' म्हणजे बदल नाही. डीफॉल्ट 30 आहे. - BW: [पर्यायी] सब-स्ट्रीम रहदारीची कमाल बँडविड्थ.
युनिट: Kbps (Kbits प्रति सेकंद). 'x' म्हणजे बदल नाही. डीफॉल्ट 8000 (8Mbps) आहे. - AS: [पर्यायी] आस्पेक्ट रेशो कॉन्फिगरेशन. 'x' म्हणजे बदल नाही. डीफॉल्ट 0 आहे.
- 0: “WIDTH” आणि “HEIGHT” कॉन्फिगर केले त्यापर्यंत वाढवा
- १: [केवळ A1] मूळ आस्पेक्ट रेशो ठेवा आणि आउटपुटच्या मध्यभागी ठेवा (लेटरबॉक्सिंग किंवा पिलरबॉक्सिंग)
- MINQ: [पर्यायी] किमान प्रतिमा गुणवत्ता क्रमांक. श्रेणी: 10, 20, …, 90, 100, उच्च सेटिंग म्हणजे चांगली प्रतिमा गुणवत्ता. 'x' म्हणजे बदल नाही. डीफॉल्ट मूल्य 10 आहे. ड्रायव्हर ऑटो बँडविड्थ नियंत्रणाचा किमान गुणवत्ता क्रमांक मर्यादित करा. MINQ मूल्यापेक्षा गुणवत्ता कमी असल्यास, ड्रायव्हर 0 आकार परत करून फ्रेम ड्रॉप करेल file.
बदलल्यानंतर, मध्ये नवीन एन्कोडर/डीकोडर IP पत्ता प्रविष्ट करा web पीसीवरील ब्राउझरमध्ये, खालील आकृतीमध्ये दाखवल्याप्रमाणे, MJPEG सबस्ट्रीम इच्छित रिझोल्यूशनसह प्रदर्शित होईल.
7.2 VLC मीडिया प्लेअर सूचना
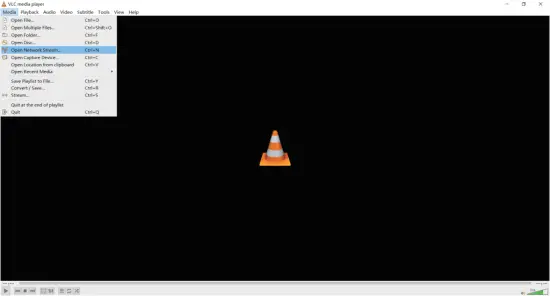
प्रथम, अध्याय 1 मध्ये वर्णन केल्याप्रमाणे चरण 3~7.1 करा, नंतर PC वर VLC मीडिया प्लेयर उघडा. कृपया खालील चिन्ह पहा.

"मीडिया > ओपन नेटवर्क स्ट्रीम" वर क्लिक करा
"ओपन नेटवर्क स्ट्रीम" पर्यायावर क्लिक केल्यानंतर, खालील पृष्ठ दिसेल.
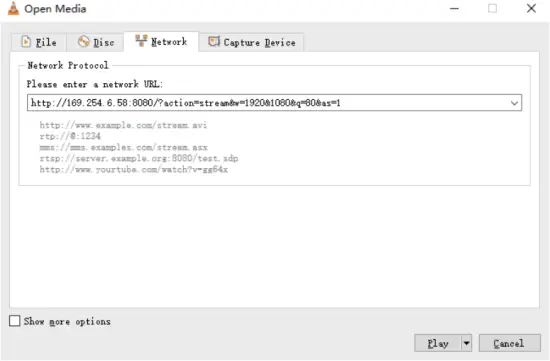
MJPEG सबस्ट्रीम नेटवर्क प्रविष्ट करा URL, नंतर क्लिक करा "खेळा” बटण.
निवडा "साधने>कोडेक माहिती", एक पॉप-अप विंडो प्रदर्शित होईल आणि तुम्हाला स्ट्रीम माहिती दर्शवेल, जसे की खालील आकृतीत दाखवले आहे.

निवडा "साधने > कोडेक माहिती > आकडेवारी"सध्याचे बिटरेट तपासण्यासाठी. कृपया खालील चित्र पहा.

टीप: तुम्ही तपासता तेव्हा बिटरेट वर आणि खाली तरंगत आहे. ही एक सामान्य घटना आहे.
8. स्विच मॉडेल
सिस्टम सेट अप करण्यासाठी वापरल्या जाणार्या नेटवर्क स्विचने खालील वैशिष्ट्यांचे समर्थन केले पाहिजे:
- स्तर 3/व्यवस्थापित नेटवर्क स्विचचा प्रकार.
- गिगाबिट बँडविड्थ.
- 8KB जंबो फ्रेम क्षमता.
- IGMP स्नूपिंग.
खालील स्विच मॉडेल्सची अत्यंत शिफारस केली जाते.
| उत्पादक | मॉडेल क्रमांक |
| CISCO | CISCO SG500 |
| CISCO | CATALYST मालिका |
| HUAWEI | S5720S-28X-PWR-LI-AC |
| ZyXEL | GS2210 |
| लक्सल | AMS-4424P |
9. 4K प्रती IP सिस्टम नियंत्रण
हे उत्पादन कंट्रोलर बॉक्स किंवा थर्ड-पार्टी कंट्रोलरद्वारे नियंत्रित केले जाऊ शकते. 4K ओव्हर आयपी सिस्टम कंट्रोलच्या तपशीलांसाठी, कृपया “व्हिडिओ ओव्हर आयपी कंट्रोलर” च्या वापरकर्ता मॅन्युअलचा संदर्भ घ्या.
10. अर्ज उदाample
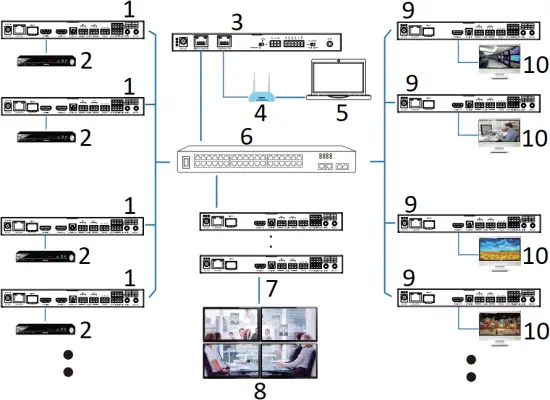
- ENC
- डीव्हीडी
- कंट्रोलर बॉक्स
- राउटर (पर्यायी)
- PC
- 1G इथरनेट स्विच
- ४ × डीईसी
- व्हिडिओ वॉल
- DEC
- TV
टीप:
(१) कंट्रोलर बॉक्सच्या कंट्रोल लॅन पोर्टचा डिफॉल्ट आयपी मोड डीएचसीपी आहे, पीसीला "स्वयंचलितपणे आयपी पत्ता मिळवा" मोडवर सेट करणे आवश्यक आहे आणि सिस्टममध्ये डीएचसीपी सर्व्हर (उदा. नेटवर्क राउटर) आवश्यक आहे.
(२) जर सिस्टममध्ये DHCP सर्व्हर नसेल, तर कंट्रोल लॅन पोर्टचा IP पत्ता म्हणून १९२.१६८.०.२२५ वापरला जाईल. तुम्हाला पीसीचा IP पत्ता त्याच नेटवर्क विभागात सेट करावा लागेल. उदा.ample, PC चा IP पत्ता 192.168.0.88 असा सेट करा.
(3) आपण प्रवेश करू शकता Web GUI इनपुट करून कंट्रोल LAN पोर्ट IP पत्ता (192.168.0.225) किंवा URL तुमच्या संगणकाच्या ब्राउझरवर “http://controller.local”.
(४) कंट्रोलर बॉक्सच्या व्हिडिओ लॅन पोर्टच्या सेटिंग्जची काळजी करण्याची गरज नाही, ते कंट्रोलरद्वारे स्वयंचलितपणे व्यवस्थापित केले जातात (डीफॉल्ट).
(५) जेव्हा नेटवर्क स्विच PoE ला समर्थन देत नाही, तेव्हा एन्कोडर, डिकोडर आणि कंट्रोलर बॉक्स DC पॉवर अॅडॉप्टरद्वारे समर्थित असले पाहिजेत.
![]()
HDMI आणि HDMI हाय-डेफिनिशन मल्टीमीडिया इंटरफेस आणि HDMI लोगो या संज्ञा युनायटेड स्टेट्स आणि इतर देशांमध्ये HDMI लायसन्सिंग LLC चे ट्रेडमार्क किंवा नोंदणीकृत ट्रेडमार्क आहेत.
ग्राहक सेवा
आमच्या ग्राहक सेवेला उत्पादन परत करणे म्हणजे त्यानंतरच्या अटी आणि शर्तींचा पूर्ण करार सूचित करतो. तेथे पूर्व सूचना न देता अटी व शर्ती बदलल्या जाऊ शकतात.
१) हमी
उत्पादनाचा मर्यादित वॉरंटी कालावधी तीन वर्षांचा आहे.
२) व्याप्ती
ग्राहक सेवेच्या या अटी व शर्ती केवळ अधिकृत वितरकाद्वारे विकल्या जाणार्या उत्पादनांसाठी किंवा इतर कोणत्याही वस्तूंसाठी प्रदान केलेल्या ग्राहक सेवेला लागू होतात.
3) वॉरंटी अपवर्जन:
- वॉरंटी कालबाह्यता.
- फॅक्टरी लागू केलेला अनुक्रमांक उत्पादनातून बदलला आहे किंवा काढून टाकला आहे.
- यामुळे होणारे नुकसान, बिघाड किंवा खराबी:
Wear सामान्य परिधान आणि फाडणे.
Supplies पुरवठा किंवा आमच्या वैशिष्ट्यांनुसार भाग न घेतलेल्या भागांचा वापर.
Warrant वॉरंटिटीचा पुरावा म्हणून कोणतेही प्रमाणपत्र किंवा बीजक नाही.
Warrant वॉरंटी कार्डवर दर्शविलेले उत्पादन मॉडेल दुरुस्तीसाठी उत्पादनाच्या मॉडेलशी जुळत नाही किंवा ते बदलण्यात आले.
Force फोर्स मॅज्युअरमुळे होणारे नुकसान.
Icing सेवा वितरकाद्वारे अधिकृत नाही.
✓ कोणतीही इतर कारणे जी उत्पादनातील दोषांशी संबंधित नाहीत. - उत्पादनाची स्थापना किंवा सेटअपसाठी शिपिंग फी, स्थापना किंवा कामगार शुल्क.
)) दस्तऐवजीकरण:
ग्राहक सेवा वॉरंटी कव्हरेजच्या व्याप्तीमध्ये दोषपूर्ण उत्पादन(ती) स्वीकारेल जेव्हा पराभव स्पष्टपणे परिभाषित केला गेला असेल आणि दस्तऐवज किंवा इनव्हॉइसची प्रत स्वीकारल्यानंतर, खरेदीची तारीख, उत्पादनाचा प्रकार, अनुक्रमांक आणि वितरकाचे नाव.
टिप्पणी: पुढील सहाय्यासाठी किंवा उपायांसाठी कृपया तुमच्या स्थानिक वितरकाशी संपर्क साधा.
कागदपत्रे / संसाधने
 |
VIVO LINK JPEG2000 AVoIP एन्कोडर आणि डिकोडर [pdf] वापरकर्ता मॅन्युअल VLVWIP2000-ENC, VLVWIP2000-DEC, JPEG2000 AVoIP एन्कोडर आणि डिकोडर, JPEG2000, AVoIP एन्कोडर आणि डिकोडर, एन्कोडर आणि डिकोडर, आणि डिकोडर |