![]() HT64
HT64
वापरकर्ता मॅन्युअल![]()
![]()

खबरदारी आणि सुरक्षितता उपाय
इलेक्ट्रॉनिक मापन यंत्रांशी संबंधित IEC/EN61010-1 निर्देशांचे पालन करून उपकरणाची रचना केली गेली आहे. तुमच्या सुरक्षिततेसाठी आणि इन्स्ट्रुमेंटचे नुकसान टाळण्यासाठी, कृपया या मॅन्युअलमध्ये वर्णन केलेल्या प्रक्रियेचे काळजीपूर्वक पालन करा आणि चिन्हाच्या आधीच्या सर्व नोट्स वाचा. ![]() अत्यंत लक्ष देऊन.
अत्यंत लक्ष देऊन.
मोजमाप करण्यापूर्वी आणि नंतर, खालील सूचनांचे काळजीपूर्वक निरीक्षण करा:
- दमट वातावरणात कोणतेही मोजमाप करू नका.
- गॅस, स्फोटक पदार्थ किंवा ज्वलनशील पदार्थ असल्यास किंवा धुळीच्या वातावरणात कोणतेही मोजमाप करू नका.
- कोणतेही मोजमाप केले जात नसल्यास मापन केलेल्या सर्किटशी संपर्क टाळा.
- न वापरलेले मेजरिंग प्रोब, सर्किट्स इत्यादी उघडलेल्या धातूच्या भागांशी संपर्क टाळा.
- साधनामध्ये विकृती, तुटणे, पदार्थ गळती, स्क्रीनवर डिस्प्ले नसणे इ. यांसारख्या विसंगती आढळल्यास कोणतेही मोजमाप करू नका.
- व्हॉल्यूम मोजताना विशेष लक्ष द्याtag20V पेक्षा जास्त आहे, कारण विद्युत शॉकचा धोका असतो.
या मॅन्युअलमध्ये आणि इन्स्ट्रुमेंटवर, खालील चिन्हे वापरली आहेत:
![]() चेतावणी: या मॅन्युअलमध्ये दिलेल्या सूचनांचे पालन करा; अयोग्य वापरामुळे इन्स्ट्रुमेंट किंवा त्याचे घटक खराब होऊ शकतात.
चेतावणी: या मॅन्युअलमध्ये दिलेल्या सूचनांचे पालन करा; अयोग्य वापरामुळे इन्स्ट्रुमेंट किंवा त्याचे घटक खराब होऊ शकतात.
![]() डबल-इन्सुलेटेड मीटर
डबल-इन्सुलेटेड मीटर
![]() एसी व्हॉलtage किंवा वर्तमान
एसी व्हॉलtage किंवा वर्तमान
![]() डीसी व्हॉलtage किंवा वर्तमान
डीसी व्हॉलtage किंवा वर्तमान
![]() पृथ्वीशी संबंध
पृथ्वीशी संबंध
१.१. प्राथमिक सूचना
- हे साधन प्रदूषण डिग्री 2 च्या वातावरणात वापरण्यासाठी डिझाइन केले आहे.
- ते VOL साठी वापरले जाऊ शकतेTAGCAT IV 600V आणि CAT III 1000V सह प्रतिष्ठापनांवर E आणि वर्तमान मोजमाप.
- लाइव्ह सिस्टीमवर ऑपरेशन्स करण्यासाठी आणि वापरकर्त्याचे धोकादायक प्रवाह आणि इन्स्ट्रुमेंटच्या चुकीच्या वापरापासून संरक्षण करण्यासाठी विहित PPE वापरण्याच्या प्रक्रियेद्वारे तयार केलेल्या सामान्य सुरक्षा नियमांचे पालन करण्याची आम्ही शिफारस करतो.
- व्हॉल्यूमच्या उपस्थितीचे संकेत नसतानाहीtage ऑपरेटरसाठी धोक्याचे प्रतिनिधित्व करू शकते, लीड्सचे योग्य कनेक्शन आणि स्थिती निश्चित करण्यासाठी, लाइव्ह सिस्टमवर मापन करण्यापूर्वी नेहमीच निरंतरता मापन करा.
- इन्स्ट्रुमेंटसह पुरविलेले लीडच सुरक्षा मानकांचे पालन करण्याची हमी देतात. ते चांगल्या स्थितीत असले पाहिजेत आणि जेव्हा आवश्यक असेल तेव्हा ते समान मॉडेलसह बदलले जावे.
- निर्दिष्ट व्हॉल्यूमपेक्षा जास्त सर्किट्सची चाचणी करू नकाtage मर्यादा.
- § 6.2.1 मध्ये दर्शविलेल्या मर्यादेपेक्षा जास्त पर्यावरणीय परिस्थितीत कोणतीही चाचणी करू नका.
- बॅटरी योग्यरित्या घातली आहे का ते तपासा.
- एलसीडी डिस्प्ले आणि रोटरी स्विच समान कार्य दर्शवत असल्याची खात्री करा.
१.२. वापरा दरम्यान
कृपया खालील शिफारसी आणि सूचना काळजीपूर्वक वाचा:
![]() खबरदारी
खबरदारी
सावधगिरीच्या नोट्स आणि/किंवा सूचनांचे पालन करण्यात अयशस्वी झाल्यास इन्स्ट्रुमेंट आणि/किंवा त्याचे घटक खराब होऊ शकतात किंवा ऑपरेटरसाठी धोक्याचे स्रोत असू शकतात.
- रोटरी स्विच सक्रिय करण्यापूर्वी, मोजले जात असलेल्या सर्किटमधून चाचणी लीड्स डिस्कनेक्ट करा.
- जेव्हा इन्स्ट्रुमेंट मोजल्या जात असलेल्या सर्किटशी जोडलेले असते, तेव्हा कोणत्याही न वापरलेल्या टर्मिनलला स्पर्श करू नका.
- बाह्य व्हॉल्यूमच्या बाबतीत प्रतिकार मोजू नकाtages उपस्थित आहेत; जरी इन्स्ट्रुमेंट संरक्षित असले तरीही, एक जास्त व्हॉल्यूमtagई खराबी होऊ शकते.
- मापन करताना, मूल्य किंवा मोजल्या जाणार्या प्रमाणाचे चिन्ह अपरिवर्तित राहिल्यास, HOLD कार्य सक्षम आहे का ते तपासा.
१.३. वापरानंतर
- When measurement is complete, set the rotary switch to OFF to switch off the instrument.
- जर इन्स्ट्रुमेंट जास्त काळ वापरायचे नसेल तर बॅटरी काढून टाका.
१.४. मापनाची व्याख्या (ओव्हरव्होलTAGइ) श्रेणी
मानक “IEC/EN61010-1: मापन, नियंत्रण आणि प्रयोगशाळेच्या वापरासाठी विद्युत उपकरणांसाठी सुरक्षा आवश्यकता, भाग 1: सामान्य आवश्यकता”, कोणत्या मापन श्रेणीला सामान्यतः ओव्हरव्हॉल म्हणतात ते परिभाषित करतेtage category, is. § 6.7.4: Measured circuits, reads: (OMISSIS)
सर्किट्स खालील मापन श्रेणींमध्ये विभागली आहेत:
- मापन श्रेणी IV लोव्होलच्या स्त्रोतावर केलेल्या मोजमापांसाठी आहेtagई स्थापना. उदाamples म्हणजे वीज मीटर आणि प्राथमिक ओव्हरकरंट संरक्षण उपकरणे आणि रिपल कंट्रोल युनिट्सवरील मोजमाप.
- मापन श्रेणी III इमारतींच्या आतील स्थापनेवर केलेल्या मोजमापांसाठी आहे. उदाampलेस म्हणजे वितरण बोर्ड, सर्किट ब्रेकर, वायरिंग, केबल्स, बस-बार, जंक्शन बॉक्स, स्विचेस, फिक्स्ड इन्स्टॉलेशनमधील सॉकेट-आउटलेट, आणि औद्योगिक वापरासाठी उपकरणे आणि इतर काही उपकरणे, उदा.ample, स्थिर स्थापनेशी कायमस्वरूपी कनेक्शनसह स्थिर मोटर्स.
- मापन श्रेणी II लो-व्हॉल्यूमशी थेट जोडलेल्या सर्किट्सवर केलेल्या मोजमापांसाठी आहेtagई स्थापना. उदाampलेस हे घरगुती उपकरणे, पोर्टेबल टूल्स आणि तत्सम उपकरणांवर मोजमाप आहेत.
- मापन श्रेणी I MAINS शी थेट कनेक्ट नसलेल्या सर्किट्सवर केलेल्या मोजमापांसाठी आहे. उदाampलेस हे MAINS वरून घेतलेल्या नसलेल्या सर्किट्सवरील मोजमाप आहेत आणि विशेष संरक्षित (अंतर्गत) MAINS-व्युत्पन्न सर्किट आहेत. नंतरच्या बाबतीत, क्षणिक ताण परिवर्तनशील असतात; त्या कारणास्तव, मानकांना आवश्यक आहे की उपकरणांची क्षणिक प्रतिकार क्षमता वापरकर्त्यास ज्ञात केली गेली आहे.
सामान्य वर्णन
साधन खालील मोजमाप करते:
- DC/AC/AC+DC TRMS Voltage
- DC/AC व्हॉल्यूमtage कमी प्रतिबाधासह (LoZ)
- DC/AC/AC+DC TRMS Current
- DC/AC/AC+DC TRMS Current with transducer clamps
- AC, AC+DC TRMS current
- 4-20mA% डिस्प्ले
- प्रतिकार आणि सातत्य चाचणी
- डायोड चाचणी
- क्षमता
- वारंवारता
- कर्तव्य सायकल
- के-प्रकार प्रोबसह तापमान
- Data Logger function and display of graphs of measured data
यापैकी प्रत्येक फंक्शन योग्य स्विचद्वारे निवडले जाऊ शकते. इन्स्ट्रुमेंट फंक्शन की (पहा § 4.2), अॅनालॉग बारग्राफ आणि एलसीडी टीएफटी हाय-कॉन्ट्रास्ट कलर डिस्प्लेसह सुसज्ज आहे. इन्स्ट्रुमेंट ऑटो पॉवर ऑफ फंक्शनने सुसज्ज आहे जे ठराविक (प्रोग्राम करण्यायोग्य) निष्क्रिय वेळेनंतर इन्स्ट्रुमेंट आपोआप बंद करते.
२.१. सरासरी मूल्ये आणि TRMS मूल्ये मोजणे
पर्यायी परिमाणांची मोजमाप साधने दोन मोठ्या कुटुंबांमध्ये विभागली आहेत:
- AVERAGE-VALUE मीटर: मूलभूत वारंवारता (50 किंवा 60 Hz) वर एकमेव लहरीचे मूल्य मोजणारी उपकरणे.
- TRMS (ट्रू रूट मीन स्क्वेअर) VALUE मीटर: चाचणी होत असलेल्या प्रमाणाचे TRMS मूल्य मोजणारी उपकरणे.
उत्तम प्रकारे साइनसॉइडल वेव्हसह, दोन उपकरणांचे कुटुंब समान परिणाम प्रदान करतात.
विकृत लहरींसह, त्याऐवजी, वाचन भिन्न असतील. सरासरी-मूल्य मीटर एकमेव मूलभूत लहरचे RMS मूल्य प्रदान करतात; TRSM मीटर, त्याऐवजी, हार्मोनिक्ससह (इन्स्ट्रुमेंट्स बँडविड्थमध्ये) संपूर्ण वेव्हचे RMS मूल्य प्रदान करतात. म्हणून, दोन्ही कुटूंबातील उपकरणांसह समान प्रमाण मोजून, प्राप्त केलेली मूल्ये एकसारखी असतात जर तरंग पूर्णपणे साइनसॉइडल असेल. जर ते विकृत झाले असेल तर, TRMS मीटर सरासरी-मूल्य मीटरने वाचलेल्या मूल्यांपेक्षा उच्च मूल्य प्रदान करतील.
२.२. ट्रू रूट मीन स्क्वेअर व्हॅल्यू आणि क्रेस्ट फॅक्टरची व्याख्या
विद्युत् प्रवाहाचे मूळ चौरस मूल्य खालीलप्रमाणे परिभाषित केले आहे: “कालावधीच्या बरोबरीच्या काळात, 1A तीव्रतेच्या मूळ वर्ग मूल्यासह पर्यायी प्रवाह, रेझिस्टरवर फिरत असताना, त्याच वेळी, त्याच उर्जेचा विघटन होतो, 1A च्या तीव्रतेसह थेट करंटद्वारे विसर्जित केले जाईल”. या व्याख्येचा परिणाम संख्यात्मक अभिव्यक्तीमध्ये होतो:
![]() रुट मीन स्क्वेअर व्हॅल्यू आरएमएस या संक्षेपाने दर्शविली जाते.
रुट मीन स्क्वेअर व्हॅल्यू आरएमएस या संक्षेपाने दर्शविली जाते.
क्रेस्ट फॅक्टरची व्याख्या सिग्नलचे पीक व्हॅल्यू आणि त्याच्यामधील संबंध म्हणून केली जाते
आरएमएस मूल्य: सीएफ![]() हे मूल्य सिग्नल वेव्हफॉर्मसह बदलते, पूर्णपणे साइनसॉइडल वेव्हसाठी ते आहे
हे मूल्य सिग्नल वेव्हफॉर्मसह बदलते, पूर्णपणे साइनसॉइडल वेव्हसाठी ते आहे ![]() विकृतीच्या बाबतीत, तरंग विकृती वाढते म्हणून क्रेस्ट फॅक्टर उच्च मूल्ये घेते.
विकृतीच्या बाबतीत, तरंग विकृती वाढते म्हणून क्रेस्ट फॅक्टर उच्च मूल्ये घेते.
वापरासाठी तयारी
३.१. प्रारंभिक तपासण्या
शिपिंग करण्यापूर्वी, इन्स्ट्रुमेंटची इलेक्ट्रिक तसेच यांत्रिक बिंदूपासून तपासणी केली गेली आहे view. सर्व संभाव्य खबरदारी घेण्यात आली आहे जेणेकरुन इन्स्ट्रुमेंटला कोणतेही नुकसान होऊ नये. तथापि, वाहतुकीदरम्यान होणारे संभाव्य नुकसान शोधण्यासाठी आम्ही सामान्यतः इन्स्ट्रुमेंट तपासण्याची शिफारस करतो. विसंगती आढळल्यास, फॉरवर्डिंग एजंटशी त्वरित संपर्क साधा. पॅकेजिंगमध्ये § 6.3.1 मध्ये सूचित केलेले सर्व घटक आहेत हे तपासण्याची आम्ही शिफारस करतो. विसंगती आढळल्यास, कृपया डीलरशी संपर्क साधा. जर इन्स्ट्रुमेंट परत केले जावे, तर कृपया § 7 मध्ये दिलेल्या सूचनांचे अनुसरण करा.
३.२. इन्स्ट्रुमेंट वीज पुरवठा
The instrument is powered by 1×7.4V rechargeable Li-ION battery included in the package. When the battery is flat, the symbol “![]() ” appears on the display. For battery recharge, please refer to § 6.1.
” appears on the display. For battery recharge, please refer to § 6.1.
७.३. स्टोरेज
तंतोतंत मोजमापाची हमी देण्यासाठी, दीर्घ स्टोरेज वेळेनंतर, साधन सामान्य स्थितीत येण्याची प्रतीक्षा करा (§ 7.1.3 पहा).
संख्या
४.१. इन्स्ट्रुमेंटचे वर्णन

मथळा:
- एलसीडी डिस्प्ले
- फंक्शन की F2
- फंक्शन की F3
- फंक्शन की F1
- फंक्शन की F4
- रेंज की
- HOLD/REL key
- रोटरी सिलेक्टर स्विच
- इनपुट टर्मिनल 10A
- इनपुट टर्मिनल

- Input terminal mAuA
- इनपुट टर्मिनल COM
४.२. फंक्शन की चे वर्णन
4.2.1. HOLD/REL key
Pressing the HOLD/REL key freezes the value of the measured quantity on the display. After pressing this key, the message “Hold” appears on the display. Press the HOLD/REL key again to exit the function. To save the vale on the display, see § 4.3.3. Press and hold the HOLD/REL key for a long time in order to activate/deactivate relative measurement. The instrument zeroes the display and saves the displayed value as a reference value which subsequent measurements will be referred to (see § 4.3.4). The symbol “A” appears on the display. This function is not active in position![]() . Press and hold the HOLD/REL key again to exit the function.
. Press and hold the HOLD/REL key again to exit the function.
४.२.२. रेंज की
Press the RANGE key to activate the manual mode and to disable the Autorange function. The message “Manual” appears on the upper left part of the display instead of “AUTO”. In manual mode, press the RANGE key to change measuring range: the relevant decimal point will change its position. The RANGE key is not active in positions![]() Hz%,
Hz%, ![]() . In Autorange mode, the instrument selects the most appropriate ratio for carrying out measurement. If a reading is higher than the maximum measurable value, the indication “O.L” appears on the display. Press and hold the RANGE key for more than 1 second to exit the manual mode and restore the Autorange mode.
. In Autorange mode, the instrument selects the most appropriate ratio for carrying out measurement. If a reading is higher than the maximum measurable value, the indication “O.L” appears on the display. Press and hold the RANGE key for more than 1 second to exit the manual mode and restore the Autorange mode.
4.2.3. Function keys F1, F2, F3, F4
Use keys F1, F2, F3 and F4 to manage the instrument’s internal functions (see § 4.3).
४.२.५. LoZ वैशिष्ट्य
हा मोड एसी/डीसी व्हॉल्यूम करण्यासाठी परवानगी देतोtagस्ट्रे व्हॉल्यूममुळे चुकीचे वाचन टाळण्यासाठी कमी इनपुट प्रतिबाधासह e मापनtage कॅपेसिटिव्ह जोडलेले.
![]() खबरदारी
खबरदारी
फेज आणि ग्राउंड कंडक्टरमध्ये इन्स्ट्रुमेंट घालणे, चाचणी दरम्यान RCDs संरक्षण उपकरणे बाहेर जाऊ शकतात. फेज-पीई व्हॉल्यूमसाठीtage measurement after a RCD device preliminarily connect the test leads between phase and neutral cables at least for 5s, then perform the phase-PE measurement to avoid unexpected trips-out
4.2.5. LEAD message at display
From instrument switch off (OFF), in the ![]() positions a short sound is emitted and a “LEAD” message is shown for a while to indicate an advise of using test leads for the current measurements.
positions a short sound is emitted and a “LEAD” message is shown for a while to indicate an advise of using test leads for the current measurements.
4.3. DESCRIPTION OF INTERNAL FUNCTIONS
4.3.1. Description of the display
 मथळा:
मथळा:
- स्वयंचलित/मॅन्युअल मोडचे संकेत
- सिस्टमच्या वेळेचे संकेत
- Indication of battery charge level and activation/deactivation of key tone (not associated with continuity test)
- मापन युनिटचे संकेत
- परिणाम मोजण्याचे संकेत
- अॅनालॉग बारग्राफ
- Indications associated with function keys F1, F2, F3, F4
4.3.2. AC+DC Voltage आणि वर्तमान मोजमाप
हे साधन सामान्य व्हॉल्यूमवर आच्छादित पर्यायी घटकांची संभाव्य उपस्थिती मोजण्यास सक्षम आहेtage किंवा वर्तमान डायरेक्ट वेव्हफॉर्म. नॉन-लिनियर लोड्सचे (उदा. वेल्डिंग मशीन, इलेक्ट्रिक ओव्हन इ.) ठराविक आवेगपूर्ण सिग्नल मोजताना हे उपयुक्त ठरू शकते.
- स्थान निवडा
 .
. - Press the F2 key selecting the “
 " " किंवा " ” modes (see Fig. 3)
 - Follow the instructions shown in § 5.1 or § 5.9
 4.3.3. HOLD function and saving

- Press the HOLD/REL key again to freeze the result. The message “Hold” appears onthe display.
- Press the F3 key to save the data in the instrument’s memory.
- Enter the General menu to display the saved result (see § 4.3.7)
४.३.५. सापेक्ष मापन

- Press and hold the HOLD/REL key to enter relative measurement (see Fig. 5 – right side). The message “REL” and symbol “
 "डिस्प्लेवर दिसेल.
 - Press the F4 key to enter the General menu, save the measured result and display it (see § 4.3.7).
4.3.5. Saving MIN/MAX/AVERAGE and PEAK values 
- Press the F4 key to enter the measuring mode of MAX, MIN and Average values of the quantity to be measured (see Fig. 6 – central part). The message “MAX MIN” appears on the display.
- The values are automatically updated by the instrument, which emits a short beep whenever the actually displayed values are exceeded (higher for MAX value, lower for MIN value).
- Press the F2 key to stop detecting the values and the F1 key to start measuring again.
- Press the F3 key to save the measured result (see Fig. 6 – right side) and display it (see § 4.3.7).

- Press the F4 key to enter the measuring mode of Peak values of the quantity to be measured (see Fig. 7 – right side). The message “PEAK” appears on the display and the values are updated in the same way as for the MAX/MIN function.
- Press the F2 key to stop detecting the values and the F1 key to start measuring again.
- Press the F3 key to save the result and display it (see § 4.3.7).
4.3.6. Creating and saving graphs of measurements

- Press the F1 key to enter the section for creating a graph of the quantity to be measured (see Fig. 8 – left side).
- Press the F2 (Fast) or F3 (Slow) key to set the sampling interval the instrument will use as a reference when creating the graph. You can choose among the following values: 0.2s, 0.5s, 1.0s, 2.0s, 5.0s, 10s
- Press the F1 key to start creating the graph. The measuring range (automatically inserted by the instrument) and the real-time value are displayed by the instrument (see Fig. 8 – central part).
- Press the F4 key to end the graph.
- Press the F1 key to save the graph in the instrument’s memory or the F4 key to start a new graph (see Fig. 8 – right side).
4.3.7. Instrument general menu
- With a measurement on the display (see Fig. 9 – left side), press function key F3 to enter the instrument’s general menu. The screen (see Fig. 9 – right side) is shown on the display.
 बचत मोजमाप
 - Press the F1 (ENTER) key to save the measurement.
Recording data (Logger) - Use the F2 or F3 key to select symbol “Record” and press the F1 key (see Fig. 10 – left side).

- Use the F2 or F3 key to select:
➢ Setting of recording duration, from 1min to 23h:59min
➢ Setting of sampling interval from 1s to 59min:59s - Press the F1 key to enable the editing functions and the F2 (+) and F3 (>>) keys to carry out the desired settings.
- Press the F1 (OK) key to confirm the settings or the F4 (CANCEL) key to go back to editing (see Fig. 10 – right side).
- Press the key F4 (CLOSE) to go back to the main screen
- Select the option “Start Recording” and press the F1 key. The following screen appears on the display

- The instrument shows the remaining time and the number of samples taken in real time, and the message “Stopped” at the end of recording (see Fig. 11 – left side). Press the F4 (STOP) key to stop recording at any time.
- Press the F2 key to save recorded data in the internal memory and view it again on the display
- Press the F3 (TREND) key to display the trend of recording (see Fig. 11 – central part).
- Press the F4 (>>) key to move the cursor on the graph and the F2 (+) key to activate the Zoom function of the graph, increasing resolution (symbol “Xy” where y=max zoom dimension appears at the top of the display on the right side) (see Fig. 11 – right side). You can zoom X1 for at least 15 measuring points, X2 for at least 30 measuring points, X3 for at least 60 measuring points and so on for maximum 6 zooming operations.
- Press the F4 (BACK) key to go back to the previous screen. Deleting the instrument’s memory
- Use the F2 or F3 key to select symbol “Delete” and press the F1 key (see Fig. 12 – left side).
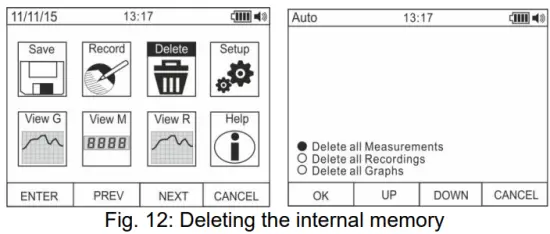
- Use the F2 or F3 key to select the options:
➢ Delete all Measurements → all snapshots (measurements) are deleted
➢ Delete all Recordings → all recordings are deleted
➢ Delete all Graphs → all graphs are deleted. - Press the F1 (OK) key to carry out the selected operation (a confirmation message is shown by the instrument). General settings of the instrument
- Use the F2 or F3 key to select symbol “Setup” and press the F1 key (see Fig. 13 – left side).

- Use the F2 or F3 key to select the options:
➢ Reset → restores the instrument’s default conditions.
➢ Format → allows activating the key tone, setting the format of date/time and of the displayed numbers (decimal comma or point).
➢ General → allows setting the system’s date/time, defining the Auto Power OFF interval, the background colour and the display’s font colour and type, and choosing the system’s language.
➢ Meter Info → provides information on the internal Firmware version and on the memory’s available space. - Press the F1 (ENTER) key to carry out the selected operation or the F4 (CANCEL) key to go back to the measuring screen. General settings of the instrument – Reset

- Press the F1 (OK) key to activate the Reset.
- The Reset operation do not deletes the instrument’s internal memory
General settings of the instrument – Format
- Use the F2 or F3 key to select the options:➢ Key tone → allows activating/deactivating the tone of the function keys.
➢ Numeric Format → allows defining the format of the numbers shown on the display among the options: 0.000 (decimal point) and 0,000 (comma)
➢ Date Format → allows defining the format of the system date between the options: MM/DD/YY and DD/MM/YY
➢ Time Format → allows defining the format of the system time between the options: - OURS and 24 HOURS
- Use the F1 (EDIT) key and the F2 and F3 keys for settings or the F4 key to go back to the previous screen. General settings of the instrument – Display

- Use the F2 or F3 key to select the options:
➢ Set Date → allows setting the system’s date as defined in the Format menu.
➢ Set Time → allows setting the system’s time as defined in the Format menu.
➢ Auto Power OFF → allows defining the instrument’s auto power off interval when idling in the range: 5min 60min with resolution 1min. Set value 00 to disable the function. Press the F3 key to switch on the instrument again after it has automatically switched off.
➢ Foreground → allows defining the display’s background colour and the colour of the font.
➢ Select Font → allows defining the type of font or the display among the available options (0, 1, 2).
➢ Language → allows selecting the system’s language among the options: Italian, English, Spanish, German and French
General settings of the instrument – Instrument Info
- The instrument shows the following information:
➢ Firmware version → internal Firmware version
➢ Free memory → percentage values of the remaining free space in the memory for saving snapshots (SAVE), recordings (REC) and graphs (GRAPH). - Press the F4 key to go back to the previous screen Recalling graphs to the display

- Use the F2 or F3 key to select symbol “View G” and press the F1 key (see Fig. 18 – left side).
- Use the F2 (PREV) or F3 (NEXT) keys to select the desired graph among the ones saved in the instrument’s memory and press key F1 (ENTER) to open the graph (see Fig. 18 – central part).
- Use the F2 (<<) or F3 (>>) keys to move the cursor within the graph in the two directions, observing the corresponding value at the bottom of the display (see Fig. 18 – right side).
- Press the F1 (DELETE) key to delete the selected graph or the F4 (BACK) key to go back to the previous screen. Recalling measured data (snapshots) on the display

- Use the F2 or F3 key to select symbol “View M” and press the F1 key (see Fig. 19 – left side).
- Use the F2 (PREV) or F3 (NEXT) key to select and view the desired measure among the ones saved in the instrument’s memory (see Fig. 19 – right side). The measure reference appears at the bottom of the display on the right side.
- Press the F1 (DELETE) key to delete the selected measure or the F4 (CLOSE) key to go back to main screen Recalling recordings to the display

- Use the F2 or F3 key to select symbol “View R” and press the F1 key (see Fig. 20 – left side).
- Use the F2 (PREV) or F3 (NEXT) key to select the desired recording among the ones saved in the instrument’s memory (see Fig. 20 – central part). The recording reference appears at the bottom of the display.
- Press the F1 (TREND) key to display the trend of recording.
- Press the F3 (>>) key to move the cursor on the graph and observe the corresponding value at the bottom of the display.
- Press the F2 (+) key to activate (if available) the zooming function of the graph.
- Press the F1 (DELETE) key to delete the selected recording or the F4 (BACK) key to go back to the previous screen.
Help on line on the display
- Use the F2 or F3 key to select symbol “Help” and press the F1 key (see Fig. 21).
- Use the F2 (UP) or F3 (DOWN) to browse the pages of the context on-line help.
- Press the F4 (CLOSE) key to go back to the main screen
ऑपरेटिंग सूचना
५.१. डीसी, एसी+डीसी व्हीओएलTAGई मापन
![]() खबरदारी
खबरदारी
कमाल इनपुट DC voltage 1000V आहे. खंड मोजू नकाtagया नियमावलीत दिलेली मर्यादा ओलांडली आहे. खंड ओलांडत आहेtage मर्यादांमुळे वापरकर्त्याला विजेचा धक्का बसू शकतो आणि इन्स्ट्रुमेंटचे नुकसान होऊ शकते.

- पोझिशन्स निवडा V Hz% or mV
- इनपुट टर्मिनलमध्ये लाल केबल घाला आणि इनपुट टर्मिनल COM मध्ये काळी केबल.
- रेड लीड आणि ब्लॅक लीड अनुक्रमे स्पॉट्समध्ये ठेवा ज्यामध्ये सर्किटची सकारात्मक आणि नकारात्मक क्षमता मोजली जाईल (चित्र 22 पहा). प्रदर्शन व्हॉल्यूमचे मूल्य दर्शवितेtage.
- डिस्प्ले "OL" संदेश दाखवत असल्यास, उच्च श्रेणी निवडा.
- जेव्हा इन्स्ट्रुमेंटच्या डिस्प्लेवर “-” चिन्ह दिसते, तेव्हा त्याचा अर्थ व्हॉल्यूमtage ची आकृती 22 मधील कनेक्शनच्या संदर्भात उलट दिशा आहे.
- To use the HOLD, RANGE and REL function, see § 4.2.
- For AC+DC measurement, see § 4.3.2 and to use the internal functions, see § 4.3.
४.२. AC VOLTAGई मापन
![]() खबरदारी
खबरदारी
कमाल इनपुट एसी व्हॉल्यूमtage 1000V आहे. खंड मोजू नकाtagया नियमावलीत दिलेली मर्यादा ओलांडली आहे. खंड ओलांडत आहेtage मर्यादांमुळे वापरकर्त्याला विजेचा धक्का बसू शकतो आणि इन्स्ट्रुमेंटचे नुकसान होऊ शकते.

- पोझिशन्स निवडा V Hz% or mV
- In position mV, press the F2 (MODE) key to view symbol “~” on the display.
- इनपुट टर्मिनलमध्ये लाल केबल घाला
 आणि इनपुट टर्मिनल COM मध्ये काळी केबल.
 - रेड लीड आणि ब्लॅक लीड अनुक्रमे सर्किटच्या स्पॉट्समध्ये ठेवा (चित्र 23 पहा). प्रदर्शन व्हॉल्यूमचे मूल्य दर्शवितेtage.
- डिस्प्ले "OL" संदेश दाखवत असल्यास, उच्च श्रेणी निवडा.
- Press the F2 (MODE) key to select measurements “Hz” or “%” in order to display the values of frequency and duty cycle of input voltage. Press the F1(TRIG) key to select the positive or negative half-wave of the function “%”The bargraph is not active in these functions.
- To use the HOLD, RANGE and REL function, see § 4.2.
- To use the internal functions, see § 4.3
५.३. AC/DC VOLTAGकमी प्रतिबाधासह ई मापन (LOZ)
![]() खबरदारी
खबरदारी
कमाल इनपुट AC/DC voltage 600V आहे. खंड मोजू नकाtagया नियमावलीत दिलेली मर्यादा ओलांडली आहे. खंड ओलांडत आहेtage मर्यादांमुळे वापरकर्त्याला विजेचा धक्का बसू शकतो आणि इन्स्ट्रुमेंटचे नुकसान होऊ शकते.

- LoZV स्थिती निवडा
 . The “LoZ” and “DC” symbols are shown
 - Press the MODE (F2) key to select possibly the “AC” measurement
- इनपुट टर्मिनलमध्ये लाल केबल घाला आणि इनपुट टर्मिनल COM मध्ये काळी केबल
- रेड लीड आणि ब्लॅक लीड अनुक्रमे सर्किटच्या इच्छित स्पॉट्समध्ये ठेवा (चित्र 24 पहा) किंवा मोजण्यासाठी सर्किटच्या सकारात्मक आणि नकारात्मक क्षमता असलेल्या स्पॉट्समध्ये (चित्र 22 पहा). प्रदर्शन व्हॉल्यूमचे मूल्य दर्शवितेtage.
- "OL" संदेश सूचित करतो की DC vol चे मूल्यtage कमाल मोजण्यायोग्य मूल्य ओलांडते.
- जेव्हा इन्स्ट्रुमेंटच्या डिस्प्लेवर “-” चिन्ह दिसते, तेव्हा त्याचा अर्थ व्हॉल्यूमtage ची आकृती 22 मधील कनेक्शनच्या संदर्भात उलट दिशा आहे
- To use the HOLD, RANGE and REL function, see § 4.2
- To use the internal functions, see § 4.3
५.४. वारंवारता आणि कर्तव्य सायकल मापन
![]() खबरदारी
खबरदारी
कमाल इनपुट एसी व्हॉल्यूमtage 1000V आहे. खंड मोजू नकाtagया नियमावलीत दिलेली मर्यादा ओलांडली आहे. खंड ओलांडत आहेtage मर्यादांमुळे वापरकर्त्याला विजेचा धक्का बसू शकतो आणि इन्स्ट्रुमेंटचे नुकसान होऊ शकते.

1. Hz% स्थिती निवडा.
2. Press the F2 (MODE) key to select measurements “Hz” or “%” in order to display the values of frequency and duty cycle of input voltage.
3. Insert the red cable into input terminal![]() आणि इनपुट टर्मिनल COM मध्ये काळी केबल.
आणि इनपुट टर्मिनल COM मध्ये काळी केबल.
4. Position the red lead and the black lead respectively in the spots of the circuit to be measured (see Fig. 25). The value of frequency (Hz) or of duty cycle (%) is shown on the display. The bargraph is not active in these functions.
5. To use the HOLD and REL function, see § 4.2.
6. अंतर्गत कार्ये वापरण्यासाठी, § 4.3 पहा
५.५. प्रतिकार मापन आणि सातत्य चाचणी
![]() खबरदारी
खबरदारी
कोणतेही प्रतिकार मापन करण्याचा प्रयत्न करण्यापूर्वी, मोजण्यासाठी सर्किटमधून वीज पुरवठा खंडित करा आणि सर्व कॅपेसिटर असल्यास, डिस्चार्ज झाल्याची खात्री करा.

- स्थान निवडा

- इनपुट टर्मिनलमध्ये लाल केबल घाला आणि इनपुट टर्मिनल COM मध्ये काळी केबल.
- मापन करण्यासाठी सर्किटच्या इच्छित स्पॉट्समध्ये चाचणी लीड्स ठेवा (चित्र 26 पहा). प्रदर्शन प्रतिकाराचे मूल्य दर्शविते.
- डिस्प्ले "OL" संदेश दाखवत असल्यास, उच्च श्रेणी निवडा.
- Press the F2 (MODO) key to select measurement )))” relevant to the continuity test, and position the test leads in the desired spots of the circuit to be measured.
- The value of resistance (which is only indicative) is displayed in 2 and the instrument sounds if the value of resistance is <50Ω
- To use the HOLD, RANGE and REL function, see § 4.2.
- To use the internal functions, see § 4.3.
४.६. डायोड चाचणी
![]() खबरदारी
खबरदारी
कोणतेही प्रतिकार मापन करण्याचा प्रयत्न करण्यापूर्वी, मोजण्यासाठी सर्किटमधून वीज पुरवठा खंडित करा आणि सर्व कॅपेसिटर असल्यास, डिस्चार्ज झाल्याची खात्री करा.

- स्थान निवडा
- Press the F2 (MODE) key to select “+” measurement.
- इनपुट टर्मिनलमध्ये लाल केबल घाला आणि इनपुट टर्मिनल COM मध्ये काळी केबल.
- तपासल्या जाणार्या डायोडच्या टोकाला लीड्स ठेवा (चित्र 27 पहा), दर्शविलेल्या ध्रुवीयतेचा आदर करा. थेट ध्रुवीकृत थ्रेशोल्ड व्हॉल्यूमचे मूल्यtage डिस्प्लेवर दाखवले आहे.
- If threshold value is equal to OmV, the P-N junction of the diode is short-circuited.
- जर डिस्प्लेने "OL" संदेश दर्शविला, तर डायोडचे टर्मिनल अंजीर 27 मध्ये दिलेल्या संकेतानुसार उलटले आहेत किंवा डायोडचे PN जंक्शन खराब झाले आहे.
- To use the HOLD and REL function, see § 4.2.
- To use the internal functions, see § 4.3.
५.७. क्षमता मोजमाप
![]() खबरदारी
खबरदारी
सर्किट्स किंवा कॅपॅसिटरवर कॅपॅसिटन्स मोजण्याआधी, तपासल्या जात असलेल्या सर्किटमधून वीजपुरवठा खंडित करा आणि त्यातील सर्व कॅपेसिटन्स डिस्चार्ज होऊ द्या. मल्टीमीटर आणि कॅपॅसिटन्स जोडताना, योग्य ध्रुवीयतेचा आदर करा (आवश्यक असेल तेव्हा).

- स्थान निवडा
- Press the F2 (MODE) key until the symbol “nF” is displayed.
- इनपुट टर्मिनलमध्ये लाल केबल घाला आणि इनपुट टर्मिनल COM मध्ये काळी केबल.
- Press the REL/A key before carrying out measurements.
- Position the leads at the ends of the capacitor to be tested, respecting, if necessary, the positive (red cable) and negative (black cable) polarity (see Fig. 28). The display shows the value. Depending on the capacitance, the instrument can take about 20s before displaying the correct final value. The bargraph is not active in this function.
- संदेश "OL" सूचित करतो की कॅपेसिटन्सचे मूल्य कमाल मोजण्यायोग्य मूल्यापेक्षा जास्त आहे.
- To use the HOLD and REL function, see § 4.2.
- To use the internal functions, see § 4.3.
५.८. के-टाइप प्रोबसह तापमान मोजमाप
![]() खबरदारी
खबरदारी
कोणतेही तापमान मापन करण्याचा प्रयत्न करण्यापूर्वी, मोजण्यासाठी सर्किटमधून वीज पुरवठा खंडित करा आणि सर्व कॅपेसिटर असल्यास, डिस्चार्ज असल्याची खात्री करा.

- स्थान निवडा

- Press the F2 (MODE) key until the symbol “°C” or “F” is displayed.
- प्रदान केलेले अडॅप्टर इनपुट टर्मिनल्समध्ये घाला (ध्रुवता +) आणि COM (ध्रुवीयता -) (चित्र 29 पहा)
- Connect the provided K-type wire probe or the optional K-type thermocouple (see § 7.2.2) to the instrument by means of the adapter, respecting the positive and negative polarity on it. The display shows the value of temperature. The bargraph is not active in this function.
- "OL" संदेश सूचित करतो की तापमानाचे मूल्य कमाल मोजण्यायोग्य मूल्यापेक्षा जास्त आहे.
- To use the HOLD and REL function, see § 4.2.
- To use the internal functions, see § 4.3.
5.9. DC, AC+DC CURRENT MEASUREMENT AND E 4-20MA% READING
![]() खबरदारी
खबरदारी
Maximum input DC current is 10A (input 10A) or 600mA (input mAuA). Do not measure currents exceeding the limits given in this manual. Exceeding voltage मर्यादांमुळे वापरकर्त्याला विजेचा धक्का बसू शकतो आणि इन्स्ट्रुमेंटचे नुकसान होऊ शकते.

- मोजण्यासाठी सर्किटमधून वीजपुरवठा खंडित करा.
- Select position µA, एम.ए or 10A 20mA for 4-20mA
 reading. to measure DC current or the same position 4-
 - Insert the red cable into input terminal 10A or into input terminal mAµA and the black cable into input terminal COM.
- ध्रुवीयता आणि वर्तमान दिशेचा मान राखून ज्या सर्किटचा विद्युत् प्रवाह तुम्हाला मोजायचा आहे त्या सर्किटशी लाल शिसे आणि काळ्या शिशाची जोडणी करा (चित्र 30 पहा).
- मोजण्यासाठी सर्किट पुरवठा करा.
- डिस्प्लेवर डीसी करंटचे मूल्य (चित्र 30 – डावीकडे पहा) दिसते.
- The value of reading 4-20mA% (0mA = -25%, 4mA = 0%, 20mA = 100% and 24mA = 125%) (see Fig. 30 right side) appears on the display. The bargraph is not active in this function.
- डिस्प्ले "OL" संदेश दर्शवित असल्यास, कमाल मोजण्यायोग्य मूल्य गाठले आहे.
- जेव्हा इन्स्ट्रुमेंटच्या डिस्प्लेवर “-” चिन्ह दिसते, तेव्हा त्याचा अर्थ असा होतो की आकृती 30 मधील कनेक्शनच्या संदर्भात विद्युत् प्रवाहाची दिशा उलट आहे.
- To use the HOLD, RANGE and REL functions, see § 4.2.
- For AC+DC measurement, see § 4.3.2 and to use the internal functions, see § 4.3
५.१०. एसी वर्तमान मापन
![]() खबरदारी
खबरदारी
Maximum input AC current is 10A (input 10A) or 600mA (input mAuA). Do not measure currents exceeding the limits given in this manual. Exceeding voltage मर्यादांमुळे वापरकर्त्याला विजेचा धक्का बसू शकतो आणि इन्स्ट्रुमेंटचे नुकसान होऊ शकते.

- मोजण्यासाठी सर्किटमधून वीजपुरवठा खंडित करा.
- Select positions μΑ, mA or 10A
- Press the F2 (MODE) key to select “AC” measurement.
- Insert the red cable into input terminal 10A or into input terminal mAµA and the black cable into input terminal COM.
- Connect the red lead and the black lead in series to the circuit whose current you want to measure (see Fig. 31).
- मोजण्यासाठी सर्किट पुरवठा करा. डिस्प्ले विद्युत् प्रवाहाचे मूल्य दर्शविते.
- डिस्प्ले "OL" संदेश दर्शवित असल्यास, कमाल मोजण्यायोग्य मूल्य गाठले आहे.
- To use the HOLD, RANGE and REL functions, see § 4.2.
- To use the internal functions, see § 4.3
5.11. DC, AC, AC+DC CURRENT MEASUREMENT WITH TRANSDUCER CLAMPS
![]() खबरदारी
खबरदारी
- या फंक्शनमधील कमाल वर्तमान मापन 3000A AC किंवा 1000A DC आहे. या मॅन्युअलमध्ये दिलेल्या मर्यादेपेक्षा जास्त प्रवाह मोजू नका
- इन्स्ट्रुमेंट दोन्ही लवचिक ट्रान्सड्यूसर cl वापरून मापन करतेamp (पर्यायी ऍक्सेसरी F3000U) आणि इतर मानक clamp एचटी कुटुंबातील ट्रान्सड्यूसर. ट्रान्सड्यूसरसाठी clamps with HT output connector is necessary the NOCANBA optional adapter in order to perform the connection

- स्थान निवडा

- Press F2(MODE) key to select “AC”, “DC” or “AC+DC” measurement
- ट्रान्सड्यूसर cl वर सेट केलेली समान श्रेणी इन्स्ट्रुमेंटवर निवडण्यासाठी RANGE की दाबाamp among the options: 1000mA, 10A, 30A, 40A (only for HT4006) 100A, 300A, 400A (only for HT4006), 1000A, 3000A. The selected range appear in the top left part of the display
- इनपुट टर्मिनलमध्ये लाल केबल घाला and the black cable into input terminal COM. For other standard transducers (see §) with HT connector use the NOCANBA optional accessory. For information about the use of transducer clamps संबंधित वापरकर्ता पुस्तिका पहा
- जबडाच्या आत केबल घाला (चित्र 32 पहा). करंटचे मूल्य डिस्प्लेवर दिसते
- डिस्प्ले "OL" संदेश दर्शवित असल्यास, कमाल मोजण्यायोग्य मूल्य गाठले आहे
- HOLD, RANGE आणि REL फंक्शन्स वापरण्यासाठी, § 4.2 पहा
- To use the internal functions, see § 4.3
देखभाल
![]() खबरदारी
खबरदारी
- केवळ तज्ञ आणि प्रशिक्षित तंत्रज्ञांनी देखभाल ऑपरेशन करावे. देखभाल कार्ये पार पाडण्यापूर्वी, इनपुट टर्मिनल्समधून सर्व केबल्स डिस्कनेक्ट करा.
- उच्च आर्द्रता पातळी किंवा उच्च तापमान असलेल्या वातावरणात साधन वापरू नका. थेट सूर्यप्रकाशास सामोरे जाऊ नका.
- वापरल्यानंतर इन्स्ट्रुमेंट नेहमी बंद करा. जर इन्स्ट्रुमेंट जास्त काळ वापरायचे नसेल तर, इन्स्ट्रुमेंटच्या अंतर्गत सर्किट्सला हानी पोहोचवू शकणारे द्रव गळती टाळण्यासाठी बॅटरी काढून टाका.
6.1. RECHARGING THE INTERNAL BATTERY
जेव्हा एलसीडी चिन्ह प्रदर्शित करते " ![]() ”, it is necessary to recharge the internal battery.
”, it is necessary to recharge the internal battery.

- रोटरी स्विच बंद करा आणि इनपुट टर्मिनल्समधून केबल्स काढा.
- Insert the adaptor of the battery charger power supply into the instrument, into the four input terminals (see Fig. 33).
- Insert the connector of the power supply into the adapter and connect the power supply to the electric mains.
- A blinking symbol of a green battery appears on the display. The recharging process is complete when the symbol is steady.
- Disconnect the battery charger from the instrument when the operation is complete.
 खबरदारी
If the charging process does not run, check the integrity of the F800mA/1000V protection fuse (see § 7.1.2) and replace it if necessary (see § 6.2)
६.२. अंतर्गत फ्यूजची बदली

- रोटरी स्विच बंद करा आणि इनपुट टर्मिनल्समधून केबल्स काढा.
- Turn the fastening screw of the battery compartment cover from position
 and remove it (see Fig. 34)
 स्थिती करण्यासाठी
 - खराब झालेले फ्यूज काढा आणि त्याच प्रकारचे नवीन फ्यूज घाला (§ 7.1.2 पहा).
- Restore the battery compartment cover into place and turn the fastening screw from position स्थिती करण्यासाठी .
६.२. इन्स्ट्रुमेंट साफ करणे
साधन स्वच्छ करण्यासाठी मऊ आणि कोरडे कापड वापरा. ओले कापड, सॉल्व्हेंट्स, पाणी इत्यादी कधीही वापरू नका.
६.३. आयुष्याचा शेवट
![]() चेतावणी: इन्स्ट्रुमेंटवरील चिन्ह सूचित करते की उपकरण आणि त्याचे सामान स्वतंत्रपणे गोळा केले पाहिजेत आणि त्यांची योग्यरित्या विल्हेवाट लावली पाहिजे.
चेतावणी: इन्स्ट्रुमेंटवरील चिन्ह सूचित करते की उपकरण आणि त्याचे सामान स्वतंत्रपणे गोळा केले पाहिजेत आणि त्यांची योग्यरित्या विल्हेवाट लावली पाहिजे.
तांत्रिक तपशील
३.२. तांत्रिक वैशिष्ट्ये
Accuracy calculated as [%reading + (num. digits*resolution)] at 18°C 28°C <75%HR
डीसी व्हॉलtage
| श्रेणी | ठराव | अचूकता | इनपुट प्रतिबाधा | जादा शुल्कापासून संरक्षण |
| 600.0 मीव्ही | 0.1 मीव्ही | ±(0.1% वाचन + 5 अंक) | >10MW | 1000VDC/ACrms |
| 6.000V | 0.001V | |||
| 60.00V | 0.01V | |||
| 600.0V | 0.1V | ±(0.2% वाचन + 5 अंक) | ||
| 1000V | 1V |
AC TRMS Voltage
| श्रेणी | ठराव | अचूकता (*) | जादा शुल्कापासून संरक्षण | |
| (50Hz¸60Hz) | (61Hz¸1kHz) | |||
| 600.0 मीव्ही | 0.1 मीव्ही | ±(0.9% वाचन + 5 अंक) | ±(3.0% वाचन + 5dgt) | 1000VDC/ACrms |
| 6.000V | 0.001V | |||
| 60.00V | 0.01V | |||
| 600.0V | 0.1V | |||
| 1000V | 1V | |||
(*) Accuracy specified from 10% to 100% of the measuring range, Input impedance: > 9M ;
Accuracy PEAK function: ±(10%rdg + 30dgt), PEAK response time: 1ms
For not sinusoidal waveforms the accuracy is: (10.0%reading + 10dgt)
AC+ DC TRMS Voltage
| श्रेणी | ठराव | Accuracy (*) (50Hz¸1kHz) | इनपुट प्रतिबाधा | जादा शुल्कापासून संरक्षण |
| 6.000V | 0.001V | ±(3.0% वाचन + 20dgt) | >10MW | 1000VDC/ACrms |
| 60.00V | 0.01V | |||
| 600.0V | 0.1V | |||
| 1000V | 1V |
(*) मापन श्रेणीच्या 10% ते 100% पर्यंत अचूकता निर्दिष्ट
For not sinusoidal waveforms the accuracy is: (10.0%reading + 10dgt)
DC/AC TRMS Voltage कमी प्रतिबाधासह (LoZ)
| श्रेणी | ठराव | Accuracy (*) (50Hz¸1kHz) | इनपुट प्रतिबाधा | जादा शुल्कापासून संरक्षण |
| 6.000V | 0.001V | ±(3.0% वाचन+40dgt) | अंदाजे 3kW | 600VDC/ACrms |
| 60.00V | 0.01V | |||
| 600.0V | 0.1V | |||
| 600V | 1V |
(*) मापन श्रेणीच्या 10% ते 100% पर्यंत अचूकता निर्दिष्ट
For not sinusoidal waveforms the accuracy is: (10.0%reading + 10dgt)
डीसी करंट
| श्रेणी | ठराव | अचूकता | संरक्षण विरुद्ध जास्त शुल्क |
| 600.0mA | 0.1mA | ±(0.9% वाचन + 5 अंक) | क्विक फ्यूज 800mA/1000V |
| 6000mA | 1mA | ||
| 60.00mA | 0.01mA | ||
| 600.0mA | 0.1mA | ±(0.9% वाचन + 8 अंक) | |
| 10.00A | 0.01A | ±(1.5% वाचन + 8 अंक) | द्रुत फ्यूज 10A/1000V |
AC TRMS चालू
| श्रेणी | ठराव | अचूकता (*) (50Hz¸1kHz) | संरक्षण विरुद्ध जास्त शुल्क |
| 600.0mA | 0.1mA | ±(1.2% वाचन + 5 अंक) | क्विक फ्यूज 800mA/1000V |
| 6000mA | 1mA | ||
| 60.00mA | 0.01mA | ||
| 600.0mA | 0.1mA | ||
| 10.00A | 0.01A | ±(1.5% वाचन + 5 अंक) | द्रुत फ्यूज 10A/1000V |
(*) Accuracy specified from 5% to 100% of the measuring range; For not sinusoidal waveforms accuracy is: +(10.0%reading + 10dgt)
Accuracy PEAK function: ±(10%rdg+30dgt) , AC+DC TRMS Current: accuracy (50Hz+1kHz): +(3.0%reading + 20dgt)
ट्रान्सड्यूसर cl सह DC करंटamp
| श्रेणी | आउटपुट प्रमाण | ठराव | अचूकता (*) | संरक्षण विरुद्ध जास्त शुल्क |
| 1000mA | 1V/1A | 1mA | ±(1.5%rdg+ 6dgt) | 1000VDC/ACrms |
| 10A | 100mV/1A | 0.01A | ||
| 30A | ||||
| 40A (**) | 10mV/1A | ±(1.5%rdg.+26dgt) (***) | ||
| 100A |
0.1A |
±(1.5%rdg+ 6dgt) | ||
| 300A | ||||
| 400A (**) | 1mV/1A | ±(1.5%rdg.+26dgt) (***) | ||
| 1000A | 1mV/1A | 1A | ±(1.5%rdg+6dgt) | |
| 3000A |
(*) Accuracy referred to only instrument without transducer ; (**) With HT4006 transducer clamp ; (***) Accuracy instrument + clamp
ट्रान्सड्यूसर cl सह AC TRMS करंटamp
| श्रेणी | आउटपुट प्रमाण | ठराव | Accuracy (*) (50Hz¸1kHz) | जादा शुल्कापासून संरक्षण |
| 1000mA | 1V/1A | 1mA | ±(2.5%rdg + 10dgt) | 1000VDC/ACrms |
| 10A | 100mV/1A | 0.01A | ||
| 30A | ||||
| 40A (**) | 10mV/1A | ±(3.5%rdg.+30dgt) (***) | ||
| 100A | 0.1A | ±(2.5%rdg + 10dgt) | ||
| 300A | ||||
| 400A (**) | 1mV/1A | ±(3.5%rdg+30dgt) (***) | ||
| 1000A | 1A | ±(2.5%rdg + 10dgt) | ||
| 3000A |
(*) Accuracy referred to only instrument without transducer ; Accuracy specified from 5% to 100% of the measuring range;
(**) With HT4006 transducer clamp ; (***) Accuracy instrument + clamp
For not sinusoidal waveforms accuracy is: ![]() (10.0%reading + 10dgt)
(10.0%reading + 10dgt)
Accuracy PEAK function: ±(10%rdg+30dgt) , AC+DC TRMS Current: accuracy (50Hz![]() 1kHz):
1kHz): ![]() (3.0%reading + 20dgt)
(3.0%reading + 20dgt)
4-20mA% reading
| श्रेणी | ठराव | अचूकता | पत्रव्यवहार |
| -२५% -१२५% | 0.1% | ±50dgt | 0mA=-25%, 4mA=0%, 20mA=100%, 24mA=125% |
डायोड चाचणी
| कार्य | वर्तमान चाचणी | कमाल खंडtagई ओपन सर्किटसह |
|
|
<1.5mA | 3.2VDC |
वारंवारता (इलेक्ट्रॉनिक सर्किट)
| श्रेणी | ठराव | अचूकता | संरक्षण विरुद्ध जास्त शुल्क |
| 40.00Hz ¸ 10kHz | 0.01Hz ¸ 0.001kHz | ±(०.५% वाचन) | 1000VDC/ACrms |
संवेदनशीलता: 2Vrms
वारंवारता (इलेक्ट्रॉनिक सर्किट)
| श्रेणी | ठराव | अचूकता | जादा शुल्कापासून संरक्षण |
| 6.000Hz | 0.001Hz | ±(0.09%rdg+5 अंक) | 1000VDC/ACrms |
| 60.00Hz | 0.01Hz | ||
| 600.0Hz | 0.1Hz | ||
| 6.000kHz | 0.001kHz | ||
| 60.00kHz | 0.01kHz | ||
| 600.0kHz | 0.1kHz | ||
| 1.000MHz | 0.001MHz | ||
| 10.00MHz | 0.01MHz |
Sensitivity: >2Vrms (@ 20% +80% duty cycle) and f<100kHz; >5Vrms (@ 20% + 80% duty cycle) and f>100kHz
प्रतिकार आणि सातत्य चाचणी
| श्रेणी | ठराव | अचूकता | बजर | जादा शुल्कापासून संरक्षण |
| 600.0W | 0.1W | ±(0.8% वाचन + 10dgt) | <50W | 1000VDC/ACrms |
| 6.000kW | 0.001kW | ±(0.8% वाचन + 5 अंक) | ||
| 60.00kW | 0.01kW | |||
| 600.0kW | 0.1kW | |||
| 6.000MW | 0.001MW | |||
| 60.00MW | 0.01MW | ±(2.5% वाचन + 10dgt) |
कर्तव्य सायकल
| श्रेणी | ठराव | अचूकता |
| ०.५% ¸ ९९% | 0.1% | ±(1.2% वाचन + 2 अंक) |
Pulse frequency range: 40Hz + 10kHz, Pulse amplitude: ±5V (100+s + 100ms)
क्षमता
| श्रेणी | ठराव | अचूकता | संरक्षण विरुद्ध जास्त शुल्क |
| 60.00 एनएफ | 0.01 एनएफ | ±(1.5% वाचन + 20dgt) | 1000VDC/ACrms |
| 600.0 एनएफ | 0.1 एनएफ | ±(1.2% वाचन + 8 अंक) | |
| 6.000 मीएफ | 0.001 मीएफ | ±(1.5% वाचन + 8 अंक) | |
| 60.00 मीएफ | 0.01 मीएफ | ±(1.2% वाचन + 8 अंक) | |
| 600.0 मीएफ | 0.1 मीएफ | ±(1.5% वाचन + 8 अंक) | |
| 6000 मीएफ | 1 मीएफ | ±(2.5% वाचन + 20dgt) |
के-प्रकार प्रोबसह तापमान
| श्रेणी | ठराव | अचूकता (*) | जादा शुल्कापासून संरक्षण |
| -40.0°C ÷ 600.0°C | 0.1°C | ±(1.5% वाचन + 3°C) | 1000VDC/ACrms |
| 600°C ÷ 1350°C | 1°C | ||
| -40.0°F ÷ 600.0°F | 0.1°F | ±(1.5%rdg+ 5.4°F) | |
| 600°F ÷ 2462°F | 1°F |
(*) प्रोबशिवाय उपकरणाची अचूकता; ±1°C वर स्थिर पर्यावरणीय तापमानासह निर्दिष्ट अचूकता
दीर्घकाळ टिकणाऱ्या मोजमापांसाठी, वाचन २°C ने वाढते
७.१.१. संदर्भ मानके
सुरक्षा: IEC/EN61010-1
EMC: IEC/EN 61326-1
इन्सुलेशन: दुहेरी इन्सुलेशन
प्रदूषण पातळी: 2
ओव्हरव्होलtage श्रेणी: CAT IV 600V, CAT III 1000V
७.१.१. सामान्य वैशिष्ट्ये
यांत्रिक वैशिष्ट्ये
आकार (L x W x H): 175 x 85 x 55 मिमी (7 x 3 x 2 इंच)
वजन (बॅटरी समाविष्ट): 400g (14 औंस)
यांत्रिक संरक्षण: IP40
वीज पुरवठा
बॅटरी प्रकार: 1×7.4V रिचार्जेबल Li-ION बॅटरी, 1300mAh
Battery charger power supply: 100/240VAC, 50/60Hz, 10VDC, 1A
कमी बॅटरी संकेत: चिन्ह "![]() "डिस्प्लेवर
"डिस्प्लेवर
बॅटरी आयुष्य: अंदाजे. 15 तास
Auto Power OFF: after 5 60min minutes’ idling (may be disabled)
Fuses: F10A/1000V, 10 x 38mm (input 10A)
F800mA/1000V, 6 x 32mm (input mAuA)
डिस्प्ले
रूपांतरण: TRMS
Characteristics: colour TFT, 6000 dots with bargraph
Sampling frequency: 3 times/s
स्मृती MEASURES → max 2000, GRAPHS → max 50 RECORDINGS → 128 of max 20000 points
७.१.१. वापरासाठी पर्यावरणीय परिस्थिती
संदर्भ तापमान: 18°C ![]() 28°C (64°F
28°C (64°F ![]() 82 ° फॅ)
82 ° फॅ)
Operating temperature: 5°C ÷ 40°C (41°F ![]() 104 ° फॅ)
104 ° फॅ)
अनुमत सापेक्ष आर्द्रता: <80% RH
Storage temperature: -20°C ÷ 60°C (-4°F ![]() 140 ° फॅ)
140 ° फॅ)
स्टोरेज आर्द्रता: <80% RH
कमाल ऑपरेटिंग उंची: 2000m (6562ft)
हे साधन निम्न व्हॉल्यूमच्या आवश्यकता पूर्ण करतेtage निर्देशांक 2014/35/EU (LVD) आणि EMC निर्देश 2014/30/EU
हे साधन युरोपियन निर्देश 2011/65/EU (RoHS) आणि 2012/19/EU (WEEE) च्या आवश्यकता पूर्ण करते
7.2. CCक्सेसरीज
७.३.१. अॅक्सेसरीज पुरवल्या
- 2/4 मिमी टिपांसह चाचणी लीड्सची जोडी
- अडॅप्टर + K-प्रकार वायर प्रोब
- Li-ION rechargeable battery Code BAT64
- Battery charger power supply multiplug + interface Code A64
- Carrying bag and user manual
7.2.2. पर्यायी सहयोगी
- हवा आणि वायू तापमानासाठी के-टाइप प्रोब कोड TK107
- सेमीसोलिड पदार्थ तापमानासाठी के-टाइप प्रोब कोड TK108
- द्रव पदार्थ तापमानासाठी के-टाइप प्रोब कोड TK109
- पृष्ठभाग तापमान कोड TK110 साठी K-प्रकार प्रोब
- 90° टिप कोड TK111 सह पृष्ठभागाच्या तापमानासाठी के-टाइप प्रोब
- लवचिक ट्रान्सड्यूसर clamp AC 30/300/3000A कॉड. F3000U
- मानक ट्रान्सड्यूसर clamp DC/AC 40-400A/1V Cod. HT4006
- मानक ट्रान्सड्यूसर clamp एसी १-१००-१०००A/१V कॉड. HT1U
- मानक ट्रान्सड्यूसर clamp एसी १-१००-१०००A/१V कॉड. HT10U
- मानक ट्रान्सड्यूसर clamp डीसी १०००ए/१व्ही कॉड. एचटी९८यू
- Adapter for standard transducer clamp with HT connector Cod. NOCANBA
सहाय्य
८.१. वॉरंटी अटी
This instrument is warranted against any material or manufacturing defect, in compliance with the general sales conditions. During the warranty period, defective parts may be replaced. However, the manufacturer reserves the right to repair or replace the product. Should the instrument be returned to the After-sales Service or to a Dealer, transport will be at the Customer’s charge. However, shipment will be agreed in advance. A report will always be enclosed to a shipment, stating the reasons for the product’s return. Only use original packaging for shipment. Any damage due to the use of non-original packaging material will be charged to the Customer. The manufacturer declines any esponsibility for injury to people or damage to property.
खालील प्रकरणांमध्ये वॉरंटी लागू होणार नाही:
- अॅक्सेसरीज आणि बॅटरीची दुरुस्ती आणि/किंवा बदली (वॉरंटीमध्ये समाविष्ट नाही).
- इन्स्ट्रुमेंटच्या चुकीच्या वापरामुळे किंवा सुसंगत नसलेल्या उपकरणांसह त्याच्या वापरामुळे आवश्यक असलेल्या दुरुस्ती.
- अयोग्य पॅकेजिंगचा परिणाम म्हणून आवश्यक असलेल्या दुरुस्ती.
- अनधिकृत कर्मचार्यांनी केलेल्या हस्तक्षेपामुळे आवश्यक असलेली दुरुस्ती.
- निर्मात्याच्या स्पष्ट अधिकृततेशिवाय केलेले इन्स्ट्रुमेंटमधील बदल.
- इन्स्ट्रुमेंटच्या वैशिष्ट्यांमध्ये किंवा सूचना मॅन्युअलमध्ये प्रदान केलेला नाही वापरा.
या मॅन्युअलची सामग्री निर्मात्याच्या अधिकृततेशिवाय कोणत्याही स्वरूपात पुनरुत्पादित केली जाऊ शकत नाही.
आमची उत्पादने पेटंट आहेत आणि आमचे ट्रेडमार्क नोंदणीकृत आहेत. जर हे तंत्रज्ञानातील सुधारणांमुळे होत असेल तर विनिर्देश आणि किंमतींमध्ये बदल करण्याचा अधिकार निर्माता राखून ठेवतो.
८.२. सहाय्य
इन्स्ट्रुमेंट योग्यरित्या कार्य करत नसल्यास, विक्रीनंतरच्या सेवेशी संपर्क साधण्यापूर्वी, कृपया बॅटरी आणि केबल्सची स्थिती तपासा आणि आवश्यक असल्यास ते बदला. इन्स्ट्रुमेंट अजूनही अयोग्यरित्या चालत असल्यास, या मॅन्युअलमध्ये दिलेल्या सूचनांनुसार उत्पादन चालवले जात असल्याचे तपासा. इन्स्ट्रुमेंट विक्रीनंतरच्या सेवेकडे किंवा डीलरला परत केले असल्यास, वाहतूक ग्राहकाच्या शुल्कावर असेल. तथापि, शिपमेंट आगाऊ मान्य केले जाईल. उत्पादनाच्या परताव्याची कारणे सांगणारा अहवाल नेहमी शिपमेंटशी संलग्न केला जाईल. शिपमेंटसाठी फक्त मूळ पॅकेजिंग वापरा; मूळ नसलेल्या पॅकेजिंग सामग्रीच्या वापरामुळे होणारे कोणतेही नुकसान ग्राहकाकडून आकारले जाईल.
HT इटालिया SRL
डेला बोरिया मार्गे, 40
48018 – Faenza (RA) – इटली
T + 39 0546 621002
F +39 0546 621144
M info@ht-instrumnents.com
www.ht-instruments.it
HT इन्स्ट्रुमेंट्स SL
सी/ कायदेशीर, 89
08024 बार्सिलोना - स्पेन
T +34 93 408 17 77
F +34 93 408 36 30
M info@htinstruments.es
www.ht-instruments.com/es-es/
HT INSTRUMENTS GmbH
Am Waldfriedhof 1b
D-41352 Korschenbroich – जर्मनी
T +49 (0) 2161 564 581
एफ +49 (0) 2161 564 583
M info@htinstruments.de
www.ht-instruments.de
आम्ही कुठे आहोत
 https://l.ead.me/bcsxjF
© कॉपीराइट HT ITALIA 2024
रिलीज 3.01 - 04/12/2024
कागदपत्रे / संसाधने
 |
HT Instruments HT64 TRMS/AC+DC Digital Multimeter With Colour LCD Display [pdf] वापरकर्ता मॅन्युअल HT64, HT64 TRMS AC DC Digital Multimeter With Colour LCD Display, HT64, TRMS AC DC Digital Multimeter With Colour LCD Display, Digital Multimeter With Colour LCD Display, Multimeter With Colour LCD Display, Colour LCD Display, LCD Display, Display |