डिजीटेक टॉकर अॅडव्हान्स्ड व्होकल सिंथेसिस चांगले

परिचय
Congratulations and thank you for purchasing the DigiTech Talker.
This unique product features IVL Technology’s Advanced Vocal Synthesis which came about through research into physical modeling of the human voice. A radical new break-through in digital signal processing, the Talker actually allows an instrument and a voice to be combined to create expressive effects. The Talker also boasts an actual hard-wired bypass for the instrument and mic inputs to maintain a perfectly clean instrument signal when the effect is not in use.
The Talker has a retro-space-age look and is housed in a heavy duty stainless steel chassis that is both functional and attractive.
एस वरtage or in the studio, the DigiTech Talker is an extremely versatile effect with a wide variety of uses.

Use the Deglitch Talker with:
- गिटार
- ढोल
- कीबोर्ड
- बास
- Drum machines
- सिक्वेन्सर्स
- Pre-recorded Music
Using The Talker
The Talker combines separate inputs (for example a guitar & a vocal) to create unusual vocoder or talking effects. Plug your microphone and guitar into the Talker’s mic and instrument inputs.
एकतर निवडा amp, mixer or “both” effect outputs. Run cables to your amp and P.A. and set the Talker input levels.
Speak or sing into the microphone as you play chords or individual notes on your instrument to achieve the talking effect. Experiment with other devices: sing over a sequencer line, try a keyboard with a vocal or pre-recorded tracks combined with a drum machine.
शक्यता अनंत आहेत!
Press the Program switch with your foot to select between six distinctive program sounds. Press the Bypass switch to by pass the effect.
टीप: If using guitar as an input, a distortion or compression device may be plugged in before the Talker to increase upper harmonics and sustain. Run the output of the distortion box into the instrument input of the Talker. Other effects (like echo) should go after the Talker in the signal chain.
टीप: The Talker allows you to route your effect signal to a guitar amp and a mixer simultaneously. When the Talker effect is being used, the output of the Talker is all effect (100% “wet”). When the Talker is Bypassed, the mic input is passed through to the PA output, and the instrument input to the Amp output, which makes the Talker “invisible” to your recording or sound reinforcement setup. If you have selected the Both option for effects routing, you can balance the levels between the PA and the Amplifier with the PA Level knob.
टीप: If you are using a single output (Amp or PA only), and you don’t hear any effect sound, check that the Effects Routing Switch is set correctly.
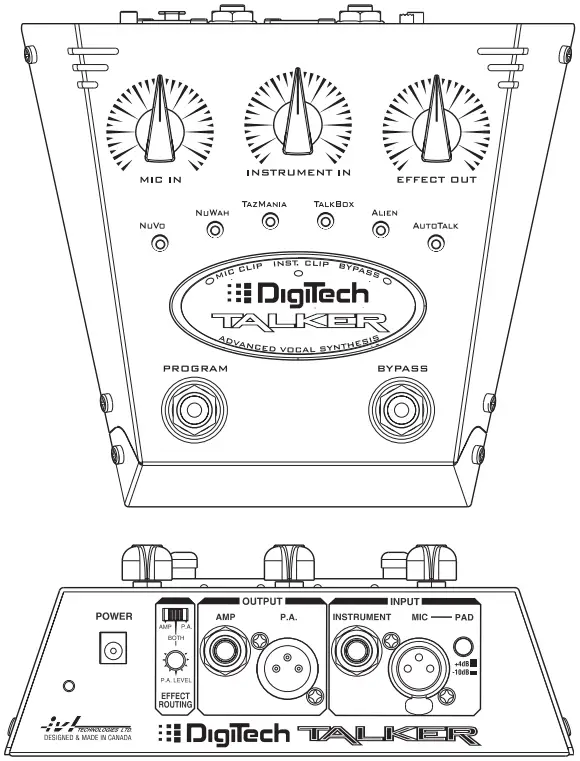
फ्रंट पॅनल
नियंत्रण वर्णन
- Mic. In: adjusts the microphone input level.
- Instrument In: adjusts the instrument input level.
- Effect Out: controls the effect amount to the outputs.
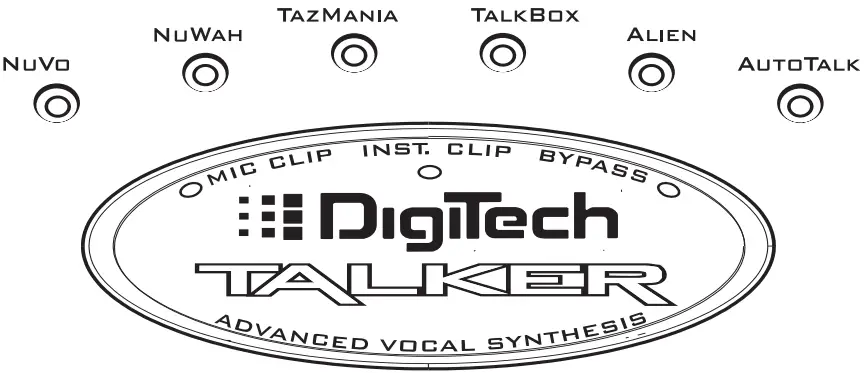
टीप: The above controls have no effect on Bypass levels. - Program LEDs: indicate which Program the Talker is set to.
- Mic Clip LED: An LED flashing green with occasional orange means your input is set properly; red indicates distortion.
- Instrument Clip LED: An LED flashing green with occasional orange means your input is set properly; red indicates distortion.
- बायपास एलईडी: A red LED means that the effect is bypassed.
- प्रोग्राम स्विच: Toggles sequentially between the six Programs.
- बायपास स्विच: Switches Bypass on or off.
In Bypass, the inputs are directly connected to their respective.
आउटपुट: instrument in > amp out, microphone in > P.A. out.
This is a hardwire bypass, as if the Talker isn’t in the chain when bypassed. The mic bypass will be at microphone levels.
बॅक पॅनल
- पॉवर इनपुट: a Harman Pro Group PS-750 power supply is included with your Talker.
- Effect Routing Switch
Amp: effect out to amplifier only (P.A. output muted).
P.A.: effect out to P.A. system (mixer) (Amp output is muted).
दोन्ही: effect to both P.A. and ampएकाच वेळी लाइफायर. - P.A. Level: Active when Effect Routing is in the Both position, this adjusts the level of effect to the P.A. output. This knob has no effect when Effect Routing is set to either Amp or P.A.
इनपुट: - साधन: unbalanced 1/4″ connector (mono) – instrument input.
- माईक: balanced XLR connector (mono) – microphone input.
- पॅड: switchable Microphone input pad (+4dB/-10dB).
आउटपुट: - Amp: unbalanced 1/4″ connector (mono) – connects effect to ampलाइफायर
- P.A.: balanced XLR connector (mono) – connects effect to P.A. system.
Talker Setup
Connect Talker to your system.
- Connect your microphone to the balanced XLR Mic In jack and select the -10 dBV or +4dBV setting with the Pad switch.
टीप: Many mics work at the -10 dBV setting.
- Connect your instrument to the unbalanced 1/4″ Instrument In jack.
- Connect the unbalanced 1/4″ Amp Output to your favorite guitar/instrument ampलाइफायर
- पर्यायी: Connect an XLR cable from PA to your mixer or PA ampलाइफायर
- Select the Effect Routing switch to Amp, P.A. or Both for depending which output(s) you want the effect sound to appear on.
- Power up the Talker by plugging the AC adaptor cable into the Power Input jack.
टीप: The Talker powers up in bypass mode with Nuvo preset selected (which takes approximately 5 seconds)
Ground loop note: When you use both the PA and Amp outputs, there is the possibility of hum due to ground loops between your amp and the PA system. If you experience hum in this setup, use only a proper audio ground lifting device such as one found in a DI box.
Amplifier distrotion note: If you prefer to use the the preamp distortion from your amplifier instead of running a distortion box before the Talker, you will hear less Talker effect unless you run the Talker into the effects loop of your amp. The effects loop adds preamplifier distortion before the Talker which makes the effect more distinct.
Setting the Bypass levels.
- Select By pass (the By pass LED should be on).
- Set your instrument and amp levels the way you normally do. If you have the P.A. output connected, adjust the levels on the P.A. to settings you normally use.
टीप: For maximum enjoyment, it’s important to set up the proper levels for the Talker effect.
Setting the Mic input level.
- Turn Bypass off (the Bypass LED should be off).
- Set the Mic level by singing or talking into the microphone at your
loudest performance volume while adjusting the Mic In knob. The Mic Clip LED should be green, just tickling the orange. If the LED is red, you have too much input. If the Mic level is still too hot press the pad switch to the +4 dBu setting.
टीप: Because the Talker defaults to the Nuvo pre-set on power up, you will not hear anything until you talk or sing and play at the same time. Also, keep in mind that the volume of your singing voice controls the volume of the Talker effect.
Setting the Instrument level.
- Bypass should still be off.
- Watch the Instrument Clip LED while you play. Adjust the Instrument In knob until the Clip LED is green, just tickling the orange. If the LED is red, you have too much input.
टीप: Once again, if you are in the Nuvo preset then you’ll hear output only when you talk and play at the same time.
Setting the levels between the Effect and the Bypassed sound.
- Sing or talk into the Mic while playing your instrument, to hear the Talker “effect”.
- Switch in and out of Bypass and adjust the Effect Out knob until you find the right balance between your instrument and the Talker. If the effect sound is louder than your instrument sound in Bypass, turn down the Effect Out knob until it is the same (or maybe a little louder for soloing purposes).
टीप: It is best not to adjust your instrument’s output level while doing this – use the Effect Out Knob for more or less volume.
Setting the balance between the Amp output and the PA output
When you have set up both an amplifier and a mixer as outputs, and you have chosen “Both” with the Effect Routing Switch, you may want to use the PA Level knob on the back panel to balance the relative volume of the effect signal going to the PA output with the bypassed mic volume. It can also be used to balance the level of the PA output compared to the Amp आउटपुट
टीप: This control has no effect on the Bypassed signal
टीप: The PA output when using the Talker effect is an amplified signal, and is capable of much higher levels than the bypassed mic signal. You may want to trim the effect level back with the PA Level knob to match your mixer’s input.
कार्यक्रमाचे वर्णन
- Nuvo: This is the most intelligible program. Play a chord and speak or sing into the mic and you will be able to hear the words clearly.
- NuWah: (Guitar effect only, no vocal needed). This is an automatic wah feature that is somewhat like an envelope follower but the wah is very human sounding.
- Taz Mania: (Use instrument and mic, or mic alone). This program uses white noise to generate a devilish voice. The gate feature is active so that the user can switch back and forth between the effect and the guitar sound without pressing the Bypass switch.
- Talk Box: This program features vocoder which has been EQ’d to sound more like the old Talk boxes such as the “Golden Throat”, Heil “Talk Box”, etc.
- Alien: This program features an old style vocoder or alien sounding effect.
- Auto Talk: This is an automatic vocoder-type effect. Play your guitar with the effect on (you’ll hear the normal guitar sound), then sing or say something into the mic. This will automatically switch into the Auto Talk effect. When you finish vocalizing, the Talker will automatically switch back to your guitar sound.
Some Suggested Applications
Guitar & Microphone With Distortion:
One way to set up when you are using guitar and some effects is to place your Talker after the distortion or compression effects. Using distortion with a guitar into the Talker can increase intelligibility and sustain. Other effects such as echo, reverb, phasor and flange, should be added after the Talker.
Drum Machine Loop:
Run the left and right outputs of a drum machine into the Mic Input and the Instrument Input of the Talker. Set the input levels and adjust the Effect Output. You may need a 1/4″ to XLR cable adapter for the Mic In. Try taking drums with different rhythms and panning them hard left and hard right to hear them modulate against each other.
Keyboard/Drum Machine:
Connect a synthesizer or sampler to the Instrument Input and a drum machine into the Mic Input to achieve a rhythmic keyboard effect. Try using a sustained string or pad type of keyboard sound. Also try modulating a sustaining bass sound or a sub-bass waveform with just the bass drum output of a drum machine or a recorded bass or bass drum track.
Bass/Vocal:
Same set-up as a guitar. For maximum effect use distortion or compression effects before the Talker Input.
Pre-recorded loop:
Run the stereo outputs of a CD or tape player into the Mic Input and the Instrument Input of the Talker. Set the Input levels and adjust the Effect Output. You may need a 1/4″ to XLR cable adapter for the Mic Input.
Recorded tracks:
If you have a multi-track recorder, experiment with using pre-recorded vocal or instrumental tracks as either the Mic or Instrument inputs, as well as against live mic or instrument input, to generate new effect tracks.
टीप: The general rule of thumb is that the sound source that has more sustained notes and a wider frequency signal should be in the Instrument input, and the source that has more rhythmic variation or expressive changes in volume and timbre should be in the Mic input.
तपशील
|
Microphone path |
Instrument path | |
| Signal/Noise (A weighted) | -91dB | -90 डीबी |
| वारंवारता प्रतिसाद (-3 डीबी) | 10 Hz ते 14.5 kHz | 10 Hz ते 14.5 kHz |
| इनपुट श्रेणी | -34 dBV-+15 dBV | -14 dBV-+15 dBV |
| आउटपुट श्रेणी | -∞ to 11.3 dBV | -∞ to 11.3 dBV |
| THD+N: (A weighted) | 0.04% | 0.04% |
| इनपुट प्रतिबाधा: | ७.७ kOhm | ७.७ kOhm |
| बायपास | हार्ड-वायर्ड | हार्ड-वायर्ड |
| Connectors: Input | balanced XLR | unbalanced 1/4″ mono |
| आउटपुट | balanced XLR | unbalanced 1/4″ mono |
| आकार: | 8″ X 2.75″ X 7.25″ | |
| वजन: | 6 lb. / 2.7 Kg. | |
| Adapter O/P Rating: | 9.75 VAC @ 820 mA | |
| Use Only Harman Pro Group PS750 power adapter (as supplied with the Talker) | ||
Manual rework 1.1 February 11, 1999 Specifications subject to change without notice.
|
|
खबरदारी |
|
|
इलेक्ट्रिक शॉकचा धोका उघडू नका |


लक्ष द्या: रिस्क डे चोक इलेक्ट्रीक - NE PAS OUVRIR.
चेतावणी: फायर किंवा इलेक्ट्रिक शॉकचा धोका कमी करण्यासाठी हे उपकरण पाऊस किंवा आर्द्रता दर्शवू नका.
वर दर्शविलेली चिन्हे आंतरराष्ट्रीय स्तरावर स्वीकृत चिन्हे आहेत जी विद्युत उत्पादनांच्या संभाव्य धोक्यांबद्दल चेतावणी देतात.
The lightning flash with arrow point in an equilateral triangle means that there are dangerous voltagयुनिटमध्ये उपस्थित आहे. समभुज त्रिकोणातील उद्गार बिंदू सूचित करतो की वापरकर्त्याने मालकाच्या मॅन्युअलचा संदर्भ घेणे आवश्यक आहे.
ही चिन्हे चेतावणी देतात की युनिटमध्ये कोणतेही वापरकर्ता सेवायोग्य भाग नाहीत. युनिट उघडू नका. स्वतः युनिटची सेवा करण्याचा प्रयत्न करू नका. सर्व सेवांचा संदर्भ पात्र कर्मचाऱ्यांना द्या. कोणत्याही कारणास्तव चेसिस उघडल्याने निर्मात्याची वॉरंटी रद्द होईल. युनिट ओले करू नका. युनिटवर द्रव सांडल्यास, ते ताबडतोब बंद करा आणि सेवेसाठी डीलरकडे घेऊन जा. नुकसान टाळण्यासाठी वादळ दरम्यान युनिट डिस्कनेक्ट करा.
सुरक्षितता सूचना
तुमचे युनिट पॉवर कॉर्डने सुसज्ज असल्यास ग्राहकांसाठी सूचना.
चेतावणी: हे उपकरण पृथ्वीचे असणे आवश्यक आहे.
मेन लीडमधील कोर खालील कोडनुसार रंगीत आहेत:
GREEN and YELLOW – Earth BLUE – Neutral BROWN – Live.
As colors of the cores in the mains lead of this appliance may not correspond with the coloured markings identifying the terminals in your plug, proceed as follows:
- हिरवा आणि पिवळा रंग असलेला कोर E अक्षराने चिन्हांकित केलेल्या प्लगमधील टर्मिनलशी किंवा पृथ्वी चिन्हाने किंवा रंगीत हिरवा, किंवा हिरवा आणि पिवळा जोडलेला असणे आवश्यक आहे.
- निळ्या रंगाचा कोर N किंवा रंगीत काळ्या चिन्हांकित टर्मिनलशी जोडलेला असणे आवश्यक आहे.
- तपकिरी रंगाचा कोर L किंवा रंगीत लाल चिन्हांकित टर्मिनलशी जोडलेला असणे आवश्यक आहे.
This equipment may require the use of a different line cord, attachment plug, or both, depending on the available power source at installation.
Connect this equipment only to the power source indicated on the equipment rear panel. If the attachment plug needs to be changed, refer servicing to qualified service personnel who should refer to the table below. The green/yellow wire shall be connected directly to the unit’s chassis.
चेतावणी: जर ग्राउंड पराभूत झाले तर, युनिटमध्ये किंवा ज्या सिस्टमशी ते जोडलेले आहे त्यामध्ये काही दोष परिस्थिती पूर्ण लाइन व्हॉल्यूममध्ये होऊ शकते.tagई चेसिस आणि पृथ्वी ग्राउंड दरम्यान. चेसिस आणि पृथ्वीच्या जमिनीला एकाच वेळी स्पर्श केल्यास गंभीर दुखापत किंवा मृत्यू होऊ शकतो.
एफसीसी अनुपालन
हे उपकरण तपासले गेले आहे आणि ते FCC नियमांच्या भाग 15 नुसार, वर्ग B डिजिटल उपकरणाच्या मर्यादांचे पालन करत असल्याचे आढळले आहे. या मर्यादा निवासी स्थापनेमध्ये हानिकारक हस्तक्षेपापासून वाजवी संरक्षण प्रदान करण्यासाठी डिझाइन केल्या आहेत. हे उपकरण रेडिओ फ्रिक्वेन्सी उर्जा निर्माण करते, वापरते आणि विकिरण करू शकते आणि, जर सूचनांनुसार स्थापित आणि वापरले नसेल तर, रेडिओ संप्रेषणांमध्ये हानिकारक हस्तक्षेप होऊ शकतो. तथापि, विशिष्ट स्थापनेत हस्तक्षेप होणार नाही याची कोणतीही हमी नाही. जर या उपकरणामुळे रेडिओ किंवा टेलिव्हिजन रिसेप्शनमध्ये हानिकारक हस्तक्षेप होत असेल, जे उपकरणे बंद आणि चालू करून निर्धारित केले जाऊ शकते, तर वापरकर्त्याला खालीलपैकी एक किंवा अधिक उपायांनी हस्तक्षेप दुरुस्त करण्याचा प्रयत्न करण्यास प्रोत्साहित केले जाते:
- रिसिव्हिंग अँटेना पुनर्स्थित करा किंवा पुनर्स्थित करा
- अवांछित ऑपरेशन होऊ शकणारे उपकरणे आणि रिसीव्हरमधील पृथक्करण वाढवा.
- रिसीव्हर कनेक्ट केलेल्या सर्किटपेक्षा वेगळ्या सर्किटवरील आउटलेटमध्ये उपकरणे कनेक्ट करा
- मदतीसाठी डीलर किंवा अनुभवी रेडिओ/टीव्ही तंत्रज्ञांचा सल्ला घ्या.
- हे वर्ग बी डिजिटल उपकरण कॅनेडियन हस्तक्षेप-कारण उपकरण नियमांच्या सर्व आवश्यकता पूर्ण करते.
- Complies with Canadian ICES-003 Class B Conforme au Regalements Canadians NMB0003 Class B.
इलेक्ट्रोमॅग्नेटिक सुसंगतता
हे युनिट अनुरूपतेच्या घोषणेवर नमूद केलेल्या उत्पादन तपशीलांशी सुसंगत आहे. ऑपरेशन खालील दोन अटींच्या अधीन आहे:
- हे डिव्हाइस हानिकारक हस्तक्षेप करू शकत नाही, आणि.
- अवांछित ऑपरेशनला कारणीभूत असणार्या हस्तक्षेपासह या उपकरणाने प्राप्त झालेला कोणताही हस्तक्षेप स्वीकारला पाहिजे. महत्त्वपूर्ण इलेक्ट्रोमॅग्नेटिक फील्डमध्ये या युनिटचे कार्य टाळले पाहिजे.
- फक्त शिल्डेड इंटरकनेक्टिंग केबल्स वापरा.
Warning For Your Protection Please Read The Following:
पाणी आणि ओलावा: उपकरणे पाण्याजवळ वापरू नयेत (उदा. बाथटबजवळ, वॉशबोल, किचन सिंक, कपडे धुण्याचे टब, ओल्या तळघरात किंवा स्विमिंग पूलजवळ इ.). वस्तू पडू नयेत आणि उघड्याद्वारे बंदिस्तात द्रव सांडणार नाही याची काळजी घ्यावी.
वीज स्रोत: उपकरण फक्त ऑपरेटिंग निर्देशांमध्ये वर्णन केलेल्या किंवा उपकरणावर चिन्हांकित केल्याप्रमाणे वीज पुरवठ्याशी जोडलेले असावे.
ग्राउंडिंग किंवा ध्रुवीकरण: खबरदारी घेणे आवश्यक आहे जेणेकरुन उपकरणांचे ग्राउंडिंग किंवा ध्रुवीकरण म्हणजे पराभव होऊ नये.
पॉवर कॉर्ड संरक्षण: पॉवर सप्लाय कॉर्ड्स राउट केल्या पाहिजेत जेणेकरुन त्यावर किंवा त्यांच्या विरुद्ध ठेवलेल्या वस्तूंनी ते चालले जाण्याची किंवा पिंच केली जाण्याची शक्यता नाही, प्लग, सोयीस्कर रिसेप्टॅकल्स आणि ते उपकरणातून बाहेर पडण्याच्या बिंदूवर कॉर्डकडे विशेष लक्ष देऊन.
सर्व्हिसिंग: आग किंवा इलेक्ट्रिक शॉकचा धोका कमी करण्यासाठी, वापरकर्त्याने ऑपरेटिंग निर्देशांमध्ये वर्णन केलेल्या उपकरणाच्या पलीकडे सेवा देण्याचा प्रयत्न करू नये. इतर सर्व सेवा पात्र सेवा कर्मचार्यांकडे पाठवल्या पाहिजेत.
खबरदारी: To reduce the risk of fire replace only with same type fuse.
लक्ष द्या: Utilizer un fusible de recharge de meme type.
खबरदारी: To reduce the risk of fire replace LAMP उत्पादकांनी शिफारस केलेल्या भागासह (सेवा साहित्य पहा)
U.k. Mains Plug Warning
A moulded mains plug that has been cut off from the cord is unsafe.
Discard the mains plug at a suitable disposal facility. NEVER UNDER ANY CIRCUMSTANCES SHOULD YOU INSERT A DAMAGED OR CUT MAINS PLUG INTO A 13 AMP वीज सॉकेट. फ्यूज कव्हर शिवाय मेन प्लग वापरू नका. रिप्लेसमेंट फ्यूज कव्हर तुमच्या स्थानिक किरकोळ विक्रेत्याकडून मिळू शकतात. रिप्लेसमेंट फ्यूज 13 आहेत amps आणि BS1362 ला ASTA मंजूर असणे आवश्यक आहे.
|
कंडक्टर |
वायर रंग |
||
| L | ओळ | तपकिरी | काळा |
| N | तटस्थ | निळा | पांढरा |
| अर्थ ग्रँड. | हिरवा/पिवळा. | हिरवा | |
Declaration Of Conformity
निर्मात्याचे नाव: IVL Technologies Ltd. per DigiTech specifications
निर्मात्याचा पत्ता: 6710 Bertram Place Victoria, B.C. Canada V8M 1Z6
घोषित करते की उत्पादने: DigiTech Talker
खालील उत्पादन वैशिष्ट्यांचे पालन करा:
ईएमसी: EN 55022 (1987): CISPR 22 (1993) वर्ग B EN 50082-1 (1992)
पूरक माहिती:
सीई मार्किंग डायरेक्टिव्ह 89/336/EEC (1989) द्वारे सुधारित केलेल्या EMC निर्देश 93/68/EEC (1993) च्या आवश्यकतांचे यासह उत्पादन.
आयव्हीएल टेक्नॉलॉजीज लि.
6710 Bertram Place Victoria, B.C.
Canada V8M 1Z6 October 6, 1997 Brian Gibson, Vice President of Engineering.
युरोपियन संपर्क: Your local DigiTech Sales and Service Office or International Sales Office 3 Overlook Drive Unit #4 Amherst, New Hampशायर ०३०३१, यूएसए दूरध्वनी ५७४-५३७-८९०० फॅक्स (०३) ९७९२ ०८७७

टीप: Additional connection information is printed on the underside of the Talker case.
ग्राहक समर्थन
Please visit Digitech on the Web at www.digitech.com
हरमन इंटरनॅशनल कंपनी

![]()

कागदपत्रे / संसाधने
 |
डिजीटेक टॉकर अॅडव्हान्स्ड व्होकल सिंथेसिस चांगले [pdf] वापरकर्ता मार्गदर्शक Talker Advanced Vocal Synthesis Good, Advanced Vocal Synthesis Good, Vocal Synthesis Good, Synthesis Good |