1. महत्वाची सुरक्षितता माहिती
Read all instructions carefully before installing or using this heater. Failure to follow these instructions may result in electric shock, fire, property damage, or serious injury.
- विद्युत सुरक्षा: This unit is 240V and requires hard-wiring by a qualified electrician. Ensure power is disconnected at the circuit breaker before installation or servicing.
- माउंटिंग: Mount the heater securely to the ceiling or wall studs. Maintain minimum clearances from combustible materials as specified in the installation section.
- अतिउष्णतेपासून संरक्षण: The heater is equipped with a built-in sensor that automatically shuts off the device if it detects overheating. Do not block air intake or exhaust.
- अभिप्रेत वापर: This heater is designed for indoor use in garages, workshops, and similar spaces. Do not use outdoors or in wet locations.
2. उत्पादन संपलेview
The GarveeTech 10000W Electric Garage Heater provides powerful and efficient heating for large areas. It features a durable steel construction, digital controls, and a remote for convenient operation.
- कार्यक्षम हीटिंग: Delivers up to 34,100 BTUs, capable of heating areas up to 1,500 square feet. Adjustable louvers allow for directional airflow.
- अचूक तापमान नियंत्रण: Integrated digital thermostat with a temperature range of 45°F-95°F (7°C-35°C). Three power settings (3300W/6600W/10000W) cater to various heating needs.
- स्मार्ट वैशिष्ट्ये: Includes a 12-hour programmable timer and an ECO mode that automatically adjusts operation based on ambient temperature.
- टिकाऊ डिझाइन: Constructed with heavy-gauge steel, sheathed heating elements, and an enclosed motor for long-lasting performance in demanding environments.
- लवचिक स्थापना: Designed for ceiling mounting with an adjustable bracket, allowing for precise positioning.

Image: The GarveeTech 10000W Electric Garage Heater highlighting its key features including 3 heat settings, adjustable temperature, 12-hour timer, overheat protection, C/F display, and 4 tilt angles for ceiling mounting.

Image: The GarveeTech 10000W Electric Garage Heater mounted in a garage, illustrating its ability to heat a large area effectively.
3. पॅकेज सामग्री
- Electric Garage Heater Unit
- रिमोट कंट्रोल
- माउंटिंग ब्रॅकेट
- सूचना पुस्तिका
4. तपशील
| वैशिष्ट्य | तपशील |
|---|---|
| ब्रँड | GarveeTech |
| मॉडेल क्रमांक | xMoZd0IxKa7al4FULPl4lgSlTGfB |
| वाटtage | 10000 वॅट्स |
| खंडtage | 240 व्होल्ट (AC) |
| Ampवय | 41.67 Amps |
| हीटिंग कव्हरेज | 1500 चौ.फूट पर्यंत. |
| तापमान श्रेणी | 45°F-95°F / 7°C-35°C |
| पॉवर सेटिंग्ज | 3300W / 6600W / 10000W |
| टाइमर फंक्शन | 1-12 तास |
| माउंटिंग प्रकार | कमाल मर्यादा माउंट |
| उत्पादन परिमाणे | १६"उ x २६"प x ४७"उ |
| आयटम वजन | 47.6 पाउंड |

प्रतिमा: बाजू view of the GarveeTech 10000W Electric Garage Heater with its dimensions (17.72 inches deep, 18.31 inches wide, 18.11 inches high) clearly indicated.
5. स्थापना सूचना
This heater requires hard-wired installation. It is strongly recommended that installation be performed by a licensed electrician to ensure compliance with all local electrical codes and safety standards.
5.1 प्री-इंस्टॉलेशन चेक
- Verify that your electrical supply is 240V and can support the heater's 41.67 Amps requirement.
- Ensure the mounting surface (ceiling joists or wall studs) can safely support the heater's weight (47.6 lbs) and the mounting bracket.
- Turn off power at the main circuit breaker before beginning any electrical work.
5.2 Mounting Location and Clearances
Choose a mounting location that allows for proper airflow and maintains minimum clearances from combustible materials.
- Minimum distance from sides of wall: 13 inches (33 cm)
- Minimum distance from ceiling: 8 inches (20 cm)
- Minimum distance from floor: 6 feet (1.8 meters)
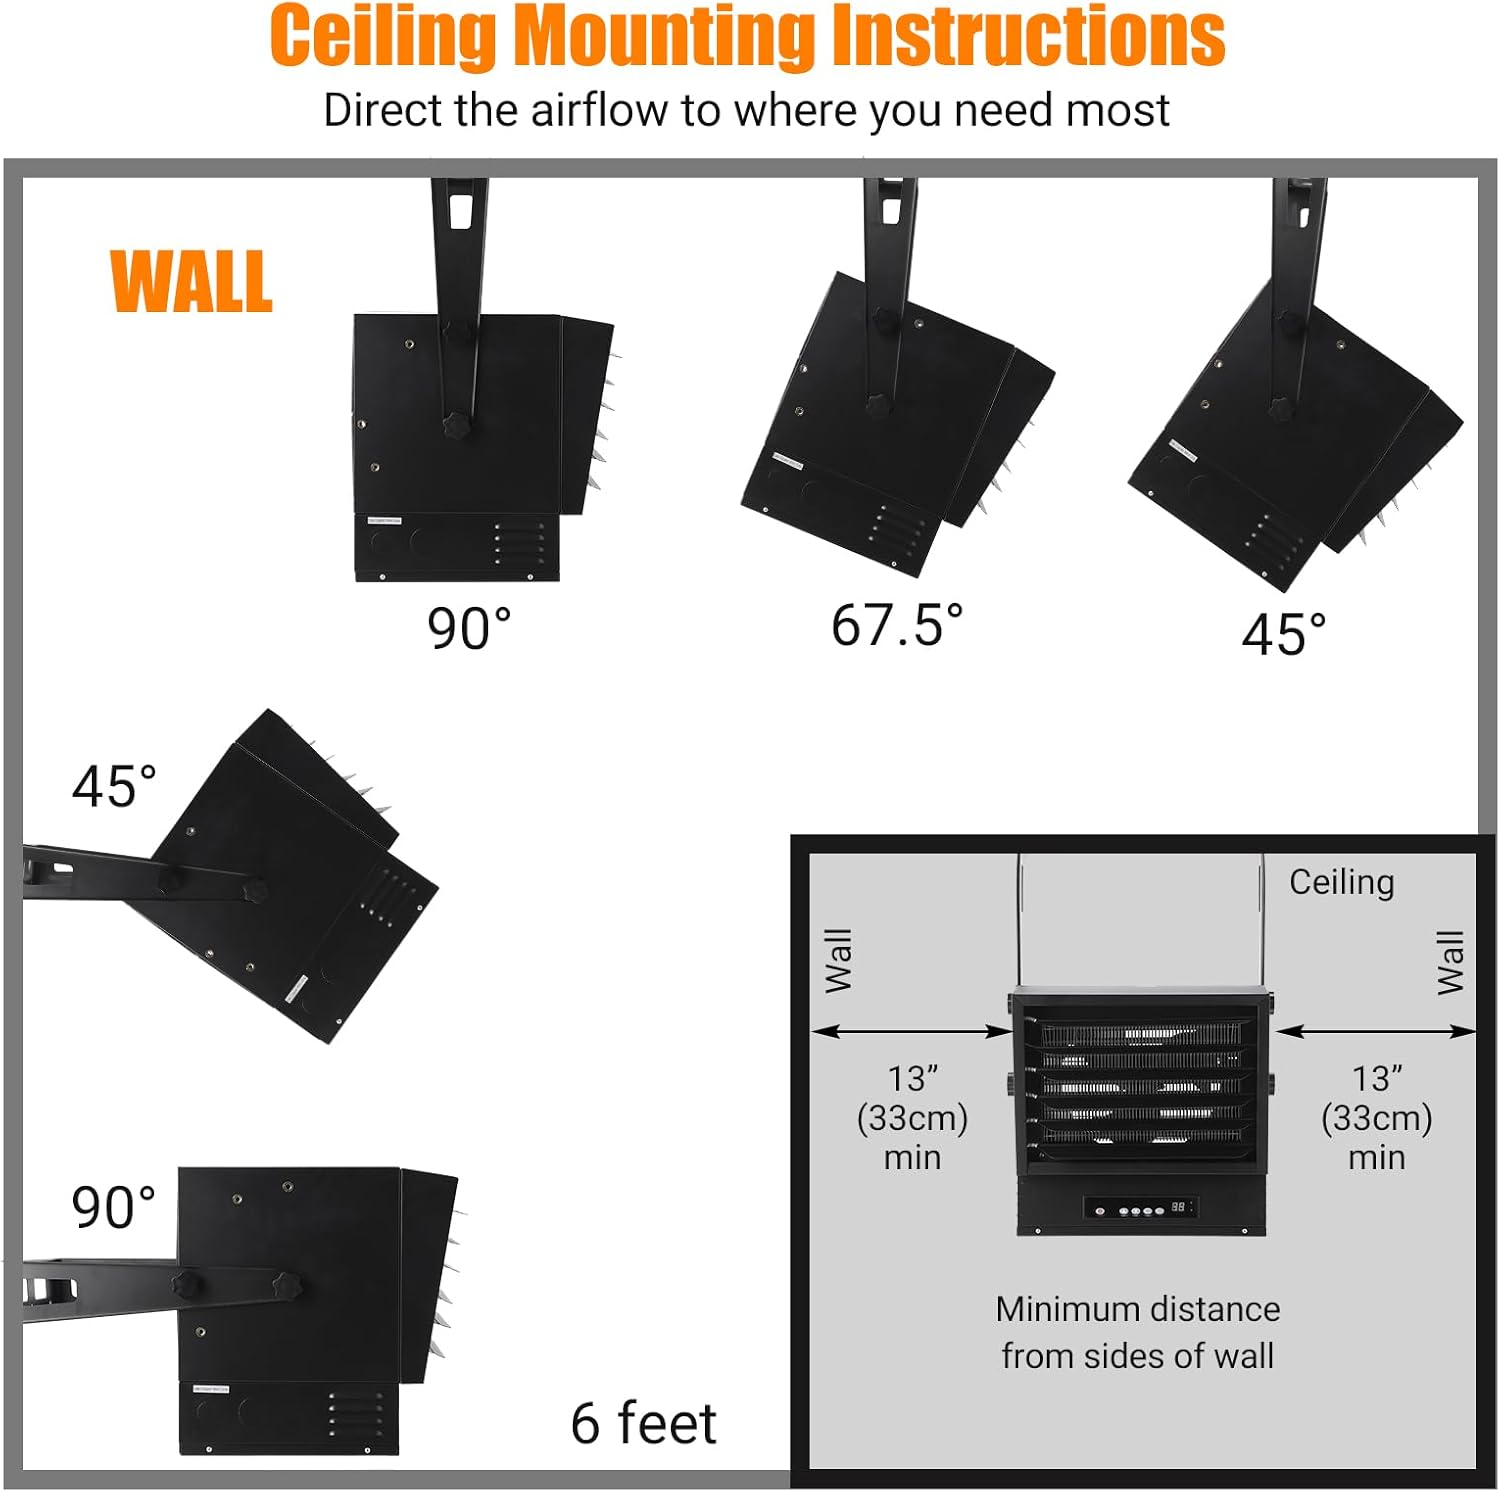
Image: A diagram illustrating recommended mounting positions (wall and ceiling) and minimum clearance distances from surrounding surfaces for safe and effective operation of the heater.
३.४ चरण-दर-चरण स्थापना
- Prepare the Heater for Wiring: Turn off the power at the breaker. Remove all screws from the bottom panel for access to the wiring compartment. Choose a side and open the cutout for wiring entry.
- वायरिंग कनेक्ट करा: Use the provided copper tips for better conductivity (for 7500W/10000W models). Run the electrical wire through the cutout. Connect the wires to the power block as instructed in the wiring diagram (L1, L2, Ground). Tighten all terminal screws to 40 in-lbs.
- Secure Bottom Panel: Close the bottom panel and tighten the screws.
- ब्रॅकेट माउंट करा: Drill two pilot holes in the chosen ceiling or wall location. Place washers on the screws and securely screw them into the ceiling/wall, ensuring the bracket is firmly attached.
- Hang the Heater: Align the lower bracket holes with the corresponding points on the heater. Then, align the upper bracket holes and secure the heater to the bracket using the provided hardware. Use the keyhole slots on the bracket to adjust the heater's angle as desired.
- Adjust Louvers: Adjust the individual louvers on the front of the heater to direct the airflow to your desired area.

Image: A visual guide detailing the four main steps for hardwired installation: opening the panel, connecting wires to the power block, tightening connections, and preparing for use.

Image: A close-up of the heater's internal wiring compartment, showing the power block and a diagram for connecting black (hot), white (hot), and green (ground) wires for 240V AC power.
Video: This video demonstrates the step-by-step installation process for a ceiling-mounted shop heater, including wiring, mounting the bracket, hanging the unit, and adjusting the louvers. It provides a visual guide for connecting the electrical supply and securing the heater.
6. ऑपरेटिंग सूचना
युनिटवरील कंट्रोल पॅनल किंवा सोबत असलेल्या रिमोट कंट्रोलचा वापर करून हीटर चालवता येतो.
६.१ नियंत्रण पॅनेल आणि रिमोट फंक्शन्स
- चालू/बंद: Press to turn the heater on or off.
- दिशा: Cycle through power settings (Low: 3300W, Medium: 6600W, High: 10000W).
- TEMP+/-: इच्छित तापमान सेटिंग समायोजित करा.
- टाइमर: Set the auto-off timer from 1 to 12 hours.
- °F/°C: Toggle between Fahrenheit and Celsius temperature display.
- ECO: Activate Smart Mode, which automatically adjusts the working mode based on ambient temperature to optimize energy use.

Image: The GarveeTech 10000W Electric Garage Heater showing its digital thermostat, control buttons, and the remote control for convenient temperature and setting adjustments.
6.2 Adjusting Airflow Louvers
The front louvers can be individually adjusted to direct the heated air precisely where it is needed. Simply manually tilt each louver to the desired angle.

Image: A close-up of the GarveeTech 10000W Electric Garage Heater's front panel, highlighting the six individually adjustable louvers that allow users to customize airflow direction.
Video: This video demonstrates the operational features of an electric garage heater, including adjusting temperature settings, utilizing the 1-12 hour timer, and showcasing the adjustable wind direction and angle. It also highlights the fan's cooling function after shutdown.
7. देखभाल
नियमित देखभालीमुळे तुमच्या हीटरची इष्टतम कार्यक्षमता आणि दीर्घायुष्य सुनिश्चित होते.
- स्वच्छता: Ensure the heater is turned off and unplugged (if applicable, or power disconnected at breaker) before cleaning. Use a soft, damp बाहेरून पुसण्यासाठी कापड. अपघर्षक क्लीनर किंवा सॉल्व्हेंट्स वापरू नका.
- Fan and Air Vents: Periodically inspect the fan and air vents for dust and debris accumulation. Use a vacuum cleaner with a brush attachment to gently remove any blockages. Ensure vents are clear for proper airflow.
- सामान्य तपासणी: Annually, or as needed, inspect the power cord and connections for any signs of damage or wear. If any damage is found, contact a qualified electrician for repair.
8. समस्या निवारण
जर तुमचा हीटर योग्यरित्या काम करत नसेल, तर खालील सामान्य समस्या आणि उपाय पहा:
- हीटर चालू होत नाही:
- Check if the power is supplied to the unit from the circuit breaker.
- Ensure the ON/OFF button is pressed on the control panel or remote.
- Verify that the thermostat setting is higher than the ambient room temperature.
- Heater stops working unexpectedly:
- The overheat protection may have activated. Turn off the heater, allow it to cool down for 30 minutes, and check for any obstructions around the air intake or exhaust.
- Check the circuit breaker for a tripped breaker.
- अपुरी हीटिंग:
- Ensure the heater is set to the highest power mode (10000W).
- Verify that the louvers are directed towards the desired heating area.
- Check for proper insulation in the room or garage.
For issues not covered here, or if troubleshooting steps do not resolve the problem, contact customer support.
9. हमी आणि समर्थन
This GarveeTech Electric Garage Heater comes with a limited manufacturer's warranty. Please refer to the warranty card included with your product for specific terms and conditions.
For technical support, warranty claims, or replacement parts, please contact GarveeTech customer service through the retailer where the product was purchased or visit the official GarveeTech webसाइट