परिचय
This manual provides comprehensive instructions for the safe and effective operation of your HANMATEK HO102 2-in-1 Handheld Digital Oscilloscope and Multimeter. Please read this manual thoroughly before using the device to ensure proper functionality and to prevent damage or injury. Keep this manual for future reference.
सुरक्षितता माहिती
Always observe the following safety precautions when operating the HANMATEK HO102:
- Do not operate the device if it appears damaged or if the casing is open.
- Ensure proper probe connections before applying power to the circuit under test.
- कमाल इनपुट व्हॉल्यूम ओलांडू नकाtage ratings for both oscilloscope (CAT III 600V) and multimeter (750 VAC / 1000 VDC) inputs.
- Use only the provided accessories or approved replacements.
- ओल्या किंवा डी मध्ये ऑपरेट टाळाamp परिस्थिती
- Refer to local safety regulations and standards for electrical testing.
उत्पादन संपलेview
The HANMATEK HO102 is a compact, portable instrument combining the functions of a digital oscilloscope and a true RMS multimeter. It features a 3.5-inch TFT display and a user-friendly interface.
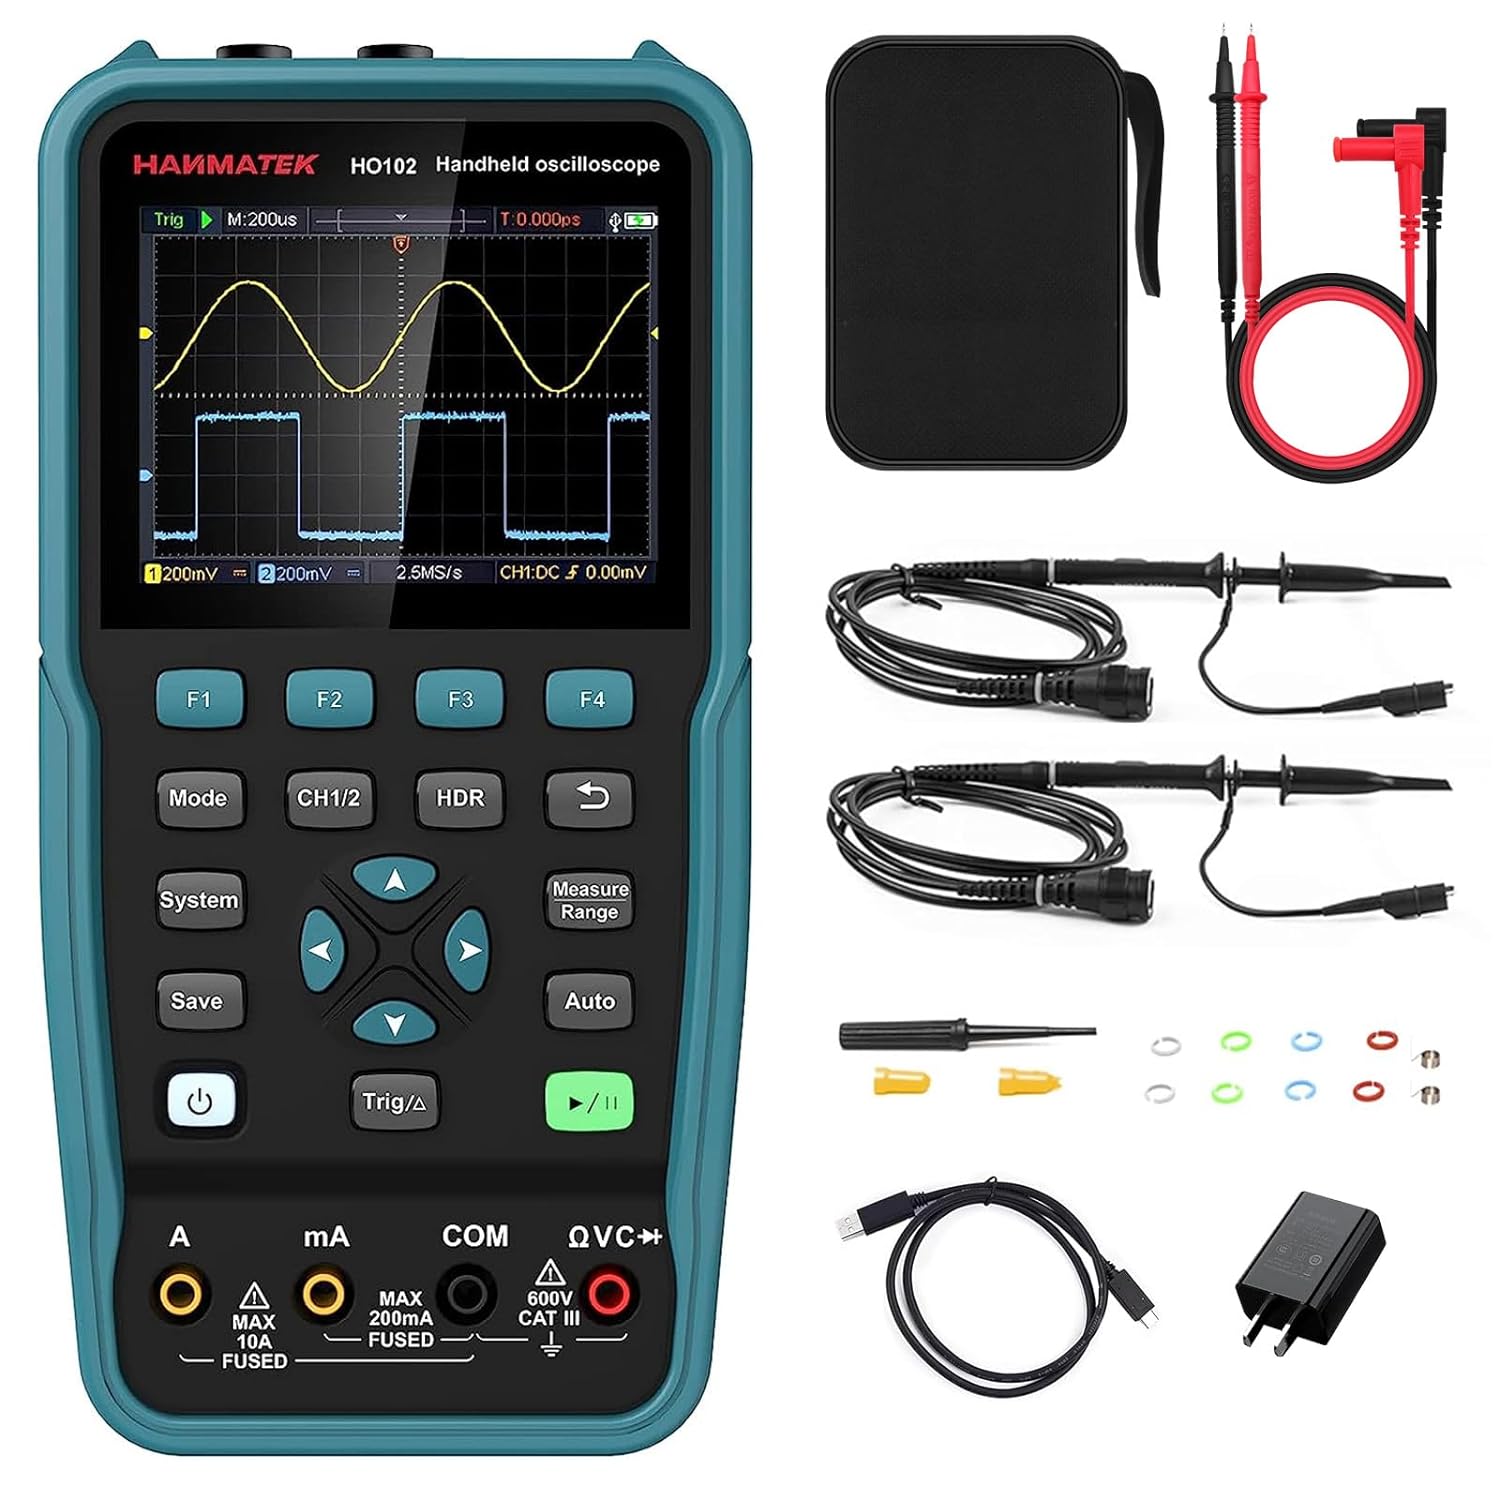
Figure 1: HANMATEK HO102 device and standard accessories.
डिव्हाइस लेआउट आणि नियंत्रणे
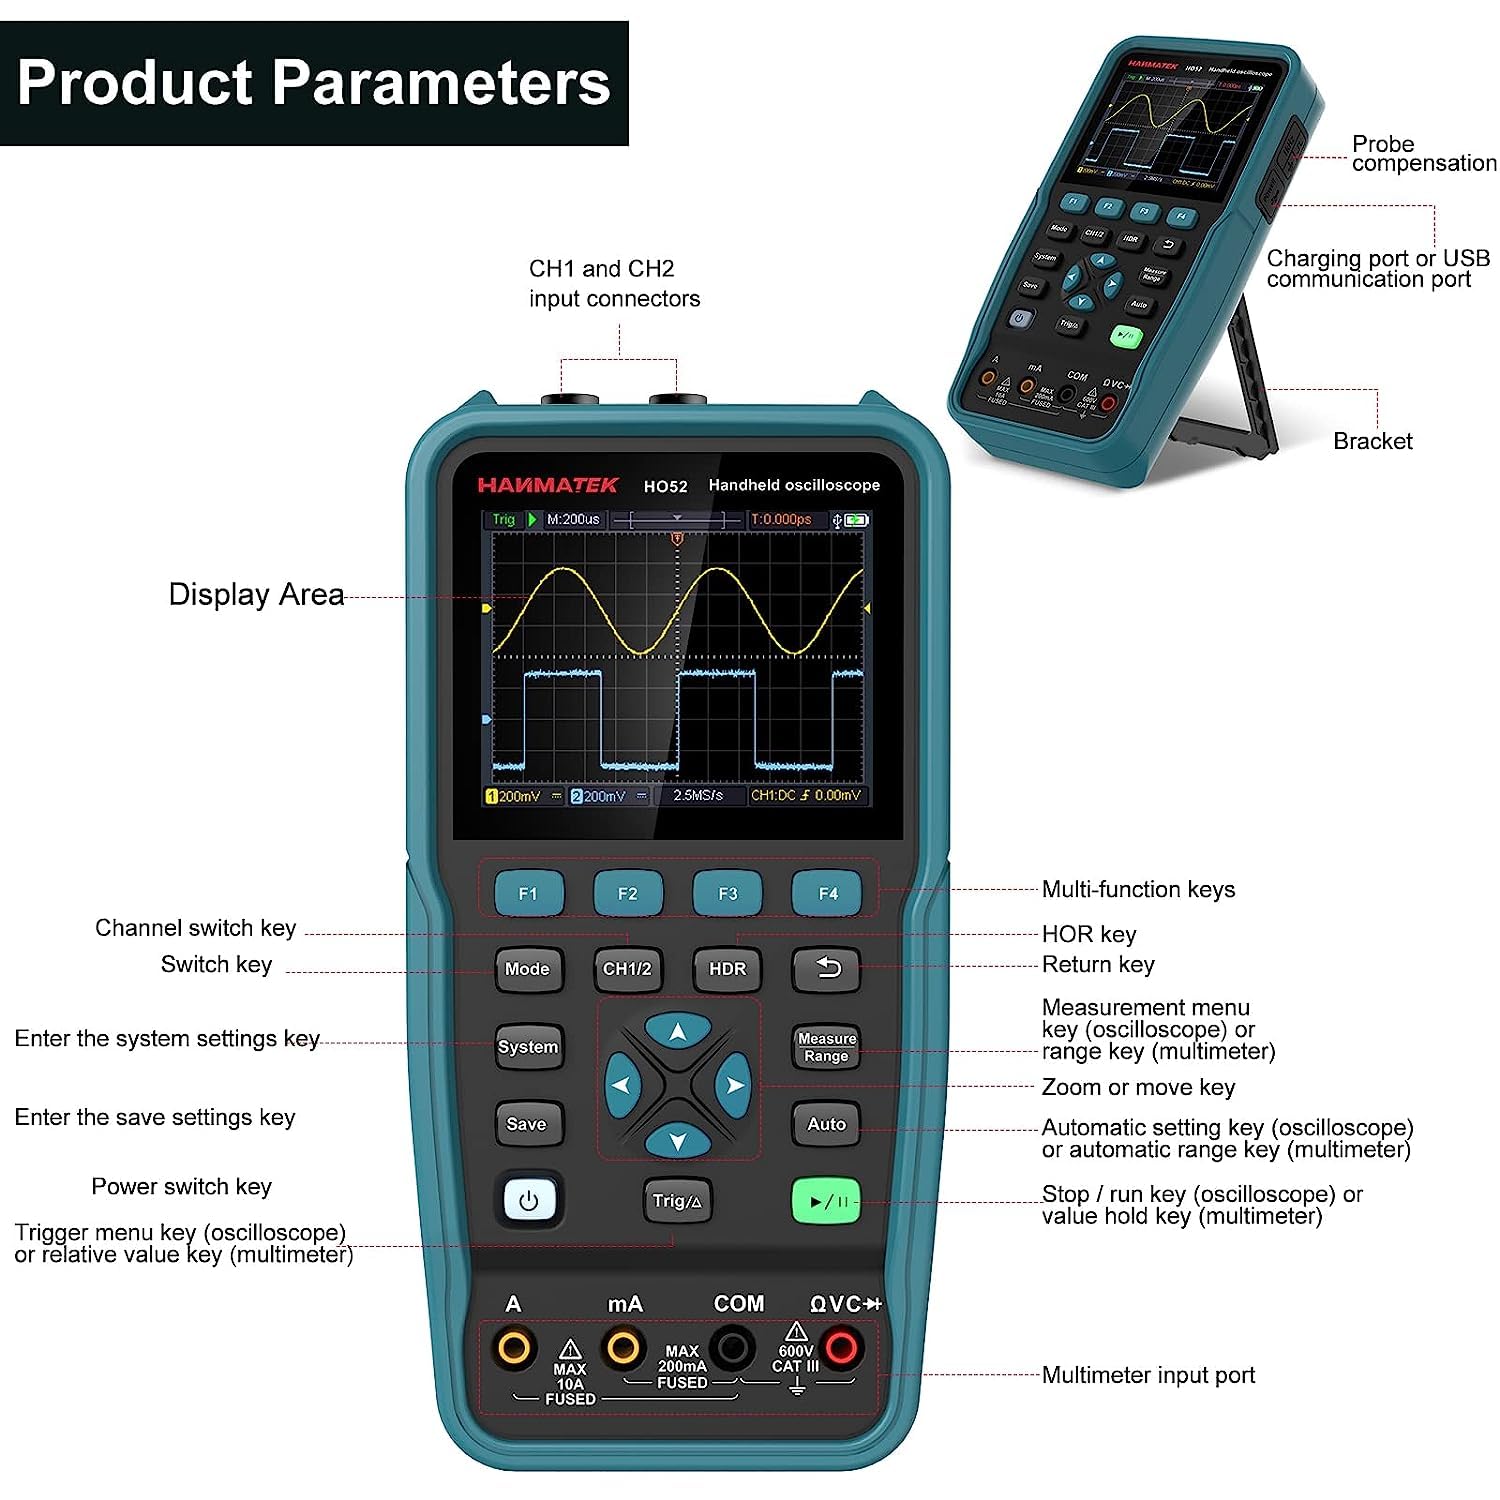
आकृती ४.१: समोरचा पॅनल आणि बाजू view with key components labeled.
- प्रदर्शन क्षेत्र: 3.5-inch TFT screen for waveform and measurement display.
- F1-F4 की: Multi-function keys, context-sensitive.
- मोड की: Switches between Oscilloscope and Multimeter modes.
- CH1/2 Key: Channel switch key for oscilloscope.
- HDR Key: Horizontal range key.
- सिस्टम की: Enters system settings menu.
- Save Key: Saves current settings or waveforms.
- पॉवर स्विच की: डिव्हाइस चालू/बंद करते.
- Trigger/Δ Key: ट्रिगर मेनू की (ऑसिलोस्कोप) किंवा संबंधित मूल्य की (मल्टीमीटर).
- Navigation Keys (Up, Down, Left, Right, Enter): For menu navigation and parameter adjustment.
- Measure/Range Key: मापन मेनू की (ऑसिलोस्कोप) किंवा श्रेणी की (मल्टीमीटर).
- स्वयं की: स्वयंचलित सेटिंग की (ऑसिलोस्कोप) किंवा स्वयंचलित श्रेणी की (मल्टीमीटर).
- Run/Stop Key: Starts/stops waveform acquisition (oscilloscope) or hold key (multimeter).
- Multimeter Input Ports (A, mA, COM, QVC+): For multimeter lead connections.
- CH1 and CH2 Input Connectors: BNC connectors for oscilloscope probes.
- Charging Port / USB Communication Port: USB Type-C port for charging and PC connection.
- कंस: Kickstand for desktop use.
सेटअप
प्रारंभिक चार्जिंग
Before first use, fully charge the device using the provided USB Type-C cable and power adapter. The charging port is located on the side of the unit.
प्रोब कनेक्शन
Connect the oscilloscope probes to the CH1 and CH2 BNC input connectors. For multimeter functions, connect the multimeter leads to the appropriate input ports (A, mA, COM, QVC+).
पॉवर चालू/बंद
दाबा आणि धरून ठेवा शक्ती key to turn the device on or off.
ऑपरेटिंग सूचना
स्विचिंग मोड
दाबा मोड key to toggle between Oscilloscope mode and Multimeter mode.
ऑसिलोस्कोप मोड
In Oscilloscope mode, the device displays real-time waveforms. Key features include:
- बँडविड्थ: २४० मेगाहर्ट्झ पर्यंत.
- Sampले रेट: 125 MSa/s (real-time).
- चॅनेल: Dual channel operation.
- Waveform Refresh Rate: Up to 10,000 Wfms/s.
- रेकॉर्ड लांबी: २.७ हजार पर्यंत.
Basic Waveform Display
Connect the oscilloscope probe to the circuit under test. Press the ऑटो key for automatic waveform scaling and triggering. This function provides a quick and convenient way to display stable waveforms.
आकृती 3: उदाample of waveform display in Oscilloscope mode.
सेटिंग्ज समायोजित करत आहे
Use the navigation keys to adjust vertical (voltage) and horizontal (time) scales. The CH1/2 key switches between channels. The HDR key adjusts the horizontal range.
ट्रिगर करत आहे
दाबा Trig/Δ key to access trigger settings. Adjust trigger level, mode, and source to stabilize the waveform display.
मोजमाप
दाबा Measure/Range key to access automatic measurement functions. The device supports four automatic measurement functions and cursor measurements for precise analysis.
XY Function
The XY function allows for displaying Lissajous figures, useful for phase difference measurements between two signals.
मल्टीमीटर मोड
In Multimeter mode, the device functions as a 4 1/2 digit true RMS multimeter with 20,000 counts. It supports various electrical measurements:
- खंडtage (AC/DC)
- Current (AC/DC)
- प्रतिकार
- डायोड चाचणी
- सातत्य चाचणी
- क्षमता
मोजमाप करत आहे
Connect the multimeter leads to the appropriate input ports based on the desired measurement. Press the ऑटो key for automatic ranging, or use the Measure/Range key to manually select the range.

आकृती 4: उदाampखंडाचा letage measurement in Multimeter mode.
Read Hold and Relative Measurement
वापरा चालवा/थांबवा key to hold the current reading. The Trig/Δ key activates the relative measurement function, displaying the difference from a stored reference value.
मेमरी फंक्शन्स
The HO102 allows saving and recalling various data types:
- 4 sets of parameters.
- 4 reference waveforms.
- 4 images (screenshots).
- 4 sets of waveforms in CSV format.
दाबा जतन करा key to store data. Saved reference waveforms can be displayed alongside live measurements for comparison.

Figure 5: Comparing a live waveform with a stored reference waveform.
PC Connection and Data Transfer
Connect the HO102 to a computer using the USB Type-C cable. The device will be recognized as a USB flash drive, allowing you to access and transfer stored images and CSV waveform data for further analysis.

Figure 6: HANMATEK HO102 connected to a PC for data transfer and analysis.
Software for this product can be downloaded from: https://bit.ly/3kQe4wQ
Auto-Calibration Function
The device includes an auto-calibration function to maintain measurement accuracy. Refer to the system settings menu for initiating this process.
देखभाल
साफसफाई
Clean the device with a soft, dry cloth. Do not use abrasive cleaners or solvents. Ensure the device is powered off before cleaning.
बॅटरी काळजी
The built-in Lithium-ion battery provides approximately 6 hours of continuous operation on a full charge. For optimal battery life, avoid fully discharging the battery frequently and store the device in a cool, dry place when not in use for extended periods.
स्टोरेज
Store the device and its accessories in the provided carrying bag to protect them from dust and physical damage.
समस्यानिवारण
| समस्या | संभाव्य कारण | उपाय |
|---|---|---|
| डिव्हाइस चालू होत नाही. | बॅटरी कमी किंवा चार्ज नाही. | Connect to power adapter and charge for at least 30 minutes. |
| Unstable or no waveform display. | Incorrect probe connection, improper trigger settings, or signal out of range. | Check probe connections. Press ऑटो key. Adjust trigger level and time/voltage तराजू. |
| Multimeter readings are inaccurate. | Incorrect lead connection, wrong measurement range, or device needs calibration. | Verify lead connections. Use ऑटो range or select appropriate manual range. Perform auto-calibration. |
| पीसीने डिव्हाइस ओळखले नाही. | Faulty USB cable or port, or driver issue. | Try a different USB cable or port. Ensure the device is powered on. Check PC device manager. |
तपशील
| वैशिष्ट्य | तपशील |
|---|---|
| मॉडेल | HO102 |
| डिस्प्ले | १.५-इंच TFT कलर डिस्प्ले |
| ऑसिलोस्कोप बँडविड्थ | 50 MHz |
| Oscilloscope Channels | 2 |
| रिअल-टाइम एसample दर | 125 एमएसए/से |
| वेव्हफॉर्म रिफ्रेश रेट | 10,000 Wfms/s |
| रेकॉर्ड लांबी | 8K |
| Multimeter Digits | 4 1/2 (20,000 counts) |
| Max Multimeter Input Voltage | 750 VAC / 1000 VDC |
| बॅटरी | १ लिथियम-आयन (समाविष्ट) |
| बॅटरी आयुष्य | अंदाजे 6 तास |
| वीज वापर | < 3W |
| इंटरफेस | यूएसबी टाइप-सी |
| परिमाण (L x W x H) | ९.४ x ५.६ x २.५९ सेमी (३.७ x २.२१ x १.०२ इंच) |
| वजन | 1.04 किलो (2.29 पौंड) |
| अनुपालन | सीई, RoHS |
पॅकेज सामग्री
The HANMATEK HO102 package includes:
- 1 x HANMATEK HO102 2-in-1 Digital Oscilloscope and Multimeter
- 1 x कॅरींग बॅग
- 2 x Oscilloscope Probes
- 1 x पॉवर अडॅप्टर
- 1 x USB Type-C केबल
- २ x मल्टीमीटर चाचणी लीड्स
- 1 x वापरकर्ता मॅन्युअल
- 1 x Calibration Pen
- 1 x CD (containing software)

Figure 7: All items included in the HANMATEK HO102 product package.
हमी आणि समर्थन
For warranty information and technical support, please refer to the official HANMATEK webतुमच्या स्थानिक वितरकाशी संपर्क साधा किंवा संपर्क साधा. खरेदीचा पुरावा म्हणून तुमची खरेदी पावती ठेवा.


