1. परिचय
This manual provides essential information for the safe and efficient operation, maintenance, and troubleshooting of your VEVOR 400W Electric Wire Stripping Machine, Model 1.5-38mm. Please read this manual thoroughly before operating the machine to ensure proper usage and to prevent injury or damage.
The VEVOR 400W Electric Wire Stripping Machine is constructed from durable aluminum alloy, designed to withstand rigorous environments and provide years of reliable service. It features a powerful 400W motor and high-hardness blades for efficient wire stripping.

Figure 1: Heavy-Duty Construction. This image highlights the robust build of the machine, featuring a 400W motor and high-quality aluminum alloy components.
2. सुरक्षितता सूचना
आग, विद्युत शॉक आणि वैयक्तिक इजा होण्याचा धोका कमी करण्यासाठी नेहमी मूलभूत सुरक्षा खबरदारीचे अनुसरण करा.
- सर्व सूचना वाचा: Familiarize yourself with the machine's operation and potential hazards.
- योग्य वैयक्तिक संरक्षक उपकरणे (पीपीई) घाला: This includes safety glasses, gloves, and hearing protection.
- Ensure a stable work environment: Operate the machine on a flat, stable surface to prevent tipping.
- कार्यक्षेत्र स्वच्छ आणि चांगले प्रकाशमान ठेवा: गोंधळलेले किंवा अंधारलेले भाग अपघातांना आमंत्रण देतात.
- मुलांना आणि जवळच्या लोकांना दूर ठेवा: विचलित झाल्यामुळे तुमचे नियंत्रण सुटू शकते.
- अपघाती सुरुवात टाळा: Ensure the switch is in the off position before connecting to power.
- अतिरेक करू नका: प्रत्येक वेळी योग्य पाऊल आणि संतुलन राखा.
- Use the right tool for the job: Do not force the machine or attachments to do a job for which they were not designed.
- वीज खंडित करा: Always unplug the machine before making adjustments, changing accessories, or storing it.
- Inspect the machine: Check for damaged parts before each use. Replace or repair any damaged parts.
- आपत्कालीन थांबा: आपत्कालीन स्टॉप बटणाचे स्थान आणि ऑपरेशन जाणून घ्या.
- विद्युत सुरक्षा: Ensure the power supply matches the machine's requirements. Do not operate in wet conditions.
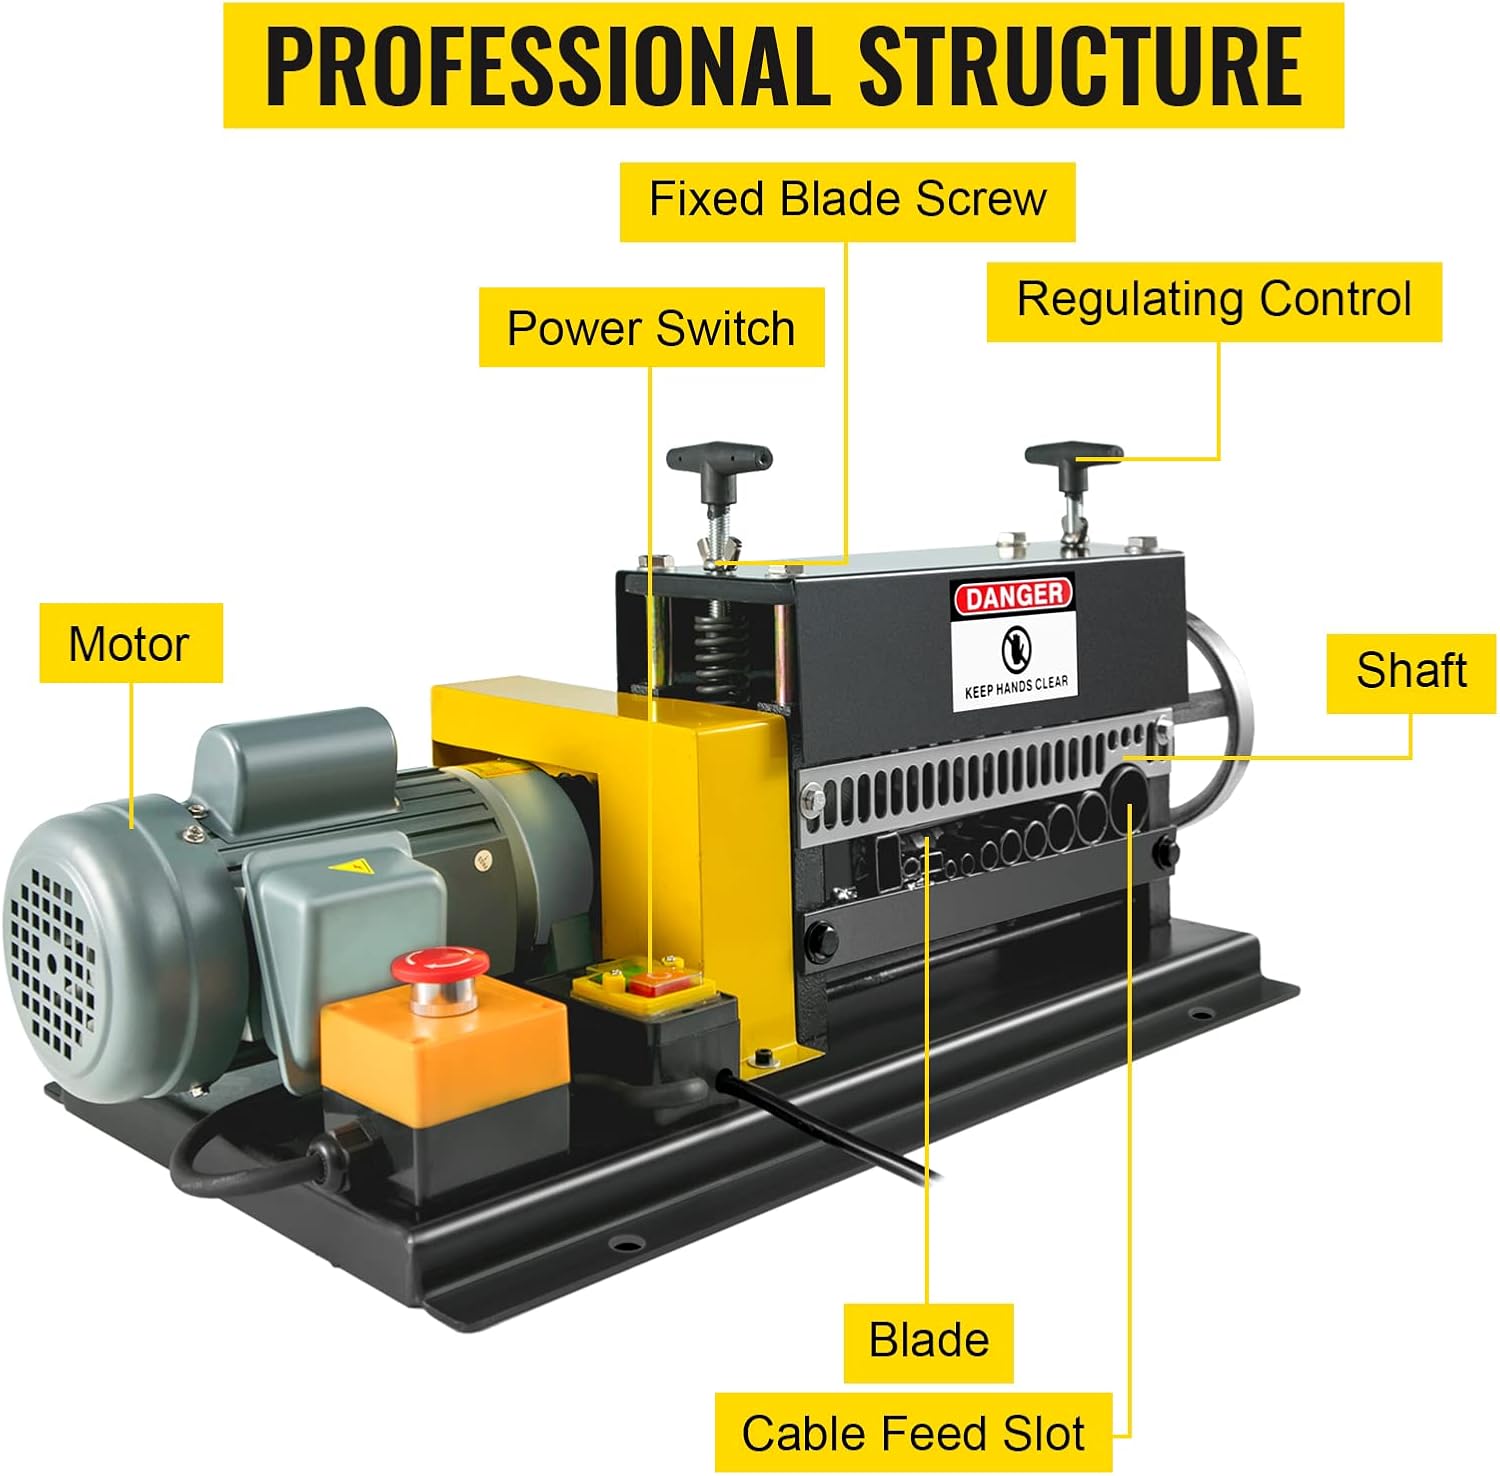
Figure 2: Key Components of the Wire Stripping Machine. This image shows the main parts of the machine, including the motor, power switch, regulating control, fixed blade screw, shaft, blade, and cable feed slot, highlighting the professional structure.
3. सेटअप
3.1 अनपॅकिंग आणि तपासणी
- मशीनला त्याच्या पॅकेजिंगमधून काळजीपूर्वक काढा.
- Inspect the machine for any signs of damage during transit. If damage is found, do not operate the machine and contact customer support.
- पॅकिंग यादीमध्ये सूचीबद्ध केलेले सर्व घटक उपस्थित असल्याची खात्री करा.
3.2 प्लेसमेंट
- Place the wire stripping machine on a sturdy, level workbench or surface capable of supporting its weight (approximately 41.3 kg).
- Ensure adequate clearance around the machine for safe operation and wire feeding/retrieval.
3.3 वीज जोडणी
- Verify that the power switch is in the "OFF" position.
- मशीनच्या व्हॉल्यूमशी जुळणाऱ्या ग्राउंड केलेल्या इलेक्ट्रिकल आउटलेटशी पॉवर कॉर्ड जोडा.tagई आवश्यकता.
4. ऑपरेटिंग सूचना
4.1 Wire Compatibility
This machine is designed to strip various types of wires, including copper wire, hardcover wire, electric wire, and feeder lines, with diameters ranging from 1.5 mm (0.06 inches) to 38 mm (1.5 inches).

Figure 3: Wire Types and Compatibility. This image illustrates the various types of wires the machine can process, including copper, hardcover, electric, and feeder lines.
4.2 Adjusting Blades and Rollers
The machine features adjustable blades and rollers to accommodate different wire sizes. Proper adjustment is crucial for effective stripping and to prevent damage to the wire or machine.
- Identify the appropriate feed hole for your wire diameter. The machine has 8 round channels and 2 flat slots.
- Use the blade adjusting handle (refer to Figure 4) to raise or lower the blade assembly.
- Adjust the blade so it scores the insulation without cutting into the copper conductor. Test with a small piece of wire and fine-tune as needed.
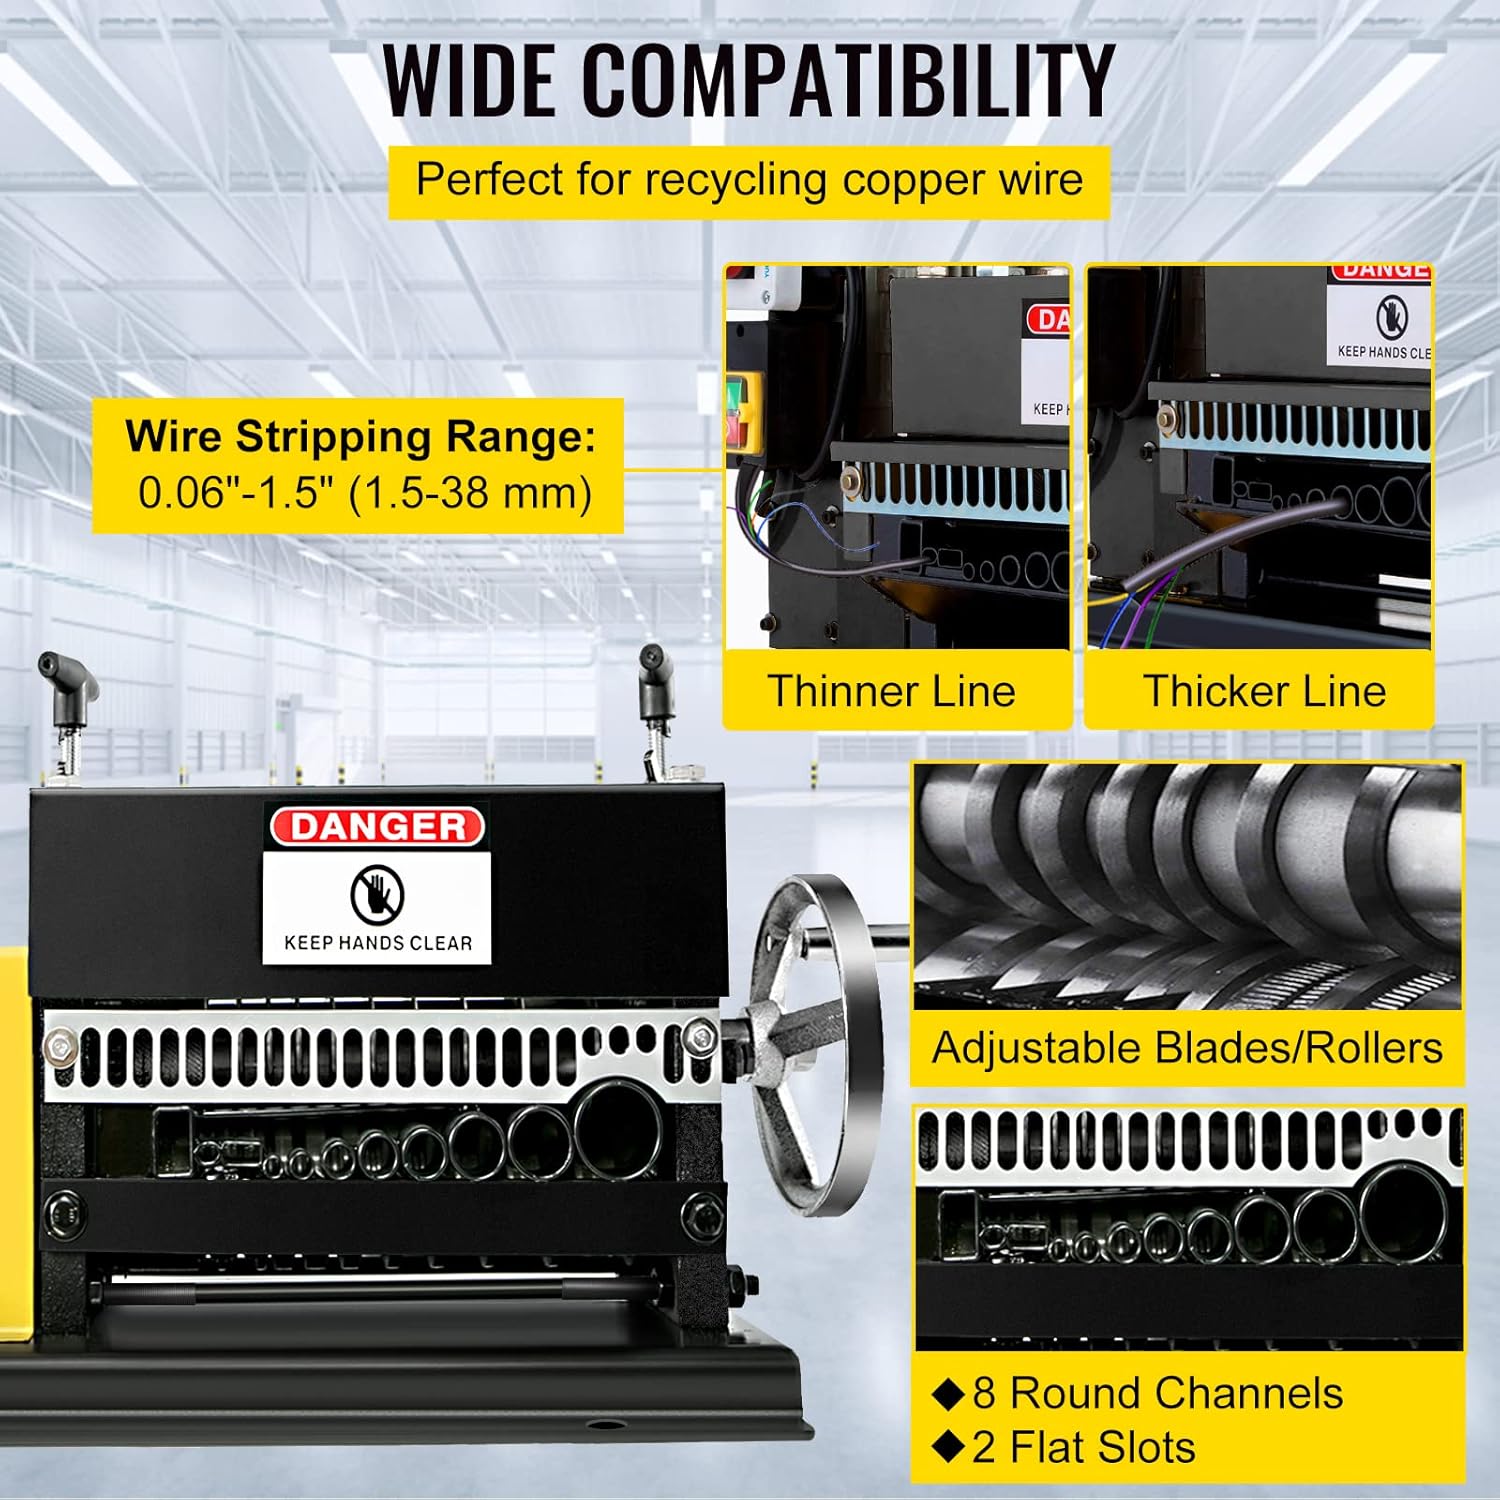
Figure 4: Adjustable Blades and Wire Feed Slots. This image details the machine's wide compatibility, showing the adjustable blades/rollers and the various feed slots for wires ranging from 1.5mm to 38mm.
4.3 Stripping Process
- Ensure the machine is properly adjusted for your wire size.
- Turn on the machine using the one-key switch (refer to Figure 5).
- Carefully feed the end of the wire into the chosen feed slot. The machine will automatically pull the wire through and strip the insulation.
- Collect the stripped wire and insulation.
- In case of a wire jam or any emergency, immediately press the red emergency stop button.

Figure 5: Effortless Operation. This image demonstrates the simple operation of the machine, featuring the blade adjusting handle and the one-key control switch.

Figure 6: High Stripping Efficiency. This image highlights the machine's powerful motor and fast stripping speed, capable of processing wire at 18 meters (60 feet) per minute.
5. देखभाल
नियमित देखभालीमुळे तुमच्या वायर स्ट्रिपिंग मशीनचे दीर्घायुष्य आणि इष्टतम कामगिरी सुनिश्चित होते.
5.1 स्वच्छता
- साफसफाई करण्यापूर्वी नेहमी वीज खंडित करा.
- Remove any accumulated wire scraps or insulation debris from the machine after each use.
- Wipe down the exterior surfaces with a clean, dry cloth. Do not use harsh chemicals or solvents.
५.२ ब्लेड तपासणी आणि बदली
- Regularly inspect the stripping blades for wear, dullness, or damage.
- Dull blades can lead to inefficient stripping and damage to the wire. Replace blades as necessary. Refer to the machine's diagram for blade access.
5.3 स्नेहन
- Periodically apply a small amount of machine oil to moving parts, such as the adjustment screws and rollers, to ensure smooth operation. Avoid over-lubrication.
6. समस्या निवारण
हा विभाग तुम्हाला येऊ शकणाऱ्या सामान्य समस्यांना संबोधित करतो. येथे सूचीबद्ध नसलेल्या समस्यांसाठी, VEVOR ग्राहक समर्थनाशी संपर्क साधा.
| समस्या | संभाव्य कारण | उपाय |
|---|---|---|
| मशीन सुरू होत नाही. | No power supply; Emergency stop button engaged; Faulty switch. | Check power connection; Disengage emergency stop; Contact support for switch replacement. |
| Wire not stripping effectively. | Blades are dull; Blades not adjusted correctly; Incorrect feed slot used. | Inspect and replace blades if dull; Adjust blade height; Use the correct feed slot for wire diameter. |
| Wire gets jammed. | Wire fed incorrectly; Blade setting too deep; Debris in feed mechanism. | Immediately press emergency stop. Disconnect power. Clear obstruction. Re-adjust blade and feed wire properly. |
| ऑपरेशन दरम्यान जास्त आवाज. | Lack of lubrication; Loose components; Internal motor issue. | Apply lubrication to moving parts; Check and tighten any loose fasteners; If noise persists, contact support. |
7. तपशील
| वैशिष्ट्य | तपशील |
|---|---|
| मॉडेल | 1.5-38 मिमी |
| ब्रँड | VEVOR |
| मोटर पॉवर | 400W |
| मोटर गती | 1400 RPM |
| वायर स्ट्रिपिंग रेंज | 1.5 mm - 38 mm (0.06" - 1.5") |
| स्ट्रिपिंग गती | 18 meters/minute (60 feet/minute) |
| Number of Feed Holes | 10 (8 Round Channels, 2 Flat Slots) |
| साहित्य | उच्च दर्जाचे ॲल्युमिनियम मिश्र धातु |
| उत्पादनाची परिमाणे (L x W x H) | ९.४ x ५.६ x २.५९ सेमी (३.७ x २.२१ x १.०२ इंच) |
| आयटम वजन | 41.3 किलो (106.2 पौंड) |
| प्रमाणन | IP44 |

Figure 7: Product Dimensions and Weight. This image provides a visual representation of the machine's physical specifications, including its length, width, height, and weight.
8. हमी आणि समर्थन
VEVOR products are designed for durability and performance. For warranty information, technical support, or to order replacement parts, please contact VEVOR customer service through their official webज्या साइटवर किंवा किरकोळ विक्रेत्याकडे उत्पादन खरेदी केले होते.
- ऑनलाइन समर्थन: अधिकृत VEVOR ला भेट द्या webवारंवार विचारले जाणारे प्रश्न, उत्पादन नोंदणी आणि संपर्क फॉर्मसाठी साइट.
- खरेदीचा पुरावा: Keep your purchase receipt for warranty claims.


