
Netzu 6210TB
Netzu Digital Alarm Clock Model 6210TB User Manual
Comprehensive Instructions for Setup and Operation
1. परिचय
This manual provides detailed instructions for the setup, operation, and maintenance of your Netzu Digital Alarm Clock, Model 6210TB. Please read this manual thoroughly before using the device to ensure proper function and longevity.
2. सुरक्षितता माहिती
- उपकरणाला अति तापमान, थेट सूर्यप्रकाश किंवा उच्च आर्द्रतेच्या संपर्कात आणू नका.
- डिव्हाइसवर जोरदार प्रभाव टाकणे किंवा त्याच्या अधीन करणे टाळा.
- Use only the provided power adapter or a compatible USB power source.
- डिव्हाइसला पाणी आणि इतर द्रवांपासून दूर ठेवा.
- डिव्हाइस स्वतः वेगळे करण्याचा किंवा दुरुस्त करण्याचा प्रयत्न करू नका. सहाय्यासाठी ग्राहक समर्थनाशी संपर्क साधा.
- डिव्हाइसभोवती योग्य वायुवीजन सुनिश्चित करा.
3. पॅकेज सामग्री
- Netzu Digital Alarm Clock (Model 6210TB)
- यूएसबी पॉवर केबल
- पॉवर अडॅप्टर
- वापरकर्ता मॅन्युअल (हा दस्तऐवज)
4. उत्पादन संपलेview
Familiarize yourself with the main components and controls of your alarm clock.

आकृती 4.1: समोर view of the Netzu Digital Alarm Clock showing the display and a connected phone.
This image displays the Netzu Digital Alarm Clock from a slight angle, highlighting its large digital time display (red), smaller temperature (green), and date (orange) readouts. A smartphone is shown connected via a cable, indicating a charging function or power source connection. The clock features buttons on top for various functions.
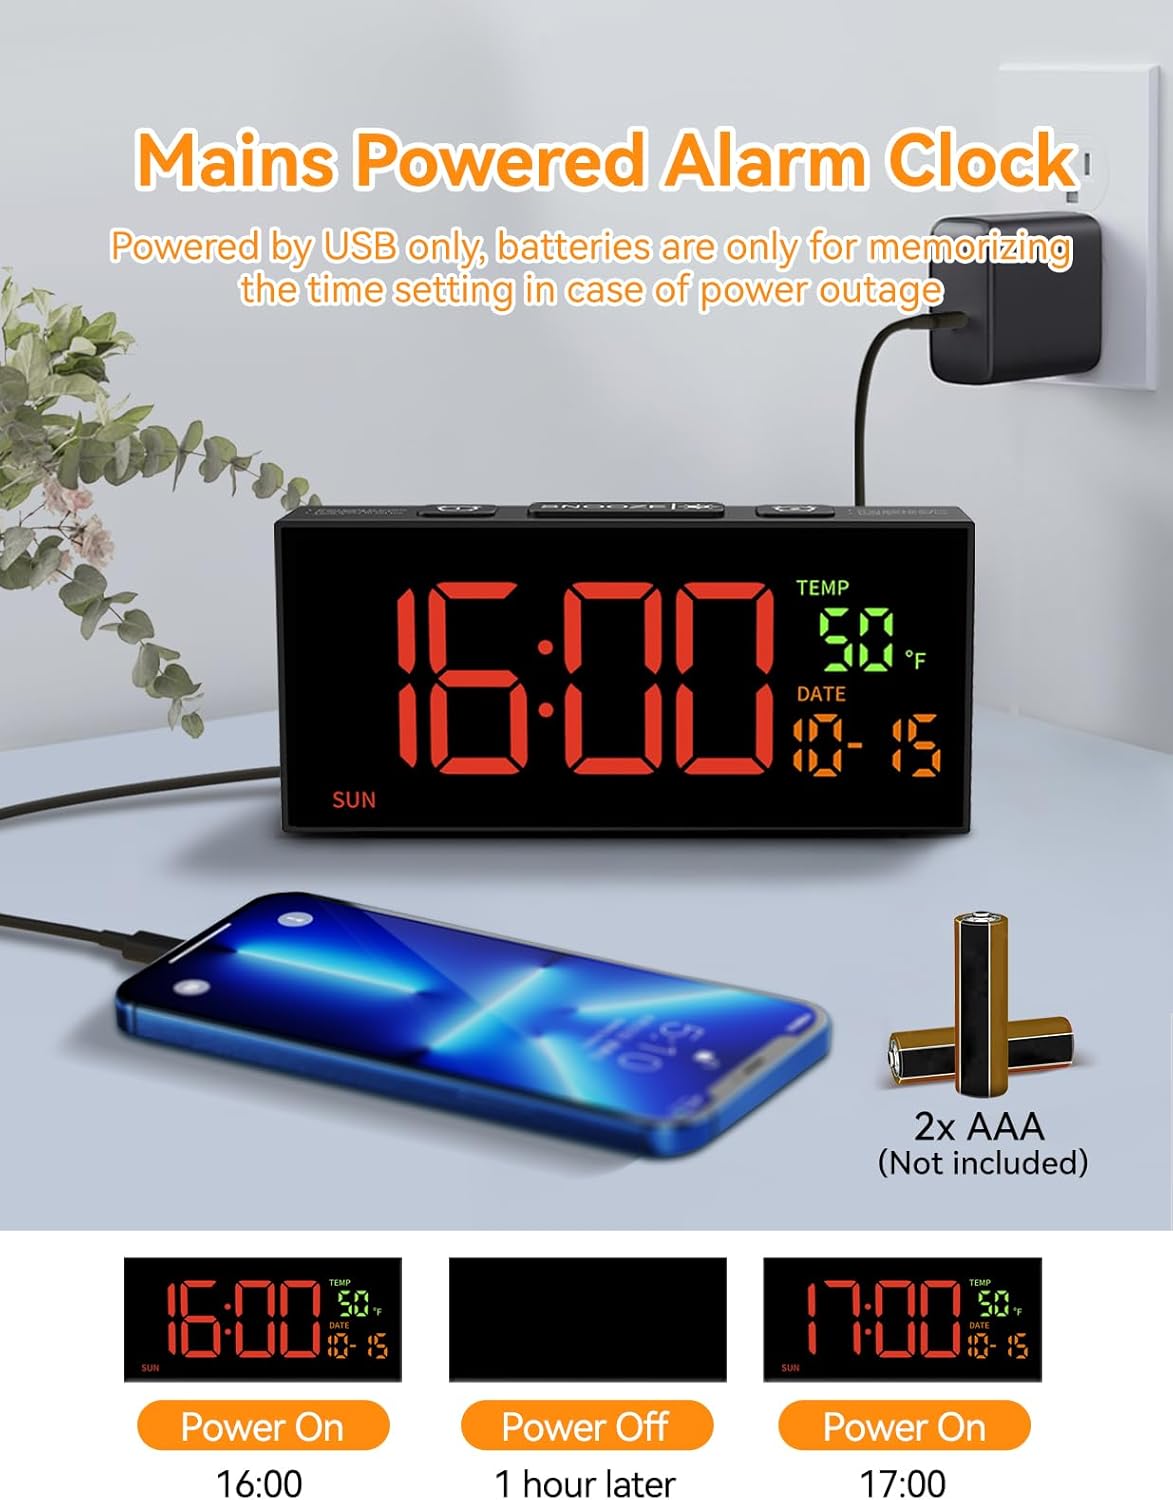
आकृती 4.2: Power connection and battery backup illustration.
This image illustrates the power connection of the alarm clock, showing it plugged into a wall adapter. It also highlights the requirement for two AAA batteries (not included) for the memory backup function, ensuring settings are retained during power outages
5. सेटअप
5.1 वीज जोडणी
- Connect the provided USB power cable to the clock's power input port.
- USB केबलचे दुसरे टोक पॉवर अडॅप्टरमध्ये प्लग करा.
- Insert the power adapter into a standard electrical outlet. The clock display will illuminate.
५.२ बॅटरी बॅकअप इन्स्टॉलेशन
The clock requires 2 AAA batteries (not included) for memory backup. These batteries preserve your time and alarm settings during a power outage or if the clock is unplugged.
- घड्याळाच्या मागील बाजूस बॅटरीचा डबा शोधा.
- बॅटरी कंपार्टमेंट कव्हर उघडा.
- योग्य ध्रुवीयता (+ आणि -) सुनिश्चित करून, 2 AAA बॅटरी घाला.
- बॅटरी कंपार्टमेंट कव्हर सुरक्षितपणे बंद करा.
6. मूलभूत सेटिंग्ज
६.४.४ वेळ आणि तारीख निश्चित करणे

आकृती 6.1: Step-by-step guide to setting the clock's time and date.
This image provides a visual guide for setting the time and date. It shows pressing the 'SET' button to enter settings, then using '+' and '-' buttons to adjust hours, minutes, year, month, and day. Blinking digits indicate the adjustable field.
- Set Clock Time:
- दाबा आणि धरून ठेवा सेट button for 2 seconds to enter time setting mode. The hour digits will blink.
- वापरा + or - तास समायोजित करण्यासाठी बटणे.
- दाबा सेट again. The minute digits will blink.
- वापरा + or - मिनिटे समायोजित करण्यासाठी बटणे.
- वर्ष सेट करा:
- दाबा सेट again. The year digits will blink.
- वापरा + or - वर्ष समायोजित करण्यासाठी बटणे.
- Set Month & Day:
- दाबा सेट again. The month digits will blink.
- वापरा + or - महिना समायोजित करण्यासाठी बटणे.
- दाबा सेट again. The day digits will blink.
- वापरा + or - दिवस समायोजित करण्यासाठी बटणे.
- दाबा सेट one last time to confirm all settings and exit the setting mode.
टीप: The system default year is 2024. Please update it to the current year. If the year, month, and day are set correctly, the day of the week will be displayed automatically.
6.2 12/24 तास स्वरूप
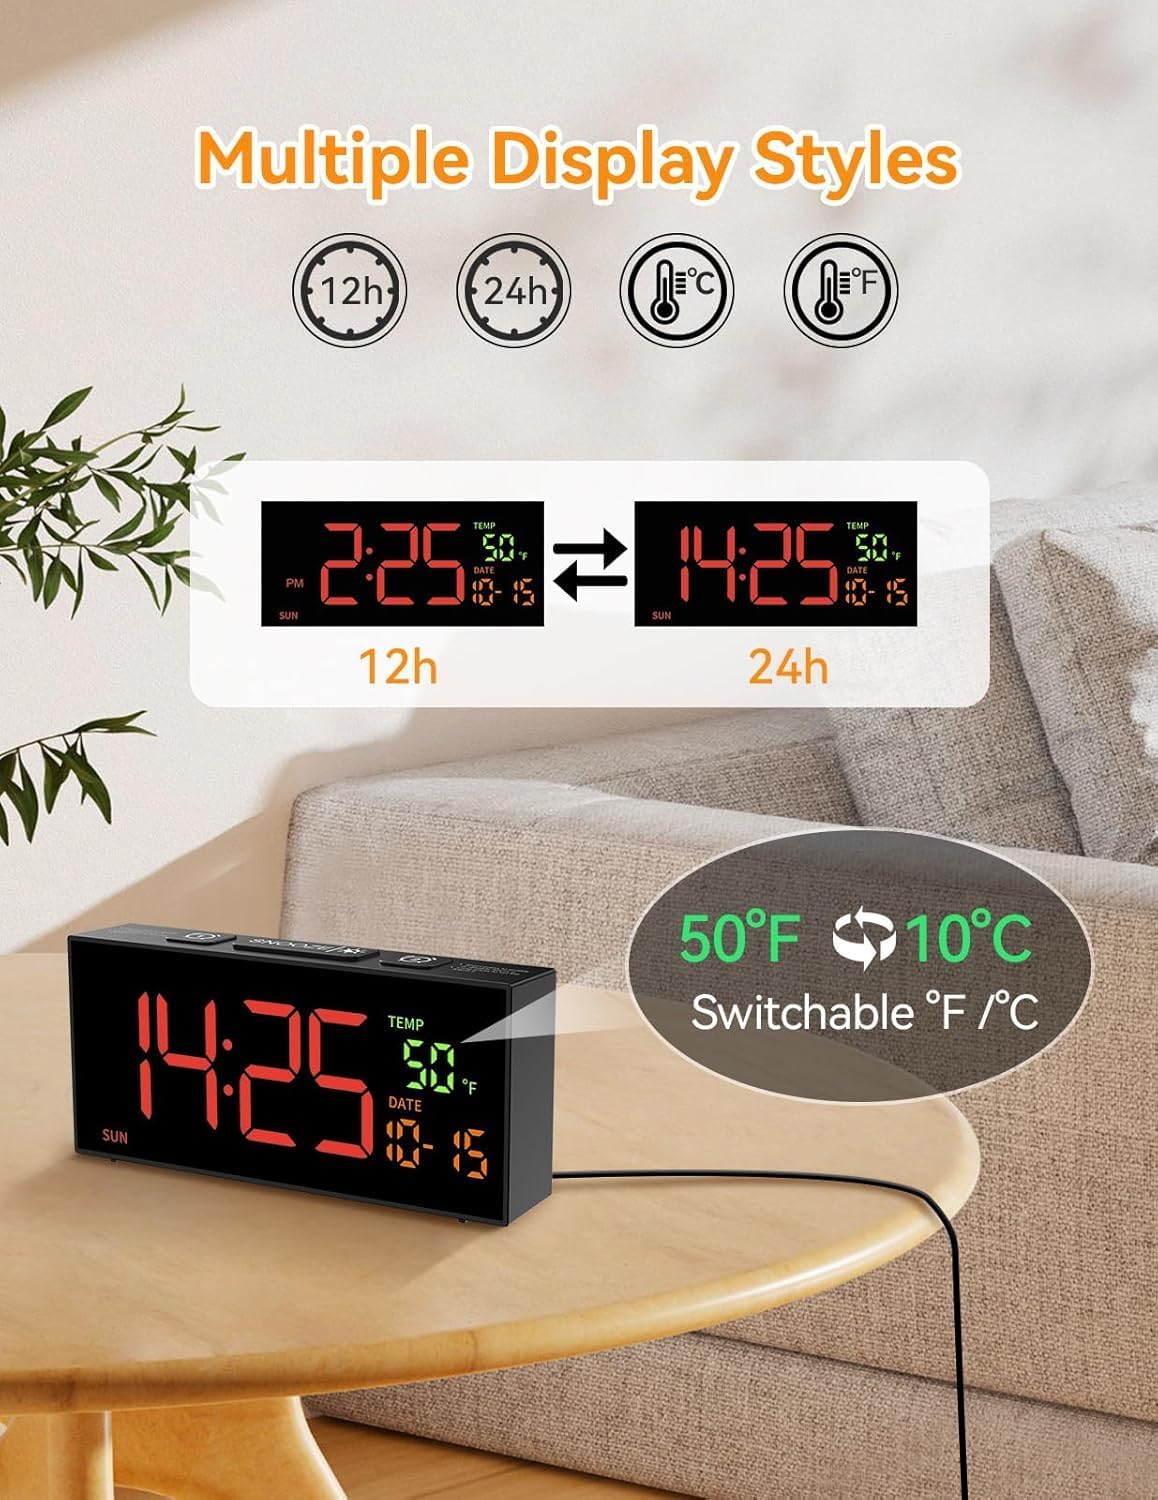
आकृती 6.2: Switching between 12-hour and 24-hour time formats.
This image demonstrates the clock's ability to display time in either 12-hour (with AM/PM indicator) or 24-hour format. Two clock displays are shown side-by-side, illustrating the change from "2:25 PM" to "14:25".
१२-तास आणि २४-तासांच्या वेळेच्या स्वरूपांमध्ये स्विच करण्यासाठी, दाबा 12/24Hr button (often combined with the '+' button during setting). The display will change accordingly.
6.3 Temperature Unit (°C/°F)
To switch between Celsius (°C) and Fahrenheit (°F) temperature units, press the ° से / ° फॅ button (often combined with the '-' button during setting). The temperature display will update.
6.4 Daylight Saving Time (DST) Adjustment

आकृती 6.3: Manual adjustment for Daylight Saving Time.
This image illustrates the manual DST feature. It shows the clock display changing from 11:30 to 10:30 (or vice versa) with a long press of the 'DST' button, indicating the time shift for Daylight Saving Time.
To manually adjust for Daylight Saving Time:
- दाबा आणि धरून ठेवा डीएसटी बटण
- The time will move forward by one hour when DST starts, and backward by one hour when it ends.
- Release the button to set the new time.
7. अलार्म सेटिंग्ज
६.२ अलार्म सेट करणे (अलार्म १ आणि अलार्म २)

आकृती 7.1: Illustration of dual alarms and their operational modes.
This image highlights the clock's dual alarm capability, showing two different alarm times (6:00 and 15:00) set for different scenarios. It also visually represents the three alarm modes: Daily, Weekday (Mon-Fri), and Weekend (Sat-Sun).
घड्याळात दोन स्वतंत्र अलार्म आहेत (अलार्म १ आणि अलार्म २).
- दाबा अलार्म 1 or अलार्म 2 button to select the desired alarm. The alarm time will appear and blink.
- वापरा + or - तास समायोजित करण्यासाठी बटणे.
- दाबा अलार्म button again. The minute digits will blink.
- वापरा + or - मिनिटे समायोजित करण्यासाठी बटणे.
- दाबा अलार्म button one last time to confirm and activate the alarm. An alarm icon will appear on the display.
7.2 अलार्म मोड
After setting the alarm time, you can select one of three alarm modes:
- Daily Mode (MON-SUN): The alarm will sound every day.
- Weekday Mode (MON-FRI): The alarm will sound only on weekdays.
- Weekend Mode (SAT-SUN): The alarm will sound only on weekends.
To cycle through alarm modes, press the अलार्म button repeatedly after setting the alarm time, until the desired mode is displayed.
7.3 Alarm Tone Selection

आकृती 7.2: Options for alarm tones and volume levels.
This image illustrates the variety of alarm tones (Chime, 7 Soft Music, Ring, Beep) and the four adjustable volume levels (90dB, 100dB, 105dB, 110dB) available on the Netzu alarm clock.
The clock offers 10 different alarm tones. To select an alarm tone:
- While in alarm setting mode (after setting time), press the + or - उपलब्ध टोनमधून सायकल करण्यासाठी बटणे.
- The selected tone will play briefly for preview.
- दाबा अलार्म तुमच्या निवडीची पुष्टी करण्यासाठी बटण.
7.4 व्हॉल्यूम समायोजन
There are 4 adjustable volume levels for the alarm. To adjust the volume:
- While in alarm setting mode (after selecting tone), press the + or - buttons to cycle through the volume levels.
- The volume will adjust, allowing you to hear the difference.
- दाबा अलार्म तुमच्या निवडीची पुष्टी करण्यासाठी बटण.
7.5 स्नूझ फंक्शन
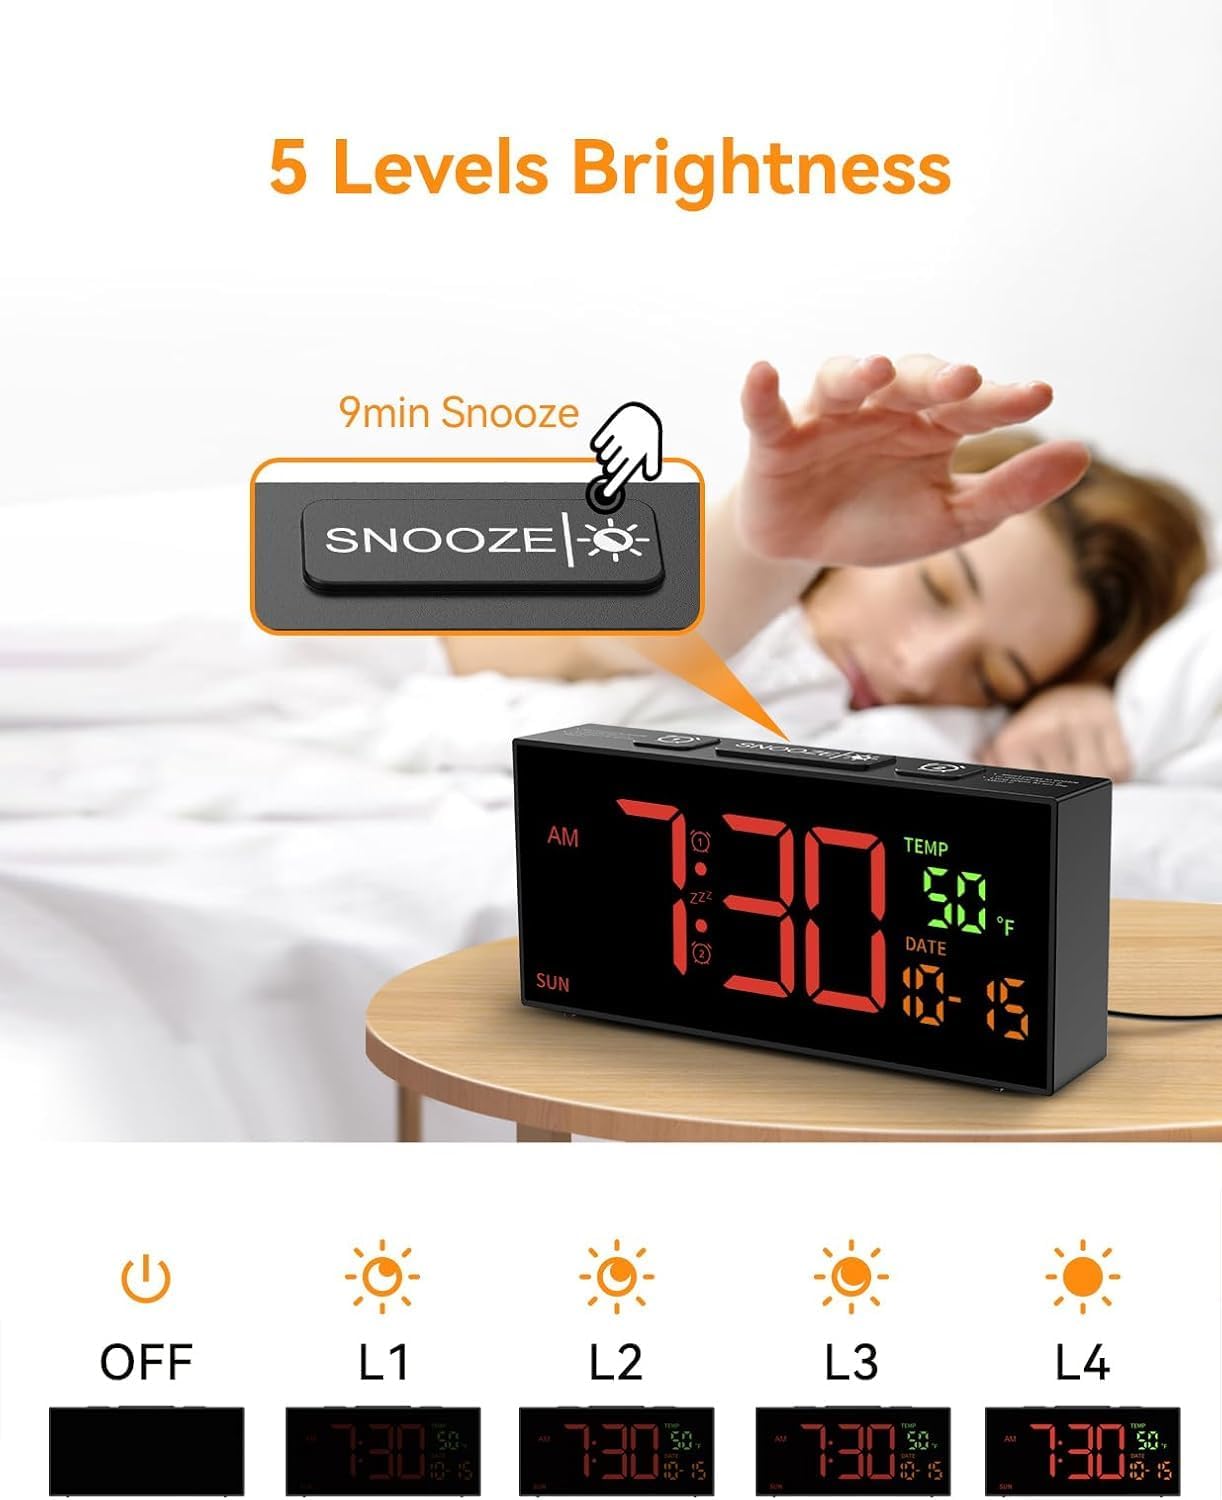
आकृती 7.3: Snooze button and brightness adjustment options.
This image illustrates the large 'SNOOZE' button on top of the clock, which also functions as a brightness control. It shows a hand pressing the button and depicts the five levels of display brightness, from off to maximum illumination.
जेव्हा अलार्म वाजतो तेव्हा मोठा दाबा स्नूझ button on top of the clock. The alarm will pause for 9 minutes and then sound again.
To turn off the alarm completely, press any other button on the clock (e.g., अलार्म 1, अलार्म 2, सेट, +, -).
8. डिस्प्ले सेटिंग्ज
8.1 ब्राइटनेस ऍडजस्टमेंट
The clock offers 5 levels of display brightness, including an "OFF" setting.
- To adjust the brightness, press the स्नूझ/ब्राइटनेस button (the large button on top) repeatedly.
- Each press will cycle through the brightness levels (L4, L3, L2, L1, OFF).
- तुमच्या वातावरणासाठी सर्वात आरामदायक पातळी निवडा.
9. देखभाल
- स्वच्छता: Use a soft, dry cloth to clean the clock's surface. Do not use abrasive cleaners or solvents.
- स्टोरेज: If storing the clock for an extended period, remove the AAA backup batteries to prevent leakage. Store in a cool, dry place.
10. समस्या निवारण
| समस्या | संभाव्य कारण | उपाय |
|---|---|---|
| घड्याळाचा डिस्प्ले बंद आहे. | वीजपुरवठा नाही. | Ensure the power adapter is securely plugged into the clock and a working electrical outlet. Check if the brightness is set to "OFF". |
| अलार्म वाजत नाही. | अलार्म सेट केलेला नाही, आवाज खूप कमी आहे किंवा अलार्म मोड चुकीचा आहे. | Verify alarm time and mode are correctly set. Increase alarm volume. Ensure the alarm icon is visible on the display. |
| पॉवर ओयू केल्यानंतर सेटिंग्ज गमावल्याtage. | Backup batteries not installed or depleted. | Install 2 new AAA batteries in the battery compartment. |
| Time is incorrect after DST. | DST not adjusted. | Manually adjust DST by pressing and holding the डीएसटी बटण |
11. तपशील
- मॉडेल: 6210TB
- डिस्प्ले प्रकार: डिजिटल एलईडी
- उर्जा स्त्रोत: Corded Electric (USB cable and adapter included)
- बॅटरी बॅकअप: 2 x AAA बॅटरी (समाविष्ट नाही)
- उत्पादन परिमाणे: ६.३"प x २.७२"प
- वजन: 10.6 औंस (अंदाजे 0.3 किलो)
- Alarm Features: Dual alarms, 3 alarm modes (Daily, Weekday, Weekend), 10 alarm tones, 4 volume levels, 9-minute snooze.
- प्रदर्शन वैशिष्ट्ये: 5 brightness levels, 12/24 hour format, °C/°F temperature display, date, day of week.
- विशेष वैशिष्ट्ये: Manual DST adjustment.
12. हमी आणि समर्थन
For warranty information or technical support, please refer to the contact details provided with your purchase documentation or visit the official Netzu webसाइट. कृपया वॉरंटी दाव्यांसाठी तुमचा खरेदीचा पुरावा जपून ठेवा.
संपर्क माहिती:
- निर्माता: नेटझु
- ईमेल: netzuserservice@outlook.com
Ask a question about this manual
Ask about setup, troubleshooting, compatibility, parts, safety, or missing instructions. Manuals+ will review the question and use this page’s manual context to help answer it.