1. परिचय
The Massive Audio Primo Series P8 Monoblock Mega Amplifier is a high-performance Class D amplifier designed for car audio systems. This manual provides essential information for proper installation, operation, and maintenance of your P8 ampइष्टतम कामगिरी आणि दीर्घायुष्य सुनिश्चित करण्यासाठी लिफायर.

प्रतिमा ३: वरती view of the Massive Audio Primo Series P8 Monoblock Ampलाइफायर, शोकasinत्याची आकर्षक रचना आणि कॉम्पॅक्ट फॉर्म फॅक्टर.
2. सुरक्षितता सूचना
Please read and understand all safety instructions before installing or operating this amplifier. Failure to follow these guidelines may result in injury or damage to the product or vehicle.
- कोणतेही विद्युत कनेक्शन करण्यापूर्वी वाहनाचे बॅटरी निगेटिव्ह टर्मिनल नेहमीच डिस्कनेक्ट करा.
- भोवती योग्य वायुवीजन सुनिश्चित करा ampओव्हरहाटिंग टाळण्यासाठी लिफायर.
- या मॅन्युअलमध्ये नमूद केल्याप्रमाणे पॉवर, ग्राउंड आणि स्पीकर कनेक्शनसाठी योग्य गेज वायरिंग वापरा.
- माउंट करा amplifier securely to prevent movement during vehicle operation.
- स्थापित करणे टाळा amplifier in areas exposed to moisture or excessive vibration.
- इष्टतम सुरक्षितता आणि कामगिरीसाठी व्यावसायिक स्थापनेची शिफारस केली जाते.
3. पॅकेज सामग्री
अनपॅक करताना सर्व वस्तू उपस्थित आहेत याची खात्री करा:
- One (1) Massive Audio Primo Series P8 Monoblock Mega Ampअधिक जिवंत
- वापरकर्ता मॅन्युअल (हा दस्तऐवज)
- माउंटिंग हार्डवेअर (समाविष्ट असल्यास)
4. प्रमुख वैशिष्ट्ये
पी७५ amplifier incorporates advanced features for superior audio performance and reliability:
- Input Sensitivity Low Level: 400mVrms ~ 10Vrms
- Auto Hi-Level Input via RCA Input
- 12v Remote Output When Hi-level Signal is Used
- Parametric EQ with 0 - 12 dB Boost
- All Models Linkable with Single RCA for easy upgrade
- Short Circuit, Thermal, Reverse Voltage, and Over Voltage संरक्षण
- N-Channel Circuitry for High-Efficiency
- 24 dB Low Pass Crossovers with an adjustable range of 30Hz - 220Hz
- Heavy Duty Power Supply
- प्रकाशित लोगो
- Heavy-Duty Aluminum Heat Sink
- यूएसए मध्ये डिझाइन आणि अभियंता
- Proprietary "Bass Kompressor" Circuitry provides Low-Frequency Enhancement
- Extreme Power in a Small Footprint
- "Q Control" to fine-tune the curve on the bass boost
- "Clip Limit Switch" allows the amplifier to take up to 16.5 volts
- Adjustable Low Pass 18dB Sub Harmonic Filter with a range of 0Hz - 60Hz
- Adjustable center frequency range of 30-80 Hz
- Nickel-Plated Connectors
- High-Efficiency Class "D" Design
5. सेटअप आणि स्थापना
तुमच्या कामगिरी आणि सुरक्षिततेसाठी योग्य स्थापना अत्यंत महत्त्वाची आहे amplifier. Consult a professional installer if you are unsure about any steps.
६.१. माउंटिंग स्थान
- Choose a dry, well-ventilated area away from direct sunlight or heat sources.
- Ensure the mounting surface is sturdy enough to support the ampलिफायरचे वजन.
- Allow sufficient space around the ampहवा परिसंचरण साठी लाइफायर.
5.2. वायरिंग कनेक्शन
Refer to the diagram below for proper wiring of power, ground, remote, and speaker connections.

Image 5.1: Rear panel of the P8 ampपॉवर, ग्राउंड, रिमोट आणि स्पीकर टर्मिनल्स दाखवणारा लाइफायर.
5.2.1. Power Connection (+12V)
Connect a heavy-gauge power cable (e.g., 4 AWG or larger) from the amplifier's +12V terminal to the positive terminal of the vehicle's battery. Install an appropriate fuse (not supplied) within 18 inches (45 cm) of the battery.
5.2.2. Ground Connection (GND)
Connect a heavy-gauge ground cable (e.g., 4 AWG or larger) from the amplifier's GND terminal to a clean, unpainted metal surface of the vehicle chassis. Ensure a solid, low-resistance connection.
5.2.3. Remote Turn-On (REM IN/OUT)
Connect a 18-gauge wire from your head unit's remote output to the amplifier's REM IN terminal. The REM OUT terminal can be used to daisy-chain the remote signal to other ampजीवनदायी
5.2.4. Speaker Connection (SPEAKER)
Connect your subwoofer(s) to the SPEAKER terminals. Ensure the total impedance of the connected speakers is not below 0.5 Ohm. Observe correct polarity (+ to + and - to -).
5.2.5. Signal Input (LINE IN)
तुमच्या हेड युनिटच्या प्री-मधून आरसीए केबल्स कनेक्ट करा.amp साठी आउटपुट amplifier's LINE IN RCA inputs. The amplifier also supports auto hi-level input via the RCA inputs.
५. ऑपरेशन आणि समायोजने
पी७५ amplifier features various controls to fine-tune your audio system. Familiarize yourself with these controls for optimal sound.
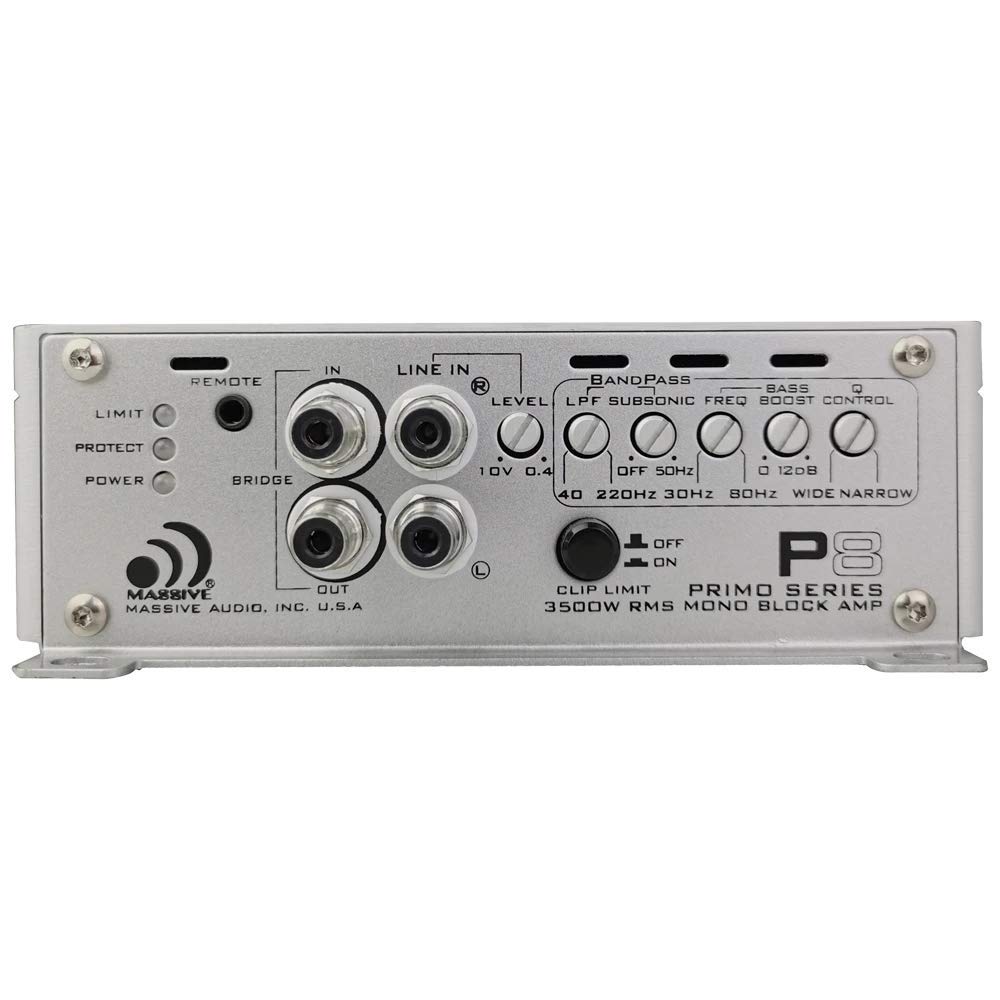
Image 6.1: Front panel of the P8 amplifier displaying the control layout for audio adjustments.
6.1. नियंत्रण पॅनेल ओव्हरview
- रिमोट करा: Input for optional remote bass control knob.
- LIMIT/PROTECT/POWER Indicators: एलईडी दर्शवितात ampजिवंत स्थिती.
- लाइन इन: RCA inputs for audio signal.
- LEVEL (Input Sensitivity): Adjusts the input gain to match the head unit's output. Range: 400mVrms - 10Vrms.
- LPF (लो पास फिल्टर): Adjusts the upper frequency limit for the subwoofer. Range: 30Hz - 220Hz (24 dB/octave).
- SUBSONIC FREQ (High Pass Filter): Filters out ultra-low frequencies below the audible range to protect subwoofers. Range: 0Hz - 60Hz (18 dB/octave).
- बेस बूस्ट: Increases bass output at a specific frequency. Range: 0 - 12 dB.
- Q CONTROL: Fine-tunes the bandwidth of the bass boost.
- CLIP LIMIT SWITCH: परवानगी देते amplifier to handle up to 16.5 volts, preventing clipping at high input levels.
6.2. Initial Setup and Adjustments
- सर्व सेट करा amplifier controls (LEVEL, LPF, SUBSONIC, BASS BOOST) to their minimum or off positions.
- Turn your head unit volume to about 75% of its maximum.
- हळू हळू वाढवा amplifier's LEVEL control until you hear slight distortion, then back off slightly.
- Adjust the LPF to suit your subwoofers and personal preference, typically between 60Hz and 100Hz for subwoofers.
- Set the SUBSONIC FREQ to protect your subwoofers from frequencies below their resonant frequency, usually around 20Hz to 30Hz.
- Use the BASS BOOST and Q CONTROL sparingly to enhance bass, avoiding excessive boost that can lead to distortion or speaker damage.
7. देखभाल
नियमित देखभाल तुमच्या दीर्घायुष्याची आणि कामगिरीची खात्री करण्यास मदत करते ampलाइफायर
- ठेवा ampलाइफायर स्वच्छ आणि धूळ आणि कचरामुक्त ठेवा. स्वच्छतेसाठी मऊ, कोरडे कापड वापरा.
- सर्व वायरिंग कनेक्शन घट्टपणा आणि गंज यासाठी वेळोवेळी तपासा.
- याची खात्री करा ampयोग्य उष्णता अपव्यय राखण्यासाठी लिफायरच्या कूलिंग फिनमध्ये अडथळा येत नाही.
8. समस्यानिवारण मार्गदर्शक
जर तुम्हाला तुमच्या ampलाइफायर, सामान्य समस्या आणि उपायांसाठी खालील तक्ता पहा.
| समस्या | संभाव्य कारण | उपाय |
|---|---|---|
| वीज नाही / वीज LED बंद | Blown fuse, poor power/ground connection, faulty remote wire. | Check inline fuse near battery. Verify +12V, GND, and REM connections. Ensure remote wire has +12V when head unit is on. |
| No Sound / Protect LED On | Speaker short circuit, impedance too low, overheating, faulty RCA cables. | Check speaker wiring for shorts. Verify speaker impedance is 0.5 Ohm or higher. Ensure adequate ventilation. Check RCA cable integrity. |
| विकृत आवाज | Gain set too high, improper LPF/Subsonic settings, poor signal quality, low voltage. | Reduce LEVEL (gain) control. Adjust LPF and Subsonic filters. Check RCA cables. Verify vehicle's electrical system. |
| Ampलाइफायर जास्त गरम करतो | Insufficient ventilation, impedance too low, prolonged high output. | स्थलांतर करा amplifier for better airflow. Check speaker impedance. Reduce listening volume or duration. |
9. तांत्रिक तपशील
| तपशील | मूल्य |
|---|---|
| RMS पॉवर (1 Ohm) | 2300w x 1 |
| आरएमएस पॉवर (४ ओम) | 1400w x 1 |
| RMS पॉवर (0.5 Ohm) | 3500w x 1 |
| पीक पॉवर | 7000w x 1 |
| किमान प्रतिबाधा | 0.5 ओम |
| बास बूस्ट वारंवारता | 30Hz - 120Hz |
| एकूण हार्मोनिक विकृती (THD) | 0.03% पेक्षा कमी |
| सिग्नल-ते-आवाज गुणोत्तर (S/N) | 100dB पेक्षा जास्त |
| सबसॉनिक फिल्टर (HPF) | 0-60Hz |
| RCA इनपुट Voltage | ९.९९९ मिलीव्ही - ९९९.९ व्ही |
| वारंवारता प्रतिसाद | 10Hz - 220Hz |
| परिमाण (L x W x H) | ८५.४" x ६२.२" x ३९" |
| खंडtage | 12 व्होल्ट (DC) |
| कमाल पुरवठा खंडtage | 12 व्होल्ट |
| माउंटिंग प्रकार | मुक्त स्थायी |
| मॉडेल क्रमांक | P8 |
| उत्पादक | Massive Audio |
10. वॉरंटी माहिती
Massive Audio products typically come with a limited manufacturer's warranty. Please refer to the official Massive Audio website or your purchase documentation for specific warranty terms and conditions, including coverage period and claim procedures. Keep your proof of purchase for warranty validation.
11. ग्राहक समर्थन
For technical assistance, service, or further inquiries regarding your Massive Audio Primo Series P8 Monoblock Amplifier, please visit the official Massive Audio website or contact their customer support department. You can also visit the Massive Audio Store on Amazon for product information: