
1. परिचय
Thank you for choosing the HiLook HIKVISION 204U-K1 4-Channel 5MP HD DVR. This manual provides essential information for the proper installation, operation, and maintenance of your digital video recorder. Please read this manual thoroughly before using the product and retain it for future reference.
2. महत्त्वाच्या सुरक्षितता सूचना
- वीज पुरवठा: Use only the power adapter specified for this device. Ensure the power voltage is stable and meets the requirements.
- वायुवीजन: कोणत्याही वायुवीजन छिद्रांना अडथळा आणू नका. उत्पादकाच्या सूचनांनुसार स्थापित करा.
- पाणी आणि ओलावा: Do not expose the device to rain or moisture. Do not place objects filled with liquids, such as vases, on the apparatus.
- तापमान: निर्दिष्ट तापमान मर्यादेत उपकरण चालवा. अति उष्ण किंवा थंड वातावरण टाळा.
- स्वच्छता: फक्त कोरड्या कापडाने स्वच्छ करा. लिक्विड क्लीनर किंवा एरोसोल क्लीनर वापरू नका.
- सर्व्हिसिंग: या उत्पादनाची स्वतः सेवा करण्याचा प्रयत्न करू नका. पात्र सेवा कर्मचाऱ्यांना सर्व सेवांचा संदर्भ द्या.
- हार्ड ड्राइव्ह: Handle the hard drive with care. Improper installation or removal can cause data loss or damage.
3. पॅकेज सामग्री
अनपॅकिंग करताना सर्व वस्तू उपलब्ध आहेत आणि चांगल्या स्थितीत आहेत याची खात्री करा. जर काही वस्तू गहाळ किंवा खराब झाल्या असतील तर तुमच्या किरकोळ विक्रेत्याशी संपर्क साधा.
- HiLook HIKVISION 204U-K1 DVR Unit
- पॉवर अडॅप्टर
- यूएसबी माउस
- SATA Data Cable (for HDD connection)
- SATA Power Cable (for HDD connection)
- द्रुत प्रारंभ मार्गदर्शक

Figure 3.1: The HiLook HIKVISION 204U-K1 DVR unit, shown with an optional hard drive and included accessories such as a mouse and cables.
4. प्रारंभिक सेटअप
१. DVR कनेक्ट करणे
Follow these steps to connect your DVR to cameras, a monitor, and the network.
- हार्ड ड्राइव्ह स्थापित करा (पर्यायी): If your DVR did not come with a pre-installed hard drive, open the DVR casing, connect the SATA data and power cables to the HDD, and secure the HDD inside the DVR.
- कॅमेरे कनेक्ट करा: Connect your surveillance cameras to the BNC video input ports on the rear panel of the DVR. This model supports 4 channels.
- मॉनिटर कनेक्ट करा: मागील पॅनलवरील HDMI किंवा VGA आउटपुट पोर्टशी मॉनिटर कनेक्ट करा.
- नेटवर्क कनेक्ट करा: Connect an Ethernet cable from the DVR's LAN port to your router or network switch for remote access and network features.
- यूएसबी माउस कनेक्ट करा: नेव्हिगेशनसाठी समाविष्ट केलेला USB माउस एका USB पोर्टमध्ये प्लग करा.
- वीज कनेक्ट करा: Connect the power adapter to the DVR's power input and then plug it into a power outlet.

Figure 4.1: Rear panel of the DVR, illustrating the various input and output ports including video in, audio in/out, VGA, HDMI, USB, network interface, and power supply.
4.2. पॉवरिंग चालू
After all connections are made, the DVR will power on automatically. The system will boot up, and you should see the HiLook logo on your connected monitor. Follow the on-screen prompts for initial setup, including setting up an administrator password and configuring network settings.
5. ऑपरेशन मार्गदर्शक
5.1. वापरकर्ता इंटरफेस ओव्हरview
The DVR's graphical user interface (GUI) can be navigated using the USB mouse. Right-click to access the main menu, and left-click to select options. The live view displays feeds from connected cameras.
5.2. रेकॉर्डिंग आणि प्लेबॅक
- मॅन्युअल रेकॉर्डिंग: थेट पासून view, click the record icon to start or stop manual recording for a specific channel.
- अनुसूचित रेकॉर्डिंग: Access the main menu, navigate to रेकॉर्ड > वेळापत्रक to set up continuous or motion-triggered recording schedules for each camera.
- प्लेबॅक: मुख्य मेनूमधून, निवडा प्लेबॅक. Choose the date, time, and camera channel to review रेकॉर्ड footage.
५.३. हालचाल शोधणे आणि सूचना
The DVR supports smart motion detection and can send alerts via email or push notifications to a mobile application.
- Configure Motion Detection: वर जा Main Menu > Alarm > Motion Detection. Select the camera channel, enable motion detection, and define the detection area and sensitivity.
- Set Up Email Alerts: In Main Menu > Network > Email, configure your SMTP server settings and recipient email addresses. Enable email linkage for motion detection events.
- मोबाइल अॅप सूचना: Download the official HiLook mobile application. Add your DVR to the app and enable push notifications for alarm events.

Figure 5.1: A smartphone screen showing a real-time email notification triggered by smart motion detection.

Figure 5.2: A smartphone displaying multiple smart motion-triggered alerts, indicating movement detected in specific areas monitored by surveillance cameras.
6. देखभाल
- स्वच्छता: Regularly clean the exterior of the DVR with a soft, dry cloth. Ensure ventilation openings are free from dust.
- फर्मवेअर अद्यतने: Check the official HiLook website for the latest firmware updates. Updating firmware can improve performance and add new features. Follow the provided instructions carefully.
- हार्ड ड्राइव्ह व्यवस्थापन: Periodically check the health of your hard drive through the DVR's system settings. Ensure sufficient storage space is available for recordings.
- पासवर्ड सुरक्षा: Regularly change your administrator password to maintain system security.
7. समस्या निवारण
If you encounter issues with your DVR, refer to the table below for common problems and solutions.
| समस्या | संभाव्य कारण | उपाय |
|---|---|---|
| मॉनिटरवर व्हिडिओ आउटपुट नाही | Loose HDMI/VGA cable; Incorrect monitor input; DVR not powered on. | Check cable connections; Select correct input on monitor; Verify power supply. |
| कॅमेरा इमेज नाही | Camera not powered; Loose BNC cable; Faulty camera. | Ensure camera power; Check BNC connections; Test camera with another input if possible. |
| दूरस्थपणे DVR अॅक्सेस करू शकत नाही | Network cable disconnected; Incorrect network settings; Firewall blocking access. | Verify Ethernet connection; Check IP address, gateway, DNS settings; Configure router/firewall. |
| रेकॉर्डिंग नाही | Hard drive not installed/initialized; Recording schedule not set; HDD full. | Install/initialize HDD; Configure recording schedule; Check HDD status and capacity. |
| मोशन डिटेक्शन काम करत नाही | Motion detection disabled; Sensitivity too low; Detection area not set. | Enable motion detection; Adjust sensitivity; Define detection area. |
8. तांत्रिक तपशील
Below are the key technical specifications for the HiLook HIKVISION 204U-K1 DVR.
| वैशिष्ट्य | तपशील |
|---|---|
| मॉडेल | 204U-K1 |
| व्हिडिओ इनपुट | 4-channel BNC interface (supports HDTVI/AHD/CVI/CVBS/IP) |
| व्हिडिओ कॉम्प्रेशन | H.265 Pro+/H.265 Pro/H.265/H.264 |
| व्हिडिओ आउटपुट | 1 HDMI, 1 VGA (simultaneous output) |
| HDMI आउटपुट रिझोल्यूशन | Up to 4K (3840 × 2160) for 204U-K1 |
| ऑडिओ इनपुट/आउटपुट | 1-ch RCA (2-way audio) / 1-ch RCA |
| हार्ड डिस्क ड्राइव्ह (HDD) | १ SATA इंटरफेस, १० TB पर्यंत क्षमता |
| नेटवर्क इंटरफेस | 1 RJ45 10M/100M self-adaptive Ethernet interface |
| यूएसबी इंटरफेस | 2 × USB 2.0 |
| वीज पुरवठा | 12 VDC |
| परिमाण (W × D × H) | Approx. 200 × 200 × 45 mm (7.9 × 7.9 × 1.8 inch) |
| वजन (HDD शिवाय) | अंदाजे ३.२ किलो (७.० पौंड) |
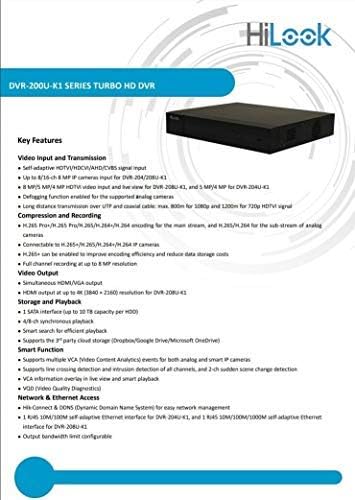
Figure 8.1: A detailed list of key features for the DVR-200U-K1 series, including video input/transmission, compression, video output, storage, smart functions, and network access.
७. वॉरंटी आणि ग्राहक समर्थन
Your HiLook HIKVISION 204U-K1 DVR comes with a limited warranty. Please refer to the warranty card included in your package or visit the official HiLook website for detailed warranty terms and conditions. For technical assistance, troubleshooting, or service inquiries, please contact your authorized HiLook dealer or customer support.
ऑनलाइन संसाधने: For additional support, firmware downloads, and FAQs, please visit the official HiLook support webसाइट